As you are used to, I always illustrate my projects with a scheme made in Fritzing. The standard components are usually present in the default software. But often enough there are components not present. I then make these components myself. Because I have added a whole series again, I wanted to share my own new library, and here they are.

ESP8266-01 Neopixel module
In Chinese web stores a “ESP-01S RGB LED Controller Module” is sold for less than a dollar (if you buy it without the ESP8266-01). The module contains everything that is needed to have an ESP8266-01S control a Neopixel strip. The module uses GPIO2 as output for the Neopixel(s). Make sure you use the new ESP8266-01S with this module. The ESP8266-01S has the necessary pull up resistors already available. If you use the standard ESP8266-01 you need to attach the required pull-ups yourself.
![]()
Download this part at my GitHub library here.

File name: ESP8266-01 Neopixel module
Version: 1.2.0
ESP8266-01S
This module offers you the possibility to connect your Arduino to WiFi for a very low price. This “S” version of the ESP-01 module has minor improvements in the PCB compared to the normal ESP-01 module. The ESP8266 module works with the normal UART port on your Arduino and can connect to networks, form your own network (hot spot) or both. The possibilities with this module are endless! This variant has 1MB of memory instead of the 512kB on the standard ESP8266 module.
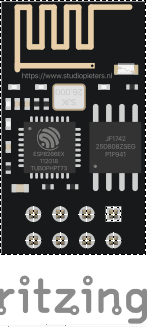
Download this part at my GitHub library here.
File name: ESP8266-01S
Version: 3.0.0
DHT11
A handy temperature and humidity sensor.
- Measurement range Humidity: 20% ~ 90% RH (0-50 °C temperature compensation)
- Measurement range Temperature: 0 ~ +50 °C
- Air humidity precision: ± 5.0% RV
- Temperature precision: ± 2.0 °C
- Low current draw
- Dimensions: 23 mm x 12 mm x 5 mm

Download this part at my GitHub library here.
File name: DHT11 basic temperature-humidity sensor
Version: 2.3.0
DHT22
A handy temperature sensor and humidity sensor. This is a lot more accurate than the DHT11.
- Humidity measurement range: 0% ~ 100% RH
- Measuring range temperature: -40 ~ +80 °C.
- Humidity accuracy: ± 2.0% RH.
- Temperature accuracy: ± 0.5 °C.
- Low power consumption.
- Dimensions: 18 mm x 14 mm x 5 mm
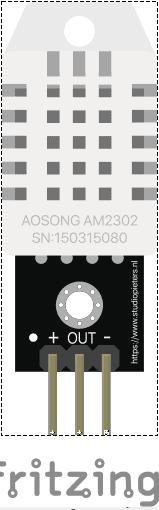
Download this part at my GitHub library here.
File name: DHT22 temperature-humidity sensor
Version: 2.0.0
433Mhz RF transmitter and receiver link kit
(Receiver module parameters):
Voltage: DC5V
Static current: 4MA
Receiver Frequency: 433MHZ
Receiver sensitivity:-105DBExternal antenna: 32CM single-core wire, wound into a spiral
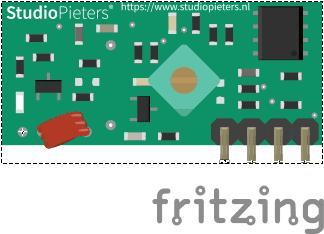
(Transmitter module parameters):
Transmission Distance :50-100 meters
Working voltage : DC3.5-12V
Modulation: AM
Transfer rate: 4KB / S
Transmit power: 10mW
Emission frequency: 433M
External antenna: 25cm ordinary multi-core or single core line
Pinout from left → right: (the DATA; the VCC; GND)
![]()
You have to attach the antenna yourself. You can use a straight 17cm copper wire for this.(see product photos)
We also have a ready to use antenna. You can find that here: 433Mhz Antenna.
Specifications:
Size:(Receiver module parameters):30 x 14mm(L x W)
(Transmitter module parameters):19 x 19mm(L x W
Download this part at my GitHub library here.
File name: FS1000A – 433Mhz RF Transmitter
Version: 2.2.0
File name: XD-RF-5V
Version: 2.2.0
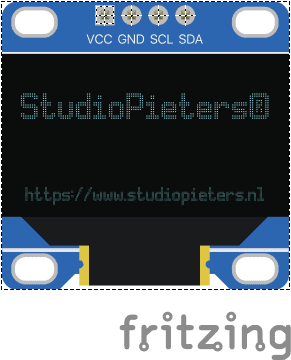
0.91 inch OLED Display 128*32 pixels blue – I2C
A 0.91 inch I2C OLED display with 128*32 blue pixels and very good viewing angles of at least 160 degrees.
Specifications:
- 128*32 pixels
- Works with 3.3V and 5V (3V-5V, both power and signals)
- Dimensions: 38 x 12 x 2.4 mm (l x h x w)
- Works on I2C (default at address 0x78)
- Controller: SSD1306
- Pin Description:
| Pin | Description |
| GND | Ground/min/earth |
| VCC | 3.3V or 5V power supply |
| SCL | I2C SCL (clock signal) |
| SDA | I2C SDA (data signal) |
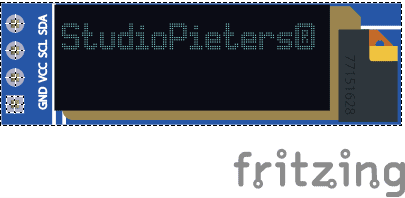
Download this part at my GitHub library here.
File name: SSD1306
Version: 2.0.0
1.3 inch OLED Display 128*64 pixels blue – I2C
A 1.3 inch I2C OLED display with 128*64 blue pixels and very good viewing angles of at least 160 degrees.
Specifications:
- 128*64 pixels
- Works with 3.3V and 5V (3V-5V, both power supply and signals)
- Dimensions: 35.4 x 33.7 x 2.7 mm (d x h x w)
- Works on I2C (standard at address 0x3C/0x78)
- Modification possible to set screen to I2C address 0x3D/0x7A
- Controller: SSH1106
- Pin Description:
| Pin | Description |
| GND | Ground/min/earth |
| VCC | 3.3V or 5V power supply |
| SCL | I2C SCL (clock signal) |
| SDA | I2C SDA (data signal) |
Download this part at my GitHub library here.
File name: SSD1306 128×64
Version: 1.0.1
WS2812B Digital 5050 RGB LED Strip – 144 LED’s
This product is a WS2812B LED Strip with 144 LED’s at 1 meter. Each LED can be cut loose from the LED Strip. This way the LED strip can be shortened or extended. Under the LED’s there is double-sided tape so you can stick the LED Strip on something.
The color of the LED is controlled by the built-in chip. You can place a lot of these LED’s behind each other and control them digitally with just 1 pin. The LED is usually supplied with the commonly used 5V voltage.
You can place up to 1024 LED’s behind each other and still get 30fps. (30 refreshments per second)
The LED is of the type RGB where each color can be controlled with 8 bits. As a result, each LED can show 16777216 colors. (24 bits)
Various platforms offer support for this LED with libraries, including Arduino and Raspberry Pi.
More information for the Arduino platform can be found here: WS2812 Breakout Hookup Guide or Adafruit NeoPixel Überguide.
Meaning of the color of the wires:
- Red: +5V input voltage
- Green: Input of data signal (signal from an Arduino, RPi, or other WS2812 (B) LED)
- White: Ground/min
You can then attach these LED strips to each other by clicking together the connectors at the ends of the strips.
If you want to have the strips close together, you have to solder them yourself or choose the 5 meter variant and shorten it (does not require soldering)
Note: Please supply the LED strip with an “extra” 5V after every meter. The voltage drops over the strip and the current at the start can increase considerably. (and maybe the beginning of your LED strip burn out!)
Read more about this here: Powering Neopixels .
We supply the strip with WS2812B LED’s or with SK6812 LED’s. Both LED’s offer the same brightness and are compatible with each other (you can use the WS2812B software for both)
![]()
Download this part at my GitHub library here.
File name: Neopixel Strip RGB
Version: 3.0.1
SK6812 Digital 5050 RGBW LED Strip – 144 LED’s
This product is a SK6812 RGBW LED Strip with 60 LED’s on 1 meter. This LED strip has an extra white LED in each module for better white color reproduction. Each LED can be cut separately from the LED Strip. This way you can shorten or extend the LED strip. Underneath the LED’s there is double-sided tape to mount the strip.
The color of the LED is controlled by the built-in chip. You can place a lot of these LED’s behind each other and control them digitally with just 1 pin. The LED strip is powered with 5V.
You can place up to 1024 LED’s in succession and then still achieve 30fps (30 changes per second).
The LED is of the RGB+W type with which each color can be controlled with 8 bits. This allows each LED to display 4294967296 types of colors (32 bits).
Various platforms offer support for this LED with the help of libraries, including Arduino.
More information for the Arduino platform can be found here: Adafruit NeoPixel Überguide.
Meaning of the color of the wires:
- Red: +5V input voltage
- Green: Input of data signal (signal from an Arduino, RPi, or other SK6812 RGBW LED)
- White: Ground/min
This product is supplied in parts of 1 meter, with each meter of LED Strip in a separate package.
You can then attach these LED strips to each other by clicking the connectors together at the ends of the strips.
If you want the strips to be close together, you have to solder them together yourself.
Note: The LED strip has a power of 0.25W per LED module (50mA@5V) regardless of the color. So, a LED strip of 60 LED’s draws around 3A. You should take this into account when powering the LED strip.
Note: Make sure that the LED strip on the meter gives an “extra” 5V voltage. This is because the voltage drops over the strip and the current at the start can rise quite nicely (and perhaps the start of your LED strip burns out!).
You can read more about this here: Powering Neopixels.
![]()
Download this part at my GitHub library here.
File name: Neopixel Strip RGBW
Version: 1.0.0

That are my new parts for now, keep up to date by checking my GitHub repository here. Have fun with them!