
HomeKit
ESP8266 HomeKit Switch as a Switch, Lamp or Fan
One ESP8266 relay firmware that Apple Home can show as a switch, a lamp or a fan, with a button on the board.
- ESP8266
- HomeKit
- Safety notes
- 2 min read
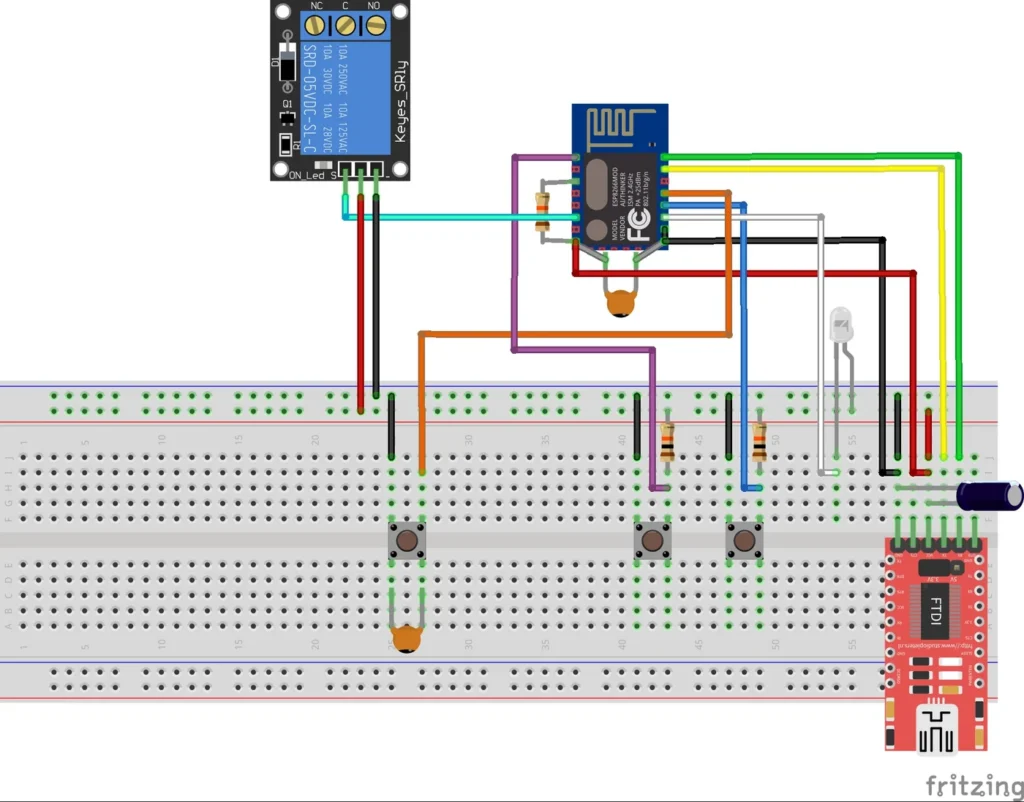
A relay switch for Apple Home, built on an ESP8266. It is the basic building block of the ESP8266 HomeKit accessories: one relay that you switch from the Home app, from Siri or with a button on the board.
The same firmware serves three uses. HomeKit can show the accessory as a switch, as a lamp or as a fan, and you choose that in the Home app.
High voltage
The relay can switch 230 V. Unplug everything before you work on the wiring, never touch the mains side while it is connected, and only take on mains wiring if you have the experience for it. Ask a certified electrician if you do not.
Switch, lamp or fan
| Shown as | Use |
|---|---|
| Switch | A general on and off switch |
| Lamp | A lamp that you switch on and off |
| Fan | A fan that you switch on and off |
The firmware is the same for all three. The difference is only in how HomeKit shows the accessory, which you set in the settings of the accessory in the Home app. The icon and the way Siri talks about it follow that choice.
The circuit
The breadboard diagram shows the module, a relay module, an FTDI adapter and a few buttons and a led:
| Part | What it does |
|---|---|
| One push button | Switches the relay on and off |
| Two more push buttons | For programming the module |
| Relay module | Switches the load |
| Led | Also in the diagram |
| FTDI adapter | Powers the setup and programs the module |
The connections follow the pinout of the module, as in the diagram. The diagram shows a module of the ESP-01 type, and the ESP8266-01 pinout lists what its pins can do.
Flash and install
The installation is the same as for the other ESP8266 HomeKit accessories on this site. The firmware runs on ESP-Open-RTOS with Life Cycle Manager 2, which sets up the WiFi and installs updates over the air. The repository holds the three bootloader files that esptool flashes first: rboot.bin, blank_config.bin and otaboot.bin. The full steps, from installing esptool to flashing, joining the LCM- WiFi network and pairing, are in ESP8266 HomeKit Blinds.
In the portal, use these values:
| Field | Value |
|---|---|
| OTA repository | AchimPieters/ESP8266-HomeKit-Switch |
| OTA binary file | main.bin |
When the installation is done, scan the QR code the device generates in the Home app to add the accessory. Then open its settings in the Home app and choose how it is shown.
Good to know
- The repository has one release, 0.0.1 of 8 September 2019, with a
main.binand a signature file,main.bin.sig. - The HomeKit Accessory Protocol specification the firmware follows is the non-commercial version, for accessories you build yourself and do not distribute or sell.
- The repository is under the MIT licence. It holds the release and the images, without source code.
The project is in the ESP8266-HomeKit-Switch repository on GitHub.
Related
 HomeKit
 Bathroom Ventilation Controller
When we renovated our bathroom, a new ventilation unit was installed, including a wireless remote control. Sounds convenient. In reality… not so much.
Read more
HomeKit
HomeKit Bathroom Ventilation Controller
When we renovated our bathroom, a new ventilation unit was installed, including a wireless remote control. Sounds convenient. In reality… not so much.
Read more
 HomeKit
ESP32 HomeKit Sunshade with Calibration and Weather Protection
A HomeKit Window Covering accessory for the ESP32 that replaces an up, down and stop switch, with touch buttons, calibration, power-loss recovery and optional wind, rain and light protection.
Read more
HomeKit
ESP32 HomeKit Sunshade with Calibration and Weather Protection
A HomeKit Window Covering accessory for the ESP32 that replaces an up, down and stop switch, with touch buttons, calibration, power-loss recovery and optional wind, rain and light protection.
Read more
 HomeKit
ESP8266 HomeKit NeoPixel RGBW Light Strip
A warm white RGBW LED strip in the Home app: pick any colour and a real white LED joins in as the colour gets softer. A test setup with an SK6812 strip and an ESP8266.
Read more
HomeKit
ESP8266 HomeKit NeoPixel RGBW Light Strip
A warm white RGBW LED strip in the Home app: pick any colour and a real white LED joins in as the colour gets softer. A test setup with an SK6812 strip and an ESP8266.
Read more
More HomeKit
Keep building.
Switches, sensors, plugs and blinds: more accessories that you build yourself and add to the Home app.
All HomeKit