The Tower Pro™ Micro servo S9 (SG90) motor is one of the most popular servo motors at the moment. This servo motor has a torque of up to 1.56 kg*cm, which makes it easy to move all kinds of sensors, camera’s or even small robots.

Tower Pro™ Micro servo S9 (SG90)
Let’s take a look at the hardware first. A servo is a general term for a closed control system. A closed control system uses the feedback signal to adjust the speed and direction of the motor to achieve the desired result.
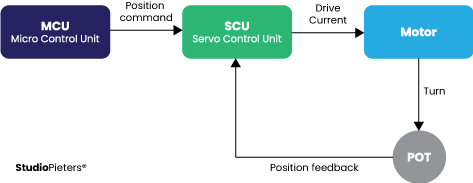
RC servo motor works on the same principle. It contains a small DC motor that is connected to the output shaft through the gears. The output shaft drives a servo arm and is also connected to a potentiometer (pot).
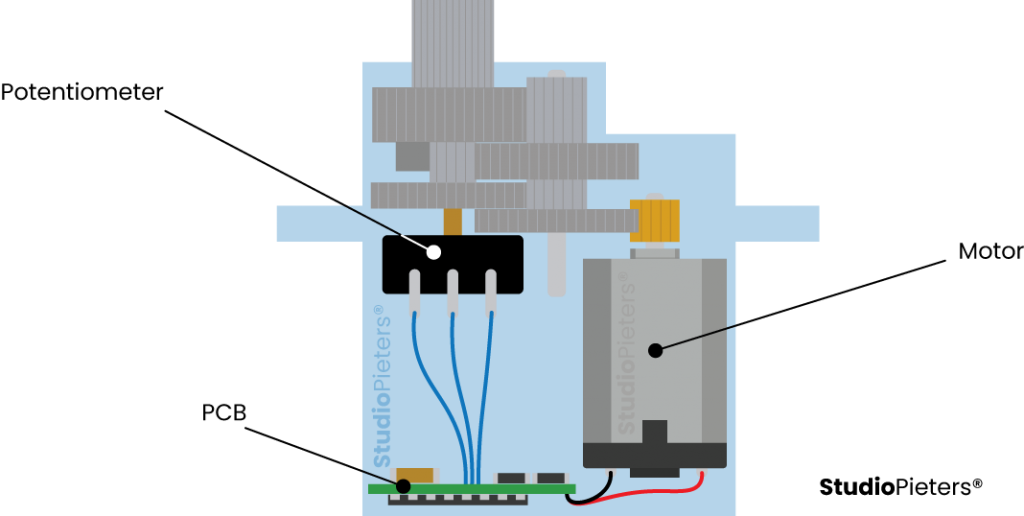
The potentiometer provides position feedback to the servo control unit where the current position of the motor is compared to the target position. According to the error, the control unit corrects the actual position of the motor to match the target position.
Servo Motor position
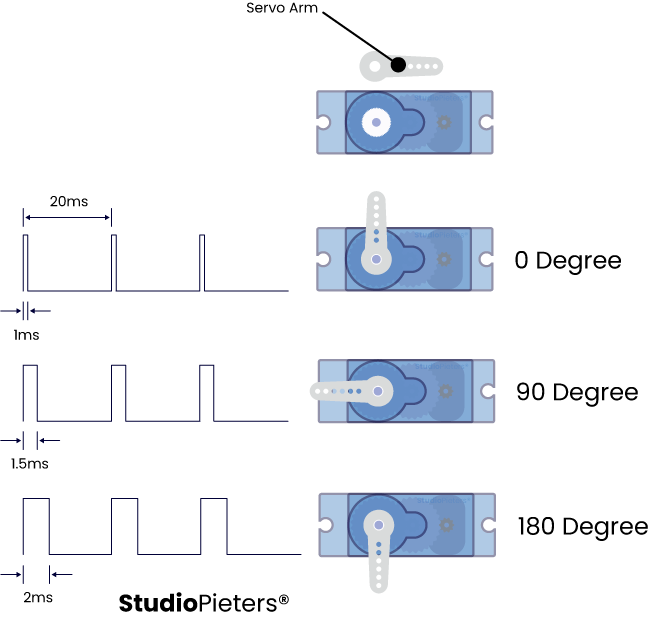
You can control the servo motor by sending a series of pulses to the signal line. A conventional analog servo motor expects to receive a pulse approximately every 20 milliseconds (the signal should be 50 Hz). The length of the pulse determines the position of the servomotor.
Examples
If the pulse is high for 1ms, then the servo angle will be zero. If the pulse is high for 1.5ms, then the servo will be at its center position. If the pulse is high for 2ms, then the servo will at 180 degrees. Pulses ranging between 1ms and 2ms will move the servo shaft through the full 180 degrees of its travel. The duration of the pulses may sometimes vary with different brands and they can be 0.5ms for 0 degrees and 2.5ms for 180 degrees.
Servo Motor Pinout
Servo motors typically have three connections, her is the PIN Out of the Tower Pro™ Micro Servo S9 (SG90). he wires varies between servo motors, but the red wire is always 5V and GND will either be black or brown. The control wire is usually orange or yellow.

Arduino Example
The Arduino IDE comes with a standar Servo library called; Servo Library for Arduino. This library allows an Arduino board to control RC (hobby) servo motors.
Usage
This library allows an Arduino board to control RC (hobby) servo motors. Servos have integrated gears and a shaft that can be precisely controlled. Standard servos allow the shaft to be positioned at various angles, usually between 0 and 180 degrees. Continuous rotation servos allow the rotation of the shaft to be set to various speeds.
The Servo library supports up to 12 motors on most Arduino boards and 48 on the Arduino Mega. On boards other than the Mega, use of the library disables analogWrite() (PWM) functionality on pins 9 and 10, whether or not there is a Servo on those pins. On the Mega, up to 12 servos can be used without interfering with PWM functionality; use of 12 to 23 motors will disable PWM on pins 11 and 12.
To use this library:
#include <Servo.h>
Sweep Example
Sweeps the shaft of a RC servo motor back and forth across 180 degrees.
Hardware Required
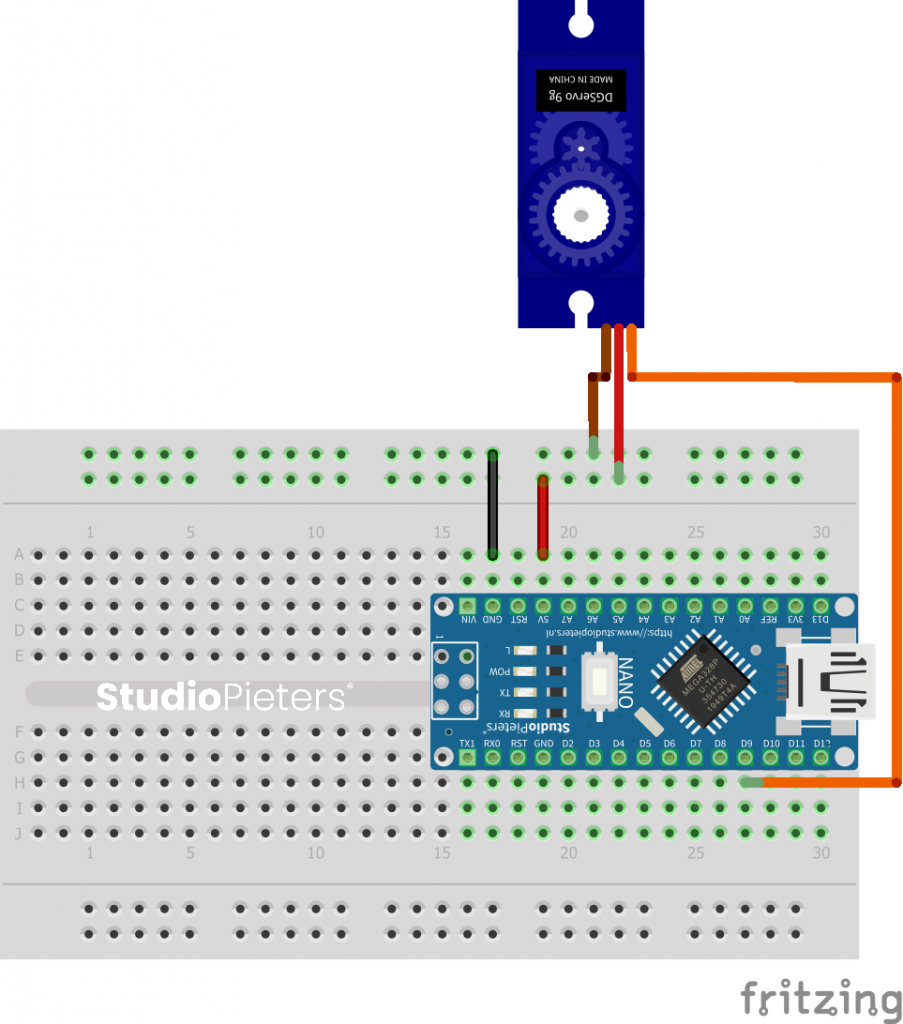
- Arduino Board
- Servo Motor
- Hook-up wires
Circuit
Servo motors have three wires: power, ground, and signal. The power wire is typically red, and should be connected to the 5V pin on the Arduino board. The ground wire is typically black or brown and should be connected to a ground pin on the Arduino board. The signal pin is typically yellow, orange or white and should be connected to a digital pin on the Arduino board. Note that servos draw considerable power, so if you need to drive more than one or two, you’ll probably need to power them from a separate supply (i.e. not the 5V pin on your Arduino). Be sure to connect the grounds of the Arduino and external power supply together.
The Code
This code will turn your servo 180 degrees and back.
#include <Servo.h>

Servo myservo;  // create servo object to control a servo
// twelve servo objects can be created on most boards

int pos = 0;    // variable to store the servo position

void setup() {
  myservo.attach(9);  // attaches the servo on pin 9 to the servo object
}

void loop() {
  for (pos = 0; pos <= 180; pos += 1) { // goes from 0 degrees to 180 degrees
    // in steps of 1 degree
    myservo.write(pos);              // tell servo to go to position in variable 'pos'
    delay(15);                       // waits 15 ms for the servo to reach the position
  }
  for (pos = 180; pos >= 0; pos -= 1) { // goes from 180 degrees to 0 degrees
    myservo.write(pos);              // tell servo to go to position in variable 'pos'
    delay(15);                       // waits 15 ms for the servo to reach the position
  }
}

Reference
Arduino, Allows Arduino boards to control a variety of servo motors., https://www.arduino.cc/reference/en/libraries/servo datasheetspdf, SG90 Servo Datasheet PDF, https://datasheetspdf.com/pdf-file/791970/TowerPro/SG90/1 lastminuteengineers, How Servo Motor Works & Interface It With Arduino, https://lastminuteengineers.com/?s=servo