Well after my last successes to make a accessory for my HomeBridge, I want to see if I can make a Temperature & Humidity Level accessory. First, you must install HomeBridge on a Raspberry Pi, and configure it as a HomeKit bridge device.How to do that, you can read here. Then I need a Temperature & Humidity sensor, so I found this one, the DHT11.
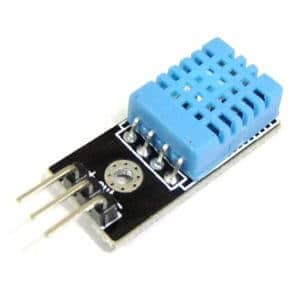
DHT11 Sensor
The DHT11 is a basic, ultra low-cost digital temperature and humidity sensor. It uses a capacitive humidity sensor and a thermistor to measure the surrounding air, and spits out a digital signal on the data pin (no analog input pins needed). Its fairly simple to use, but requires careful timing to grab data. The only real downside of this sensor is you can only get new data from it once every 2 seconds, so when using our library, sensor readings can be up to 2 seconds old.
Installing the Plugin on your HomeBridge
When you have installed the HomeBridge you need to install the homebridge-http-temperature-humidity package in order to let the HomeBridge communicate with your ESP8266 over HTTP.
sudo npm install -g homebridge-httptemperaturehumidity --unsafe-perm
Edit the HomeBridge /var/homebridge/config.json file on the Raspberry Pi HomeBridge. the file may alternatively be in /home/.homebridge or /root/home/./homebridge.
sudo nano ~/.homebridge/config.json
Add this code to the config.json file. Mind the last comma, you may or may not need it if you have other accessories, or Homebridge is crashing on load.
{
   "bridge": {
      "name": "Homebridge",
      "username": "CC:22:3D:E3:CE:30",
      "port": 51826,
      "pin": "031-45-154"
   },

   "description": "Example configuration file for homebridge-httptemperaturehumidity plugin",

   "platforms": [

    ],

   "accessories": [
      {
           "accessory": "HttpTemphum",
           "name": "Living Room",
           "url": "http://192.168.1.210/dht",
           "sendimmediately": "",
           "http_method": "GET"
       }

   ]
}
The Hardware
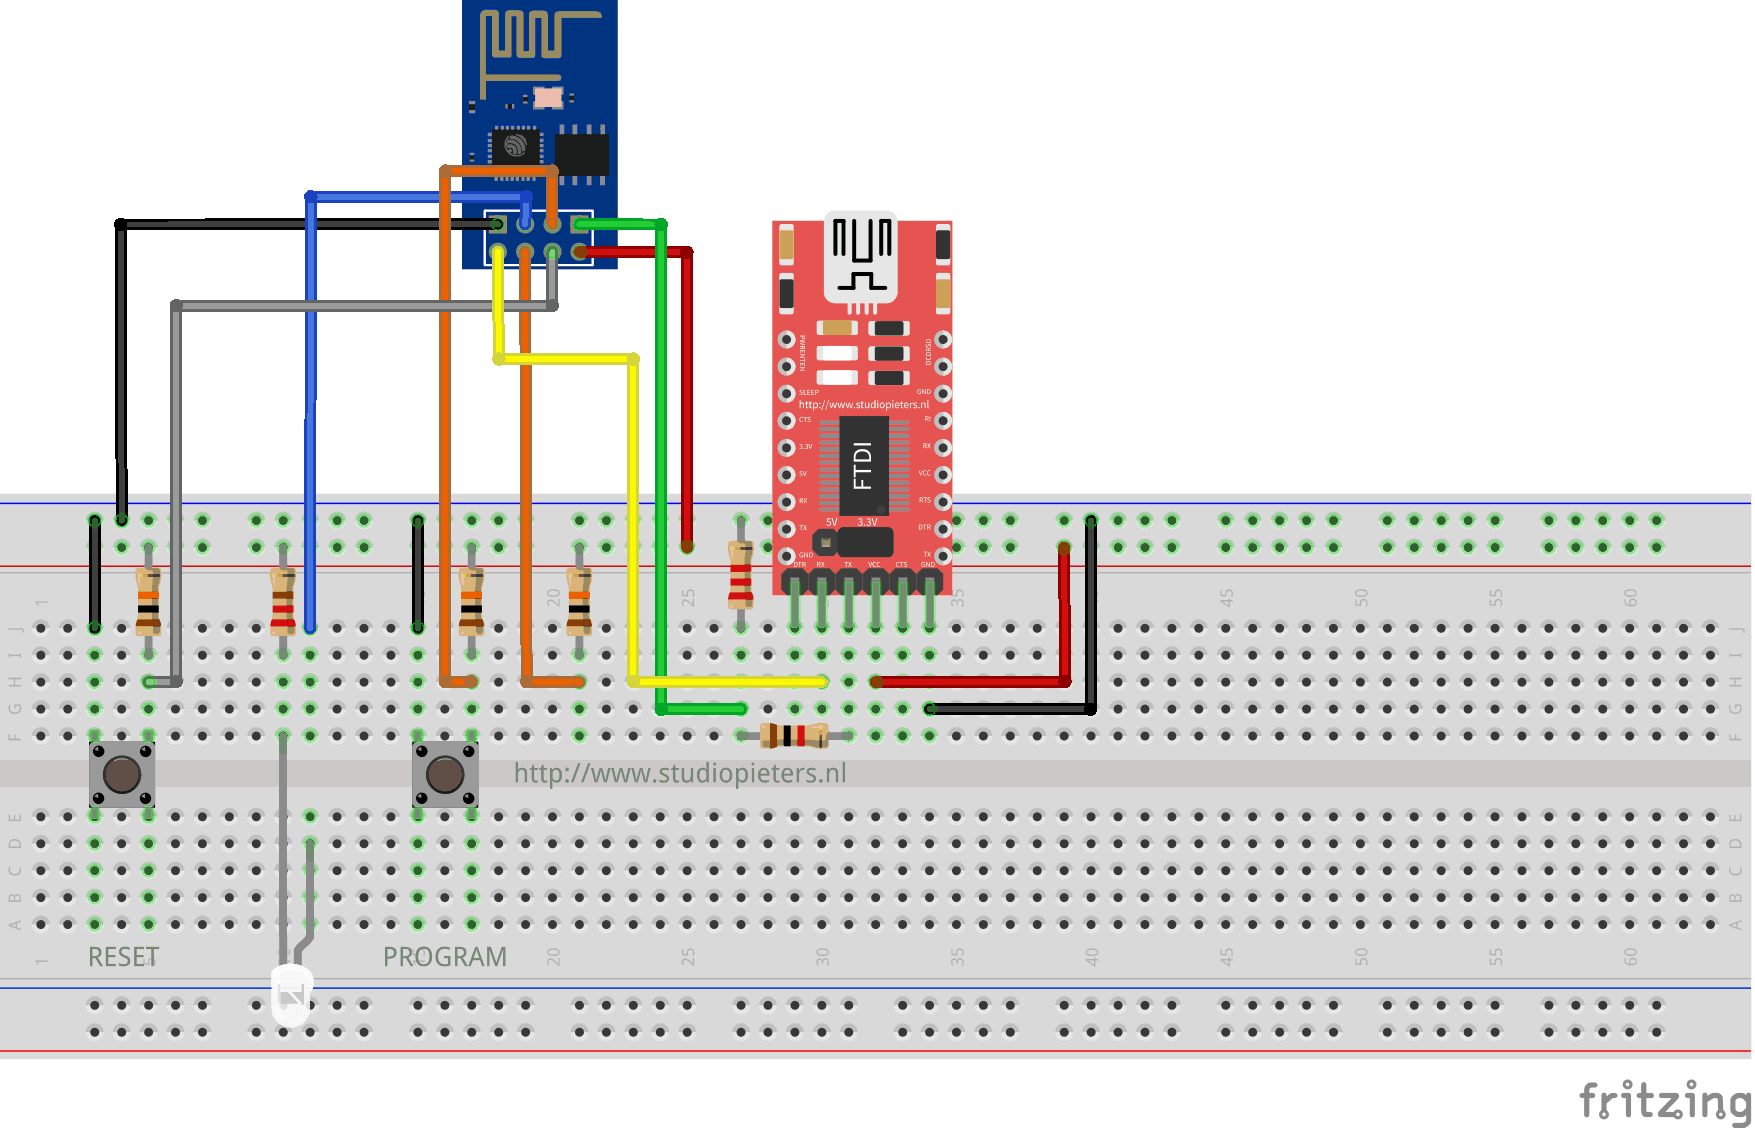
Once you have HomeKit / HomeBridge working on your Pi and your iPhone, we can build a Temperature & Humidity sensor that can be read by Siri and the HomeKit app. At first we need to setup the FTDI programmer to program the ESP8266-E12 with the Arduino IDE.
The Code
The we can upload the program below to your ESP8266.
/* Project name: Apple Homebridge - Temperature & Humidity level
   Project URI: https://www.studiopieters.nl/apple-homebridge-Temperature & Humidity level/
   Description: Apple Homebridge - Temperature & Humidity level
   Version: Apple homebridge - Temperature & Humidity level 1.0.3
   License: GNU General Public License V2 or later  */

#include <ESP8266WiFi.h>
#include <WiFiClient.h>
#include <ESP8266WebServer.h>
#include <DHT.h>
#define DHTTYPE DHT11
#define DHTPIN  2

const char* ssid     = "Your SSID";
const char* password = "Your Password ";

ESP8266WebServer server(80);

// Initialize DHT sensor
// NOTE: For working with a faster than ATmega328p 16 MHz Arduino chip, like an ESP8266,
// you need to increase the threshold for cycle counts considered a 1 or 0.
// You can do this by passing a 3rd parameter for this threshold.  It's a bit
// of fiddling to find the right value, but in general the faster the CPU the
// higher the value.  The default for a 16mhz AVR is a value of 6.  For an
// Arduino Due that runs at 84mhz a value of 30 works.
// This is for the ESP8266 processor on ESP-01
DHT dht(DHTPIN, DHTTYPE, 11); // 11 works fine for ESP8266

float humidity, temp_c;  // Values read from sensor

// Generally, you should use "unsigned long" for variables that hold time
unsigned long previousMillis = 0;        // will store last temp was read
const long interval = 2000;              // interval at which to read sensor

void handle_root() {
  server.send(200, "text/plain", "Homebridge http Temperature and humidity Sensor, read from /dht");
  delay(100);
}

void setup(void)
{
  // You can open the Arduino IDE Serial Monitor window to see what the code is doing
  Serial.begin(115200);  // Serial connection from ESP-01 via 3.3v console cable
  dht.begin();           // initialize temperature sensor

  // Connect to WiFi network
  WiFi.begin(ssid, password);
  IPAddress ip(192, 168, 178, 60);
  IPAddress gateway(192, 168, 178, 1);
  IPAddress subnet(255, 255, 255, 0);
  WiFi.config(ip, gateway, subnet);
  Serial.print("\n\r \n\rWorking to connect");

  // Wait for connection
  while (WiFi.status() != WL_CONNECTED) {
    delay(500);
    Serial.print(".");
  }
  Serial.println("");
  Serial.println("DHT data Reading Server");
  Serial.print("Connected to ");
  Serial.println(ssid);
  Serial.print("IP address: ");
  Serial.println(WiFi.localIP());

  server.on("/", handle_root);

  server.on("/dht", []() {
    gettemperature();
    server.send(200, "text/json", "{\n" "\"temperature\": " + String(temp_c) + ",\n ""\"humidity\": " + String(humidity) + "" "\n}");
  });


  server.begin();
  Serial.println("HTTP server started");
}

void loop(void)
{
  server.handleClient();
}

void gettemperature() {
  // Wait at least 2 seconds seconds between measurements.
  // if the difference between the current time and last time you read
  // the sensor is bigger than the interval you set, read the sensor
  // Works better than delay for things happening elsewhere also
  unsigned long currentMillis = millis();

  if (currentMillis - previousMillis >= interval) {
    // save the last time you read the sensor
    previousMillis = currentMillis;

    // Reading temperature for humidity takes about 250 milliseconds!
    // Sensor readings may also be up to 2 seconds 'old' (it's a very slow sensor)
    humidity = dht.readHumidity();          // Read humidity (percent)
    temp_c = dht.readTemperature(false);     // Read temperature as Fahrenheit
    // Check if any reads failed and exit early (to try again).
    if (isnan(humidity) || isnan(temp_c)) {
      Serial.println("Failed to read from DHT sensor!");
      return;
    }
  }
}
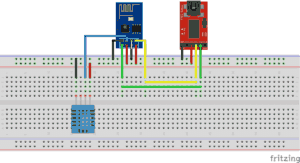
Now we can modify our setup so we can see if everything is working. In the fritzing diagram below you can see that now I have added a the DHT11 Sensor and keeping the RX and TX connected so we can see in the monitor from the Arduino IDE if everything is working as we want to.
Now we have to connect our iPhone to the home bridge and add the new accesoires.
Hooray! it works!

![]()
Download all Files for this project on github.

Do you have any questions? Leave a comment down here.
Reference
Nick Farina (Nov 14 2017), Homebridge, Homebridge is a lightweight NodeJS server you can run on your home network that emulates the iOS HomeKit API., https://github.com/nfarina/homebridge Luca Critelli (Dec 16 2016), homebridge-http-temperature-humidity, Supports https devices on HomeBridge Platform,https://github.com/vknabel/homebridge-http-temperature-humidity