A few weeks back I made a RGB Light for my HomeBridge, now I wanted to see if I could make a NeoPixel Light. First, you must install HomeBridge on a Raspberry Pi, and configure it as a HomeKit bridge device.How to do that, you can read here. Then I need a NeoPixel LED Strip, so I found this one, a NeoPixel LED Strip .
NEOPIXEL LED strip
The NeoPixel strip are LED that are digitally addressable LED’s. 12.5 mm wide (and 10 mm wide if you remove the plastic trunk from the strip – for indoor use). The LED’s use 9.5W per meter. This is when all LED’s are fully (white) lit. So a good power supply is required. for more information read the Adafruit NeoPixel Überguide here.

Installing the Plugin on your HomeBridge
When you have installed the HomeBridge you need to install the Homebridge-NeoPixel package in order to let the HomeBridge communicate with your ESP8266 over http.
sudo npm install -g homebridge-neopixel --unsafe-perm
Edit the HomeBridge /var/homebridge/config.json file on the Raspberry Pi HomeBridge. the file may alternatively be in /home/.homebridge or /root/home/./homebridge.
sudo nano ~/.homebridge/config.json
Add this code to the config.json file. Mind the last comma, you may or may not need it if you have other accessories, or Homebridge is crashing on load.ashing on load.
{
   "bridge": {
      "name": "Homebridge",
      "username": "CC:22:3D:E3:CE:30",
      "port": 51826,
      "pin": "031-45-154"
   },

"description": "Example configuration file for Apple Homebridge - NeoPixel",

"platforms": [

],

"accessories": [
  {     "accessory": "HTTP-NEO",
        "name": "Neo Lamp",

        "switch": {
        "status": "http://192.168.1.10/status",
        "powerOn": "http://192.168.1.10/on",
        "powerOff": "http://192.168.1.10/off"
        },

        "color": {
        "status": "http://192.168.1.10/color",
        "url": "http://192.168.1.10/set/%s"
        },

        "brightness": {
        "status": "http://192.168.1.10/bright",
        "url": "http://192.168.1.10/set/%s"
        }
  }

]
}
The Hardware
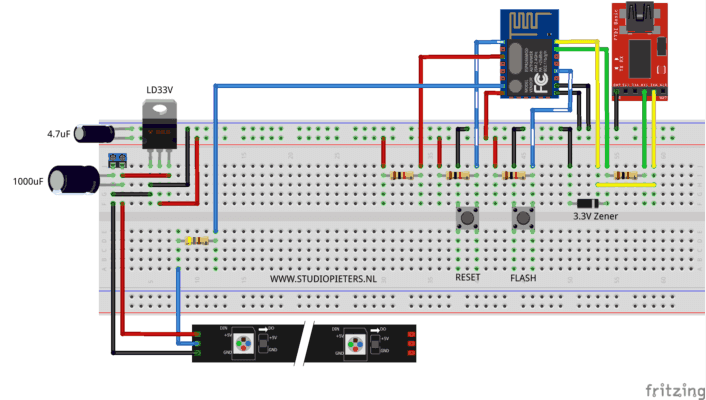
Now we can make our setup so we can see if everything is working. In the fritting digram below you can see that now I have added a NeoPixel Strip plus a external power supply 5V 1A. We are keeping the RX and TX connected so we can see in the monitor from the Arduino IDE if everything is working as we want to.
The Code
The we can upload the program below to your ESP8266.
/* Project name: Apple Homebridge - NeoPixel Project URI: https://www.studiopieters.nl/homebridge-neopixel-light/ Description: Apple Homebridge - NeoPixel Light Version: 6.0.3 License: GNU General Public License V2 or later */ #include <ESP8266WiFi.h> #include <Adafruit_NeoPixel.h> #include <math.h> //////////////////////////////////////////////////////////////////// // Which pin On which pin is the ESP8266-12E connected to the NeoPixels #define PIN 13 // How many NeoPixels are attached to the ESP8266-12E #define NUMPIXELS 144 // Parameter 1 = number of pixels in strip // Parameter 2 = pin number (most are valid) // Parameter 3 = pixel type flags, add together as needed: // NEO_KHZ800 800 KHz bitstream (most NeoPixel products w/WS2812 LEDs) // NEO_KHZ400 400 KHz (classic 'v1' (not v2) FLORA pixels, WS2811 drivers) // NEO_GRB Pixels are wired for GRB bitstream (most NeoPixel products) // NEO_RGB Pixels are wired for RGB bitstream (v1 FLORA pixels, not v2) Adafruit_NeoPixel strip = Adafruit_NeoPixel(NUMPIXELS, PIN, NEO_GRB + NEO_KHZ800); /////////////////////////////////////////////////////////////////// WiFiServer server(80); //Set server port String readString; //String to hold incoming request String hexString = "000000"; //Define inititial color here (hex value) int state; int r; int g; int b; float R; float G; float B; int x; int V; ///// WiFi SETTINGS - Replace with your values ///////////////// const char* ssid = "YOUR_ROUTER_SSID"; const char* password = "YOUR_ROUTER_PASSWORD"; IPAddress ip(192, 168, 1, 10); // set a fixed IP for the NodeMCU IPAddress gateway(192, 168, 1, 1); // Your router IP IPAddress subnet(255, 255, 255, 0); // Subnet mask //////////////////////////////////////////////////////////////////// void WiFiStart() { Serial.print("Connecting to "); Serial.println(ssid); WiFi.begin(ssid, password); WiFi.config(ip, gateway, subnet); while (WiFi.status() != WL_CONNECTED) { delay(100); Serial.print("_"); } Serial.println(); Serial.println("Done"); Serial.print("IP address: "); Serial.println(WiFi.localIP()); Serial.println(""); server.begin(); } void allOff() { state = 0; for (int i = 0; i < NUMPIXELS; i++) strip.setPixelColor(i, 0, 0, 0); strip.show(); } //Write requested hex-color to the pins void setHex() { state = 1; long number = (long) strtol( &hexString[0], NULL, 16); r = number >> 16; g = number >> 8 & 0xFF; b = number & 0xFF; for (int i = 0; i < NUMPIXELS; i++) strip.setPixelColor (i, r, g, b); strip.show(); } //Compute current brightness value void getV() { R = roundf(r / 2.55); G = roundf(g / 2.55); B = roundf(b / 2.55); x = _max(R, G); V = _max(x, B); strip.setBrightness(V); strip.show(); } //For serial debugging only void showValues() { Serial.print("Status on/off: "); Serial.println(state); Serial.print("RGB color: "); Serial.print(r); Serial.print("."); Serial.print(g); Serial.print("."); Serial.println(b); Serial.print("Hex color: "); Serial.println(hexString); getV(); Serial.print("Brightness: "); Serial.println(V); Serial.println(""); } void setup() { Serial.begin(115200); setHex(); //Set initial color after booting. Value defined above WiFi.mode(WIFI_STA); WiFiStart(); showValues(); //Uncomment for serial output strip.begin(); strip.show(); // Initialize all pixels to 'off' state = 0; } void loop() { //Reconnect on lost WiFi connection if (WiFi.status() != WL_CONNECTED) { WiFiStart(); } WiFiClient client = server.available(); if (!client) { return; } while (client.connected() && !client.available()) { delay(1); } //Respond on certain Homebridge HTTP requests if (client) { while (client.connected()) { if (client.available()) { char c = client.read(); if (readString.length() < 100) { readString += c; } if (c == '\n') { Serial.print("Request: "); //Uncomment for serial output Serial.println(readString); //Uncomment for serial output //Send reponse client.println("HTTP/1.1 200 OK"); client.println("Content-Type: text/html"); client.println(); //On if (readString.indexOf("on") > 0) { setHex(); showValues(); } //Off if (readString.indexOf("off") > 0) { allOff(); showValues(); } //Set color if (readString.indexOf("set") > 0) { hexString = ""; hexString = (readString.substring(9, 15)); setHex(); showValues(); } //Status on/off if (readString.indexOf("status") > 0) { client.println(state); } //Status color (hex) if (readString.indexOf("color") > 0) { client.println(hexString); } //Status brightness (%) if (readString.indexOf("bright") > 0) { getV(); client.println(V); } delay(1); client.stop(); readString = ""; } } } } }
Update: if you use Homebridge version 2, It is possible that you will get a ECONNRESET-bug. But the good nes is we have a possible fix:
The error can be resolved by inserting:
while (client.read() >= 0);
right before:
client.stop();
Now we have to connect our iPhone to the home bridge and add the new accesoires.
Yes! It works!

![]()
Download all Files for this project on github.

Do you have any questions? Leave a comment down here.
Reference
Nick Farina (Nov 14 2017), Homebridge, Homebridge is a lightweight NodeJS server you can run on your home network that emulates the iOS HomeKit API., https://github.com/nfarina/homebridge Achim Pieters (Feb 7 2017), homebridge-neopixel, Supports NeoPixel http(s) devices on the HomeBridge Platform, https://github.com/AchimPieters/HomeBridge-NeoPixel AdaFruit (Aug 30 2013), NeoPixel Überguide, Everything you always wanted to know about Adafruit NeoPixels but were afraid to ask, https://learn.adafruit.com/adafruit-neopixel-uberguide/the-magic-of-neopixels