It has been a while sins I made a module for my HomeBridge, now I wanted to see if I could make a door lock. First, you must install HomeBridge on a Raspberry Pi, and configure it as a HomeKit bridge device.How to do that, you can read here. Then I need a door lock, so I found these here below.
Cabinet Door Lock
Applied to the cabinet lock, locker locks, file cabinet locks ,etc. Designed with the open frame type and mount board, high power Easy to install for the electric door lock or other automatic door lock systems with the mounting board. Voltage: 12VDC, Current: 0.35A, Size:54*41mm (L*W).

Installing the Plugin on your HomeBridge
When you have installed the HomeBridge you need to install the Homebridge-lock package in order to let the HomeBridge communicate with your ESP8266 over http.
sudo npm install -g homebridge-lock --unsafe-perm
Edit the HomeBridge /var/homebridge/config.json file on the Raspberry Pi HomeBridge. the file may alternatively be in /home/.homebridge or /root/home/./homebridge.
sudo nano ~/.homebridge/config.json
Add this code to the config.json file. Mind the last comma, you may or may not need it if you have other accessories, or Homebridge is crashing on load.
{
  "bridge": {
    "name": "Homebridge",
    "username": "CC:22:3D:E3:CE:30",
    "port": 51826,
    "pin": "031-45-154"
  },

  "description": "This is an example configuration file with one fake accessory and one fake platform. You can use this as a template for creating your own configuration file containing devices you actually own.",

  "accessories": [
    {
      "accessory": "HTTPLock",
      "name": "Door",
      "url": "http://192.168.1.10/",
      "lock-id": "1",
      "username": "username",
      "password": "password"
    }
  ]
}
The Hardware
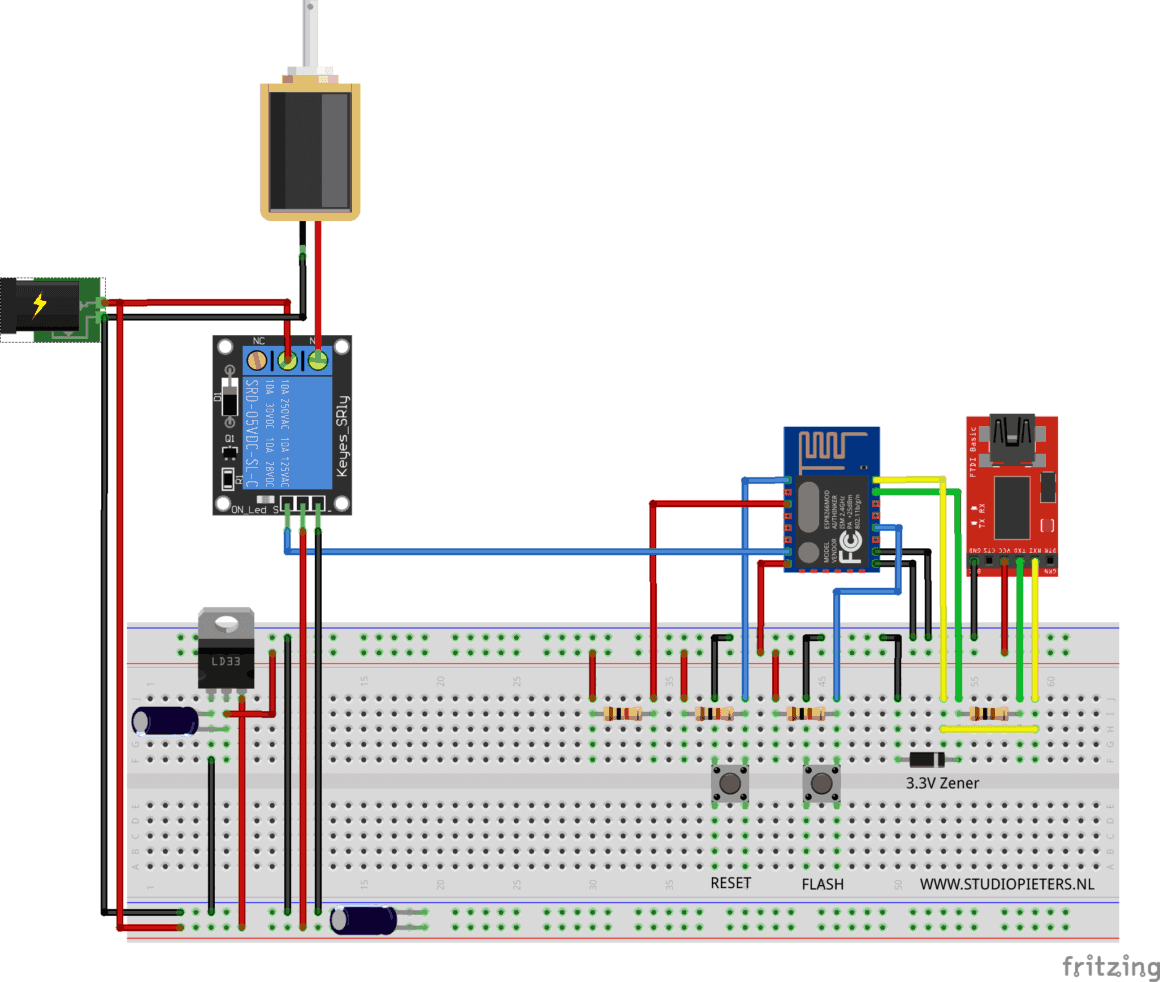
Now we can make our setup so we can see if everything is working. In the Fritzing diagram below you can see that now I have added a door lock plus a external power supply 5V 1A. We are keeping the RX and TX connected so we can see in the monitor from the Arduino IDE if everything is working as we want to.
The Code
The we can upload the program below to your ESP8266.
/* Project name: Apple Homebridge – Door Lock
   Project URI: https://www.studiopieters.nl/apple-homebridge-door-lock/
   Description: Apple Homebridge – Door Lock
   Version: 2.2.0
   License: MIT
*/

#include <ESP8266WiFi.h>
#include <WiFiClient.h>
#include <ESP8266WebServer.h>
#include <ESP8266mDNS.h>

#define RELAY_PIN 13    // Pin on ESP8266 to relay

const char* ssid        = "YOUR-SSID";
const char* password    = "YOUR-PASSWORD";
const long  lockTimeout = 5000;

ESP8266WebServer server(80);
long unlockedTime = 0;

void handleQuery() {
  char rsp[255];
  sprintf(rsp, "{\"state\":\"%s\",\"statusCode\":200}", digitalRead(RELAY_PIN) ? "unlocked" : "locked");
  server.send(200, "text/plain", rsp);
}

void handleLock() {
  String state = server.arg("state");
  if (state == "locked") {
    digitalWrite(RELAY_PIN, 0);
  } else {
    digitalWrite(RELAY_PIN, 1);
    // Lock again after 3 seconds
    unlockedTime = millis();
  }
  server.send(200, "text/plain", "{\"battery\":100,\"statusCode\":200}");
}

void setup() {
  Serial.begin(115200);
  pinMode(RELAY_PIN, OUTPUT);
  WiFi.mode(WIFI_STA);
  WiFi.begin(ssid, password);

  Serial.println("");
  while (WiFi.status() != WL_CONNECTED) {
    delay(500);
    Serial.print(".");
  }

  Serial.println("");
  Serial.print("Connected to ");
  Serial.println(ssid);
  Serial.print("IP address: ");
  Serial.println(WiFi.localIP());

  server.on("/", HTTP_GET, handleQuery);          // Query lock status
  server.on("/", HTTP_POST, handleLock);          // Set lock status
  server.begin();

}

void loop() {
  server.handleClient();

  // Restore lock status
  if ((unlockedTime > 0) && (millis() - unlockedTime > lockTimeout)) {
    unlockedTime = 0;
    digitalWrite(RELAY_PIN, 0);
  }
}
Note: The lock will change back to locked status after 5 seconds. Because the lock can’t keep unlock status long time (Must < 10s).
Now we have to connect our iPhone to the home bridge and add the new accesoires.


Hooray! It works!

![]()
Download all Files for this project on github.

Do you have any questions? Leave a comment down here.
Reference
Nick Farina (Nov 14 2017), Homebridge, Homebridge is a lightweight NodeJS server you can run on your home network that emulates the iOS HomeKit API., https://github.com/nfarina/homebridge Volca ( Jul 18 2017), EspLock Plugin, This plugin supports locks controlled by any custom HTTP endpoint via GET (to get state, either “locked” or “unlocked”), and POST (to set new state, same two values), https://github.com/volca/homebridge-esplock