The next project is to create a MQTT button, So we can control other MQTT devices or start a homekit scene without having to use your iPhone, iPad. However, if you press once and turn them on, how would you turn the off? You’d have to have a whole separate command just to turn the lights back off.

Ideally, we want to set this up as a toggle button. So you press once to turn the living room lights on, then press once again to turn them back off. To make this work isn’t all to complicated. Though at first glance it seems like we only have two toggle commands, we are effectively adding four commands in total. However, to map these commands to the two physical actions, we have to control what they do based on conditional statements. In practice, it goes like this:
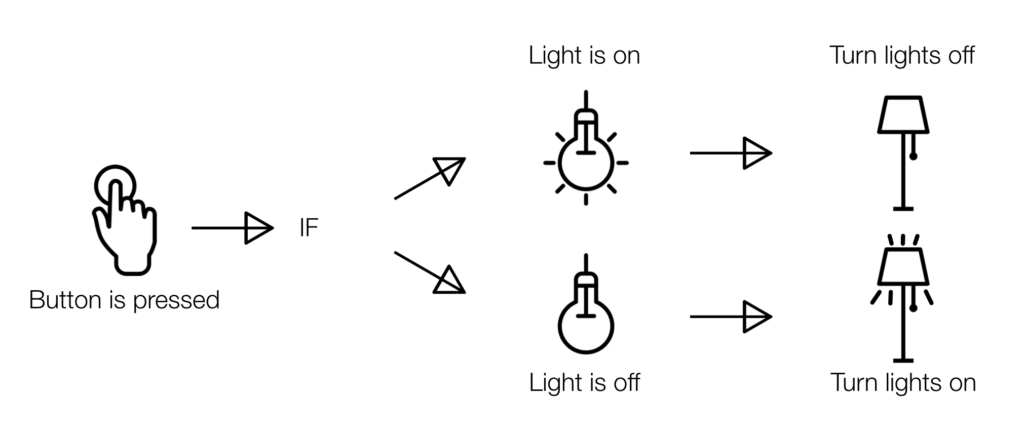
First, don’t feel limited to just turning lights on and off. You can set complete scenes this way as well. A button press could lock and unlock a door, turn a fan on or off and so forth. First, don’t feel limited to just turning lights on and off. You can set complete scenes this way as well. A button press could lock and unlock a door, turn a fan on or off and so forth.
HOMEBRIDGE
You need to setup your Apple Homebridge based on MQTT first to connect this setup with Apple HomeKit / Siri. For whom did not read my previous blog about setting up your Apple Homebridge based on MQTT you can find it here.
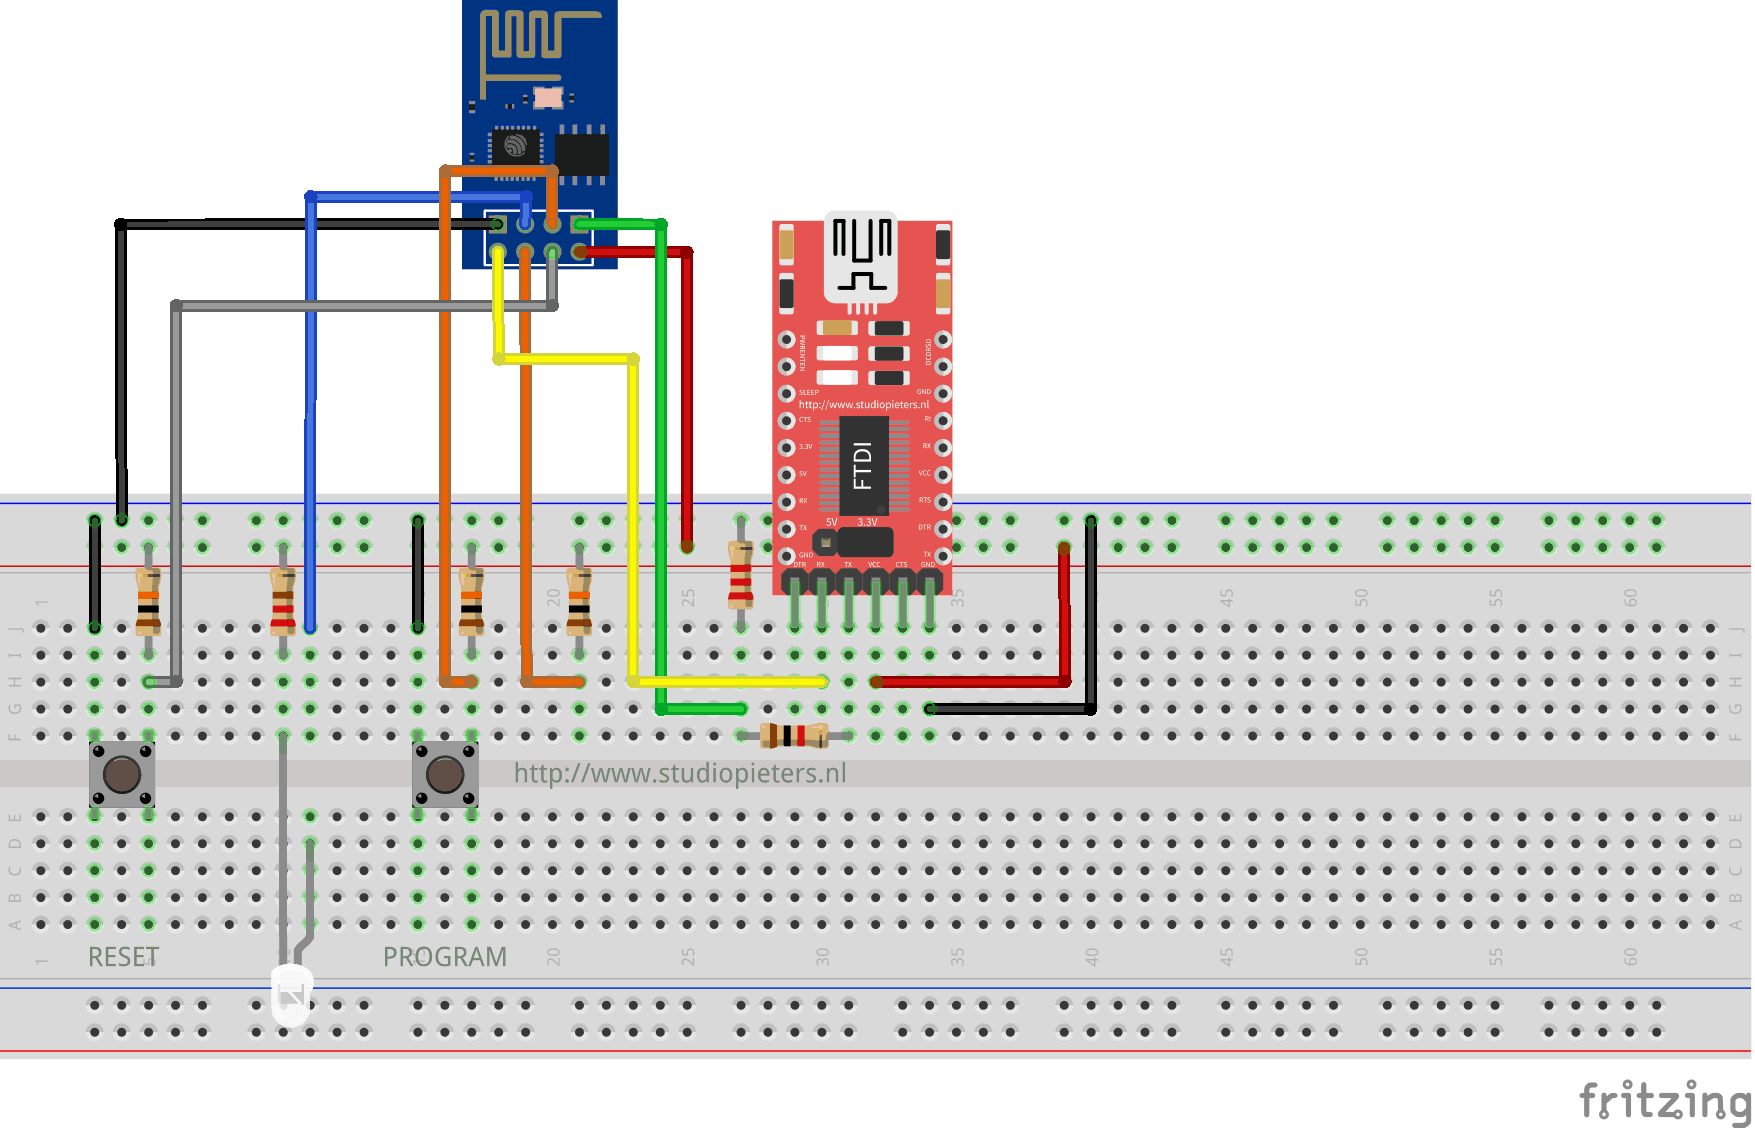
THE HARDWARE
1 x ESP8266-01
1 x FTDI Programmer
3 x 10KΩ Resistors
1 x 220Ω Resistor
1 x 2.2KΩ Resistor
1 x 1.0KΩ Resistor
2 x Micro switches
1 x 3 mm LED
1 x Breadboard and jumper wires
When I have collected al the necessary parts, I can setup the test environment like show in the image below.
SOFTWARE
To connect this hardware with our Apple Homebridge based on MQTT, we need a MQTT client. There are many open source libraries available allowing you to connect your ESP8266 to a MQTT server. The one I found most stable and complete, is the pubsubclient by Imroy. Note that there are multiple pubsubclient libraries available, so make sure you download the one by Imroy. After installing this library to your Arduino IDE, It’s time to start coding.
The Code
/* Project name: HomeBridge – MQTT Button
   Project URI: https://www.studiopieters.nl/homebridge-mqtt-button/
   Description: HomeBridge – MQTT Button
   Version: 1.7.4
   License: MIT
*/


#include <ESP8266WiFi.h>
#include <PubSubClient.h>

const char *ssid =  "Your_SSID";    // cannot be longer than 32 characters!
const char *pass =  "Your_PASS";

int inPin = 0;         // the number of the input pin
int ledPin = 2;        // Control Led to see if everything is working.

int state = HIGH;      // the current state of the output pin
int reading;           // the current reading from the input pin
int previous = LOW;    // the previous reading from the input pin

// the follow variables are long's because the time, measured in miliseconds, will quickly become a bigger number than can be stored in an int.
long Time = 0;         // the last time the output pin was toggled
long debounce = 200;   // the debounce time, increase if the output flickers


// Update these with values suitable for your network.
IPAddress server(192, 168, 1, 10);

#define BUFFER_SIZE 100


void callback(const MQTT::Publish& pub) {
  pinMode(ledPin, OUTPUT);

  // check if the message in On or Off
  if (pub.payload_string() == "ON") {
    state = LOW;
    // turn LED on:
    digitalWrite(ledPin, HIGH);
    Serial.println(pub.payload_string());
  } else {
    state = HIGH;
    // turn LED off:
    digitalWrite(ledPin, LOW);
    Serial.println(pub.payload_string());
  }
}

WiFiClient wclient;
PubSubClient client(wclient, server);

void setup() {
  // Setup console
  pinMode(inPin, INPUT);
  Serial.begin(115200);
  delay(10);
  Serial.println();
  Serial.println();
}

void loop() {
  if (WiFi.status() != WL_CONNECTED) {
    Serial.print("Connecting to ");
    Serial.print(ssid);
    Serial.println("...");
    WiFi.begin(ssid, pass);

    if (WiFi.waitForConnectResult() != WL_CONNECTED)
      return;
    Serial.println("WiFi connected");
  }

  if (WiFi.status() == WL_CONNECTED) {
    if (!client.connected()) {
      if (client.connect("arduinoClient")) {
        client.set_callback(callback);
        client.subscribe("button/01"); // change InTopic to your Topic description
      }
    }

    if (client.connected())
      client.loop();

    reading = digitalRead(inPin);

    // if the input just went from LOW and HIGH and we've waited long enough
    // to ignore any noise on the circuit, toggle the output pin and remember
    // the time
    if (reading == HIGH && previous == LOW && millis() - Time > debounce) {
      if (state == HIGH) {
        state = LOW;
        digitalWrite(ledPin, HIGH);
        client.publish("button/01", "ON");
      }
      else {
        state = HIGH;
        digitalWrite(ledPin, LOW);
        client.publish("button/01", "OFF");
      }

      Time = millis();
    }

    previous = reading;

  }

}
First off, lets start by adding your Network Credentials:
const char *ssid = "Your_SSID"; // cannot be longer than 32 characters!
const char *pass = "Your_PASS";
Now you have to add the IP address of your Apple Homebridge based on MQTT:
IPAddress server(192, 168, 1, 10);
HOMEKIT2MQTT WEBSERVER
To add the new accessories, homekit2mqtt has a build-in web-server. This allows you that easily add new MQTT accessories for Homekit. So to connect to your homekit2mqtt web-server, open your web browser and type:
Raspberry_ip_adress:51888
Now you can login with the username:
homekit
and password:
031-45-154
For this setup I added a accessories to the Apple Homebridge based on MQTT by removing all standard MQTT clients by selecting them and press DEL in the lower left corner.
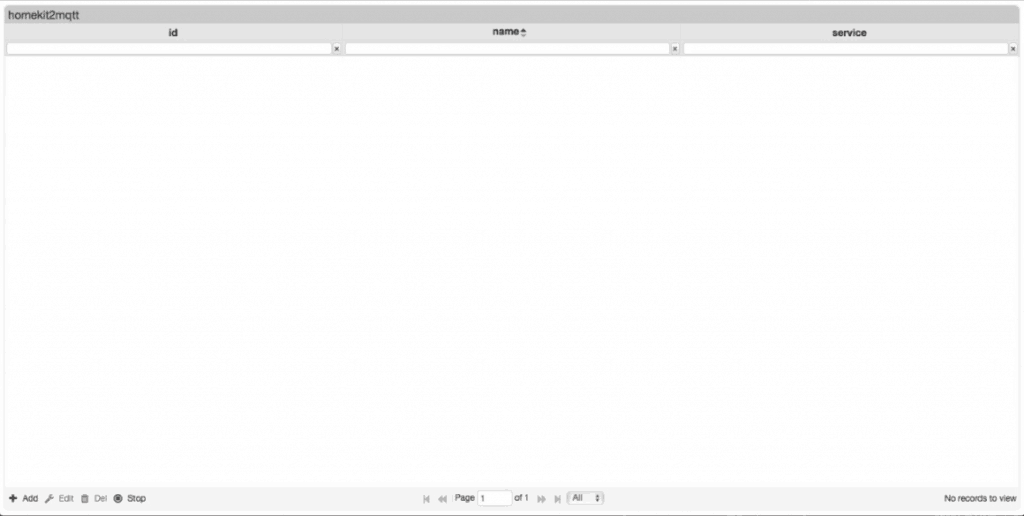
Then I pressed + Add, to add my new build neopixel light. In the service field you can select your type of service, in this case want want to add a Switch.
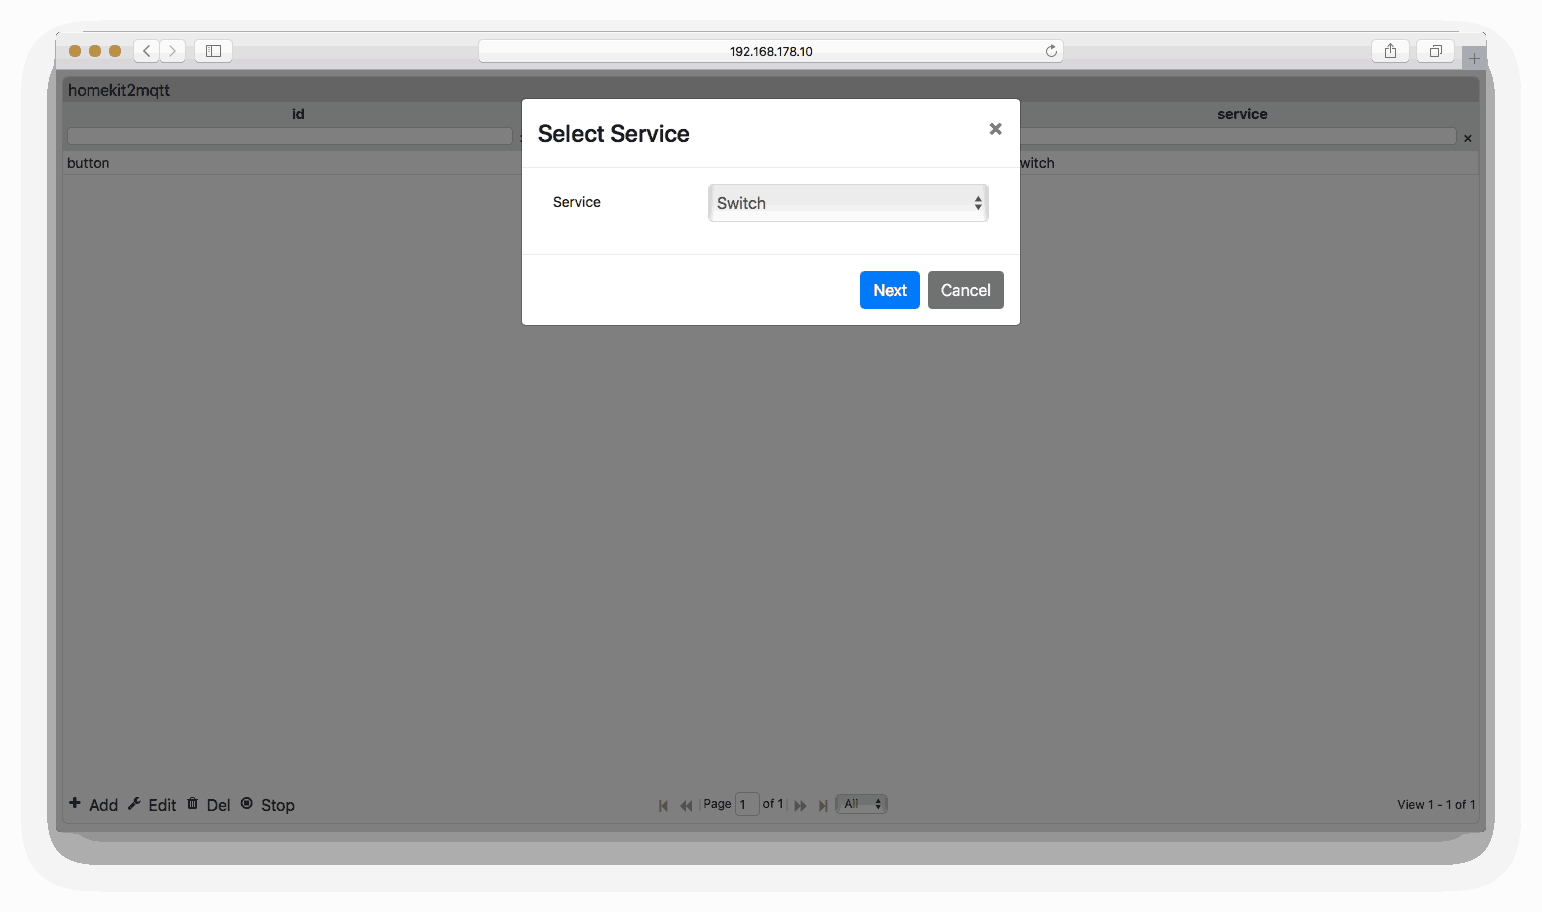
HomeKit2MQTT now fills the rest of the fields with the predefined settings of the template. We have to change them to the following settings:
| id | Button |
| name | Button |
| SetOn | Button/01 |
| StatusOn | Button/01 |
| Identify | N.A. |
| onFalse | OFF |
| onTrue | ON |
| identify | N.A. |
| Manufacturer | StudioPieters. (Optional) |
| Model | Button Version 1 (Optional) |
| Serial | 03282018.1.7.4 (Optional) |
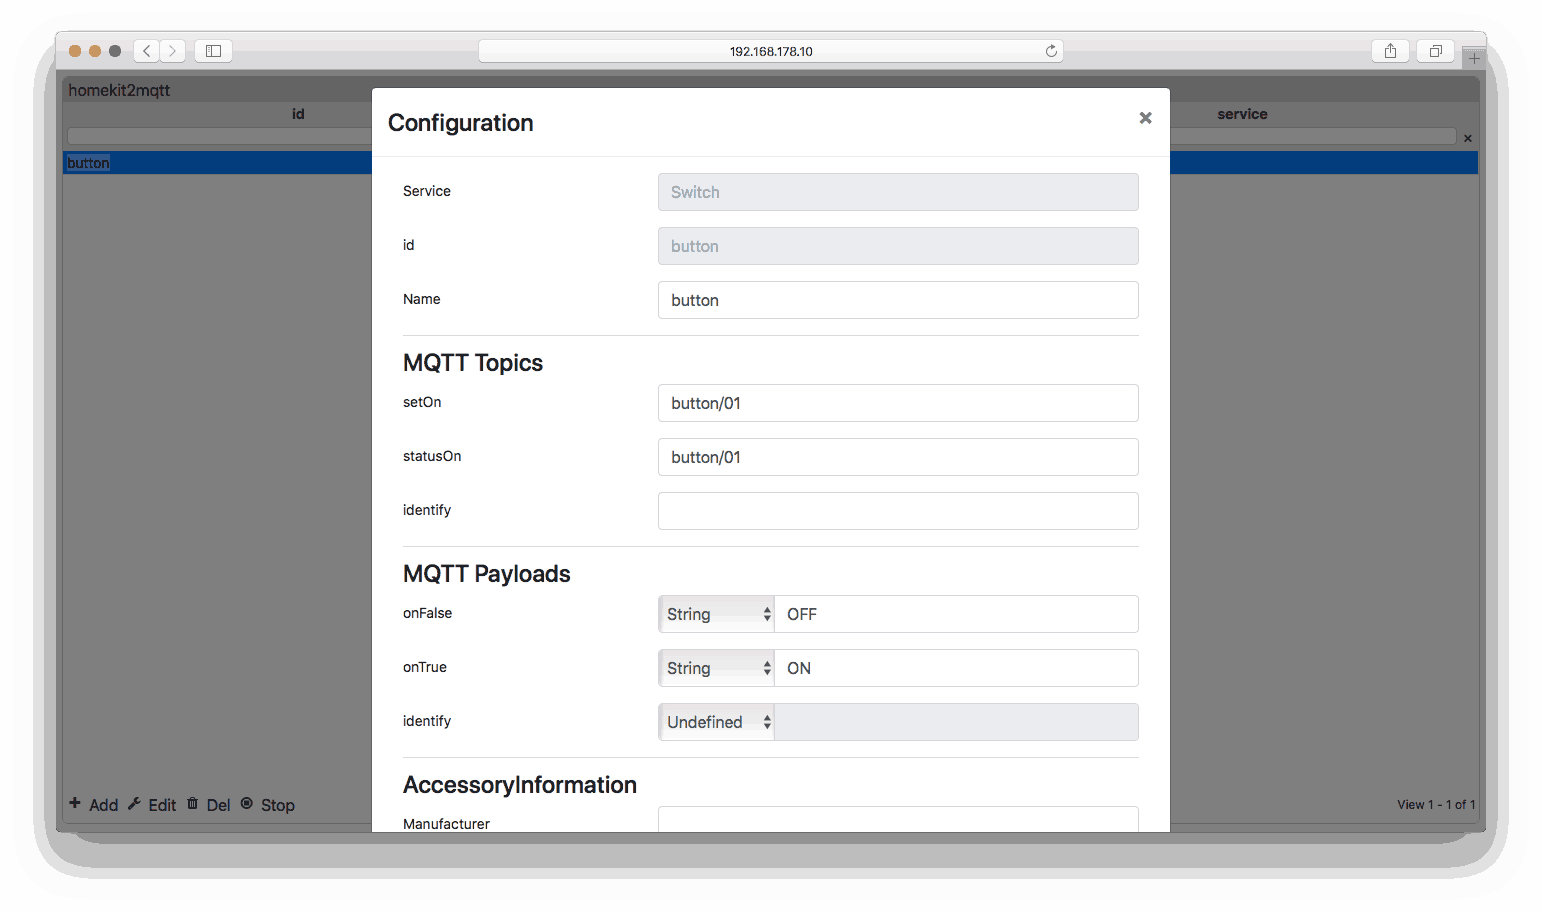
We have to change OnTrue and OnFalse to a String value and to OnTrue (ON) and OnFalse (OFF) and then select Save and close the web browser. You can add the accessoryInformation if you want, but isn’t necessary.
Yes it Works!

There is only on thing it will need a continuous power supply. Let’s see if we can find a solution? time for HomeBridge – MQTT Button – part II …
![]()
DOWNLOAD ALL FILES FOR THIS PROJECT ON GITHUB.

DO YOU HAVE ANY QUESTIONS? LEAVE A COMMENT DOWN HERE.
REFERENCE
Sebastian Raff (APR 25 2018), Homekit2MQTT, Use to control a MQTT-connected “Thing” in your home automation through Siri and with HomeKit apps., https://github.com/hobbyquaker/homekit2mqtt, Ian Tester (May 16 2017), pubsubclient, A client library for the ESP8266 that provides support for MQTT, https://github.com/Imroy/pubsubclient