When you have created your first HomeKit accessory. Then you probably want to debug your code or change something, but then you need to erase ESP module and re-flash it. This has to be easier. For whom that ready my blog regularly know that I always start with installing LCM (Life Cycle Manager). This tool offers a way to update your firmware OTA (Over The Air). In the upcoming blog I will explain several way’s to trigger your ESP Module to check if there is a new firmware, and if there is to install it.
Firmware update by Eve
Eve works with all HomeKit-enabled accessories. See your home at a glance. Customize your ecosystem down to the finest detail. Activate scenes in a snap. And easily create automations using timers and rules. With Eve, you’re at the forefront of connected home control – and guided – every step of the way. Get a quick overview of everything that’s happening in your connected home. Quickly access your favorite scenes to instantly control multiple accessories as one. And dive into room or type details with a simple tap. Personalize your home according to your exact preferences. Choose among the many pre-defined rooms or add your own. And organize all your HomeKit-enabled accessories in a way that feels natural.

Easily create advanced scenes to control multiple accessories with a single command. And set timers to synchronize your home with your daily routine. Better yet, add powerful rules to set scenes based on accessory values or your location, and have your home work for you – automatically. The Eve family of HomeKit-enabled accessories puts your home at your fingertips. Control your lights, appliances, radiators and other connected comforts – with your iPhone or just your voice. Easily create automations for carefree convenience around the clock. And gather data on temperature, air quality, humidity, energy consumption and more.
DOWNLOAD Eve for HomeKit
![]()
![]()
The Code
As example for the Firmware Update example, we use the LED code from the original Apple HomeKit accessory server library. Open the LED directory and add the files ota-api.c and ota-api.h next to your led.c file.

Open the Terminal app. Click the Finder icon in your dock. Click Go. Click Utilities. Double-click Terminal. then type:
cd esp
change into folder esp-homekit-demo
cd esp-homekit-demo
then change into the examples folder.
cd examples
Then open the led accessory
cd led
Now you will see two files:
led.c
makefile
Download the files below an add the filesand copy the ota-api.c and ota-api.h next to your led.c and makefile file.
ota-api.c
Version: 1.0.0

ota-api.h
Version: 1.0.0
Atom
ATOM is a free and open-source text and source code editor for macOS, Linux, and Microsoft Windows with support for plug-ins written in Node.js, and embedded Git Control, developed by GitHub. Atom is a desktop application built using web technologies. Most of the extending packages have free software licenses and are community-built and maintained. You can download your free copy here.
Download Atom

Changing Makefile
To be ablet to execute teh Firmware Update, we need to change some files. Open the Terminal app. Click the Finder icon in your dock. Click Go. Click Utilities. Double-click Terminal. then type:
cd esp
change into folder esp-homekit-demo
cd esp-homekit-demo
then change into the examples folder.
cd examples
Then open a accecory (e.g. Led)
cd led
Now you will see two files:
led.c
makefile
Open makefile with ATOM and change the following line:
PROGRAM = led

EXTRA_COMPONENTS = \
	extras/http-parser \
	$(abspath ../../components/esp8266-open-rtos/cJSON) \
	$(abspath ../../components/common/wolfssl) \
	$(abspath ../../components/common/homekit)

FLASH_SIZE ?= 32

EXTRA_CFLAGS += -I../.. -DHOMEKIT_SHORT_APPLE_UUIDS

include $(SDK_PATH)/common.mk

monitor:
	$(FILTEROUTPUT) --port $(ESPPORT) --baud 115200 --elf $(PROGRAM_OUT)
to
PROGRAM = main

EXTRA_COMPONENTS = \
	extras/http-parser \
        extras/rboot-ota \
	$(abspath ../../components/esp8266-open-rtos/cJSON) \
	$(abspath ../../components/common/wolfssl) \
	$(abspath ../../components/common/homekit)

FLASH_SIZE ?= 32

EXTRA_CFLAGS += -I../.. -DHOMEKIT_SHORT_APPLE_UUIDS

include $(SDK_PATH)/common.mk

monitor:
	$(FILTEROUTPUT) --port $(ESPPORT) --baud 115200 --elf $(PROGRAM_OUT)
Open main.c with ATOM. Inside main.c you should start with adding this section soon after #include section. You need to add this section to make your device OTA capable.It creates the extra characteristic &ota_trigger, witch is placed at the end of the primary service (before the NULL). This extra characteristic can be used in the Eve app, which will show it, where unfortunately the HomeKit app does not.It will also apply the four other parameters in the accessories_information section.
#include "ota-api.h"

homekit_characteristic_t ota_trigger  = API_OTA_TRIGGER;
homekit_characteristic_t manufacturer = HOMEKIT_CHARACTERISTIC_(MANUFACTURER,  "X");
homekit_characteristic_t serial       = HOMEKIT_CHARACTERISTIC_(SERIAL_NUMBER, "1");
homekit_characteristic_t model        = HOMEKIT_CHARACTERISTIC_(MODEL,         "Z");
homekit_characteristic_t revision     = HOMEKIT_CHARACTERISTIC_(FIRMWARE_REVISION,  "0.0.0");
Next place these lines before calling homekit_server_init(&config);
int c_hash=ota_read_sysparam(&manufacturer.value.string_value,&serial.value.string_value,
                                      &model.value.string_value,&revision.value.string_value);
    //c_hash=1; revision.value.string_value="0.0.1"; //cheat line
    config.accessories[0]->config_number=c_hash;;
After all adjustments you should have this in the end.
/*
Copyright 2019 Achim Pieters | StudioPieters®

Permission is hereby granted, free of charge, to any person obtaining a copy
of this software and associated documentation files (the "Software"), to deal
in the Software without restriction, including without limitation the rights
to use, copy, modify, merge, publish, distribute, sublicense, and/or sell
copies of the Software, and to permit persons to whom the Software is
furnished to do so, subject to the following conditions:

The above copyright notice and this permission notice shall be included in all
copies or substantial portions of the Software.

THE SOFTWARE IS PROVIDED "AS IS", WITHOUT WARRANTY OF ANY KIND, EXPRESS OR
IMPLIED, INCLUDING BUT NOT LIMITED TO THE WARRANTIES OF MERCHANTABILITY,
FITNESS FOR A PARTICULAR PURPOSE AND NONINFRINGEMENT. IN NO EVENT SHALL THE
AUTHORS OR COPYRIGHT HOLDERS BE LIABLE FOR ANY CLAIM, DAMAGES OR OTHER LIABILITY,
WHETHER IN AN ACTION OF CONTRACT, TORT OR OTHERWISE, ARISING FROM, OUT OF OR IN
CONNECTION WITH THE SOFTWARE OR THE USE OR OTHER DEALINGS IN THE SOFTWARE.
*/
#include <stdio.h>
#include <esp/uart.h>
#include <esp8266.h>
#include <FreeRTOS.h>
#include <task.h>

#include <homekit/homekit.h>
#include <homekit/characteristics.h>
#include <wifi_config.h>

#include "ota-api.h" // Add This Line

const int led_gpio = 2;
bool led_on = false;

void led_write(bool on) {
        gpio_write(led_gpio, on ? 0 : 1);
}

void led_init() {
        gpio_enable(led_gpio, GPIO_OUTPUT);
        led_write(led_on);
}

void led_identify_task(void *_args) {
        for (int i=0; i<3; i++) {
                 for (int j=0; j<2; j++) {
                          led_write(true);
                          vTaskDelay(100 / portTICK_PERIOD_MS);
                          led_write(false);
                          vTaskDelay(100 / portTICK_PERIOD_MS);
                 }
                 vTaskDelay(250 / portTICK_PERIOD_MS);
        }
        led_write(led_on);
        vTaskDelete(NULL);
}

void led_identify(homekit_value_t _value) {
        printf("LED identify\n");
        xTaskCreate(led_identify_task, "LED identify", 128, NULL, 2, NULL);
}

homekit_value_t led_on_get() {
        return HOMEKIT_BOOL(led_on);
}

void led_on_set(homekit_value_t value) {
        if (value.format != homekit_format_bool) {
                printf("Invalid value format: %d\n", value.format);
                return;
        }
        led_on = value.bool_value;
        led_write(led_on);
}

// Add These lines
homekit_characteristic_t ota_trigger = API_OTA_TRIGGER;
homekit_characteristic_t manufacturer = HOMEKIT_CHARACTERISTIC_(MANUFACTURER, "X");
homekit_characteristic_t serial = HOMEKIT_CHARACTERISTIC_(SERIAL_NUMBER, "1");
homekit_characteristic_t model = HOMEKIT_CHARACTERISTIC_(MODEL, "Z");
homekit_characteristic_t revision = HOMEKIT_CHARACTERISTIC_(FIRMWARE_REVISION, "0.0.0");

homekit_accessory_t *accessories[] = {
        HOMEKIT_ACCESSORY(.id=1, .category=homekit_accessory_category_sensor, .services=(homekit_service_t*[]) {
               HOMEKIT_SERVICE(ACCESSORY_INFORMATION, .characteristics=(homekit_characteristic_t*[]) {
                      HOMEKIT_CHARACTERISTIC(NAME, "Sample LED"),
                      &manufacturer,
                      &serial,
                      &model,
                      &revision,
                      HOMEKIT_CHARACTERISTIC(IDENTIFY, led_identify),
                      NULL
               }),
               HOMEKIT_SERVICE(LIGHTBULB, .primary=true, .characteristics=(homekit_characteristic_t*[]){
                      HOMEKIT_CHARACTERISTIC(NAME, "Sample LED"),
                      HOMEKIT_CHARACTERISTIC(
                             ON, false,
                            .getter=led_on_get,
                            .setter=led_on_set,
                             ),
                             &ota_trigger, // Add This Line
                             NULL
                      }),
                      NULL
                }),
                NULL
};

homekit_server_config_t config = {
       .accessories = accessories,
       .password = "123-45-678",
       .setupId="1QJ8",
};

void on_wifi_ready() {
}

void user_init(void) {
         uart_set_baud(0, 115200);
         led_init();
         // Add These lines
         int c_hash=ota_read_sysparam(&manufacturer.value.string_value,&serial.value.string_value,
                                      &model.value.string_value,&revision.value.string_value);
         //c_hash=1; revision.value.string_value="0.0.1"; //cheat line
         config.accessories[0]->config_number=c_hash;

         homekit_server_init(&config);
}

The preparation
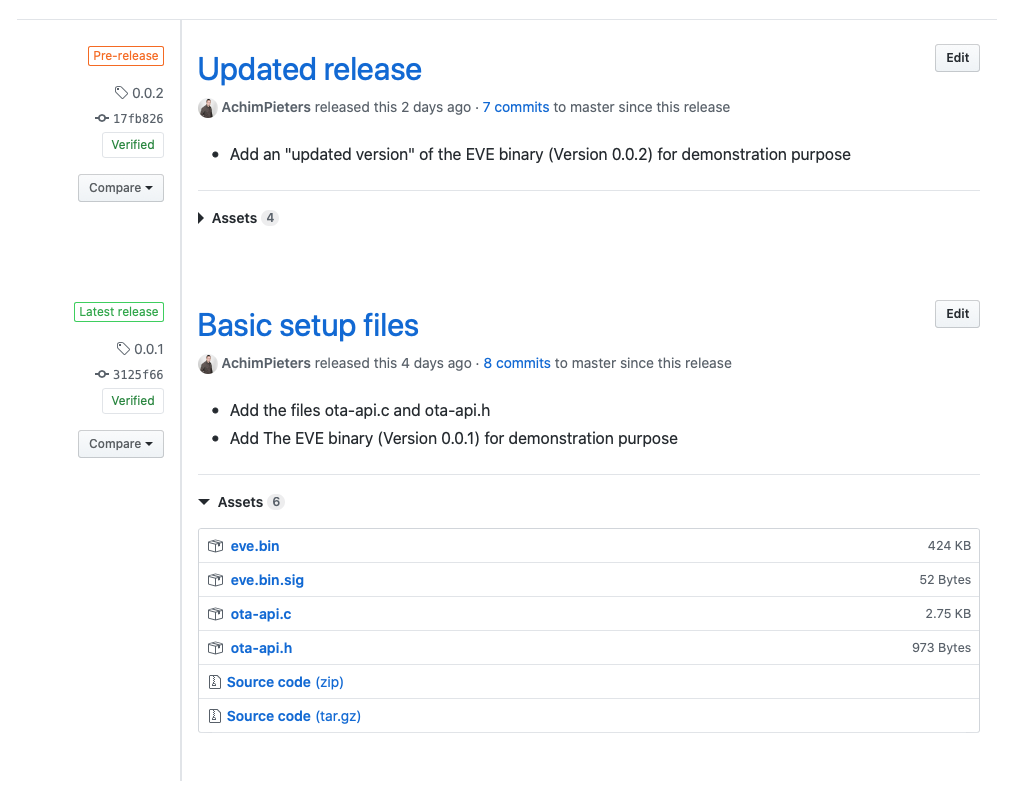
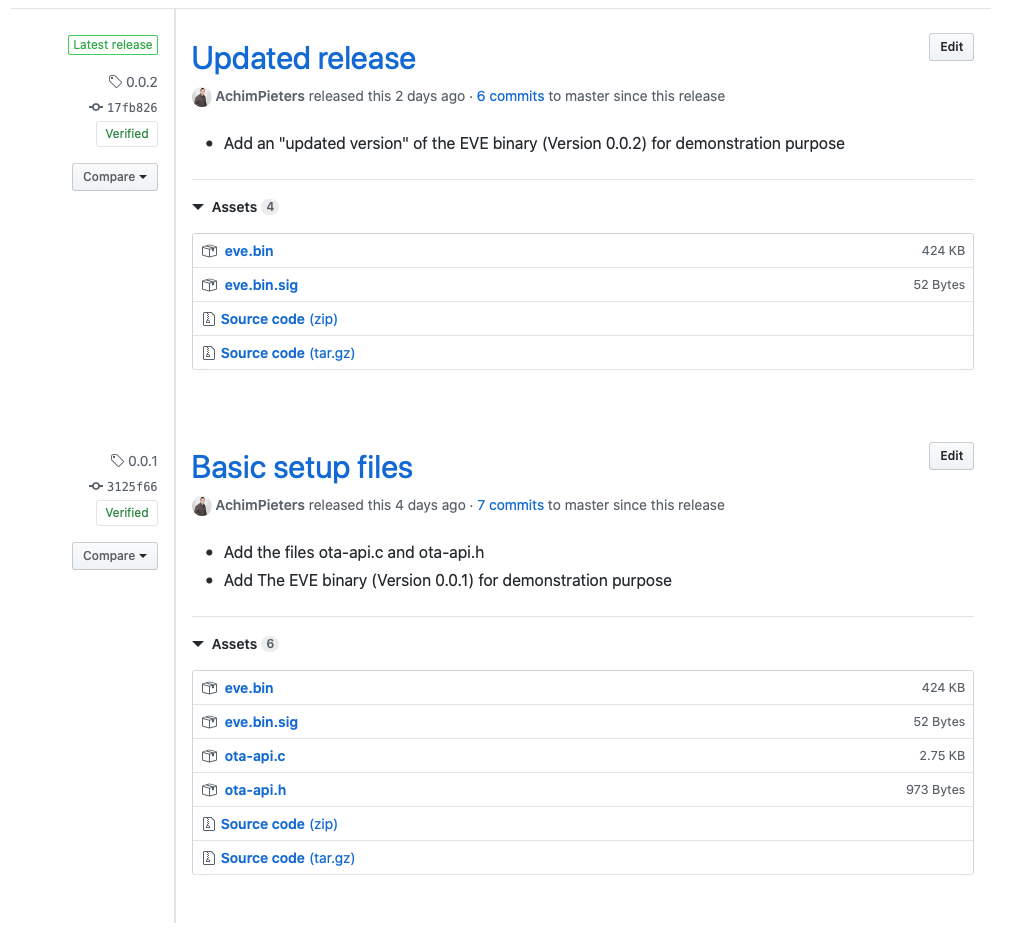
Assuming that you have already made one or more devices, I assume that you know how to install your ESP module and connect it to HomeKit, if not then you should start here first. For test propose I have setup a GitHub repository with 2 bin versions eg. version 0.0.1 and 0.0.2. Version 0.0.1 is Latest released and is used to install your ESP module. Version 0.0.2 is setup as Pre-release. When my ESP module is installed I will set version 0.0.2 to a released version and toggle the update button in the Eve App. Now when everything works well it updates the firmware from 0.0.1 to 0.0.2.
The test
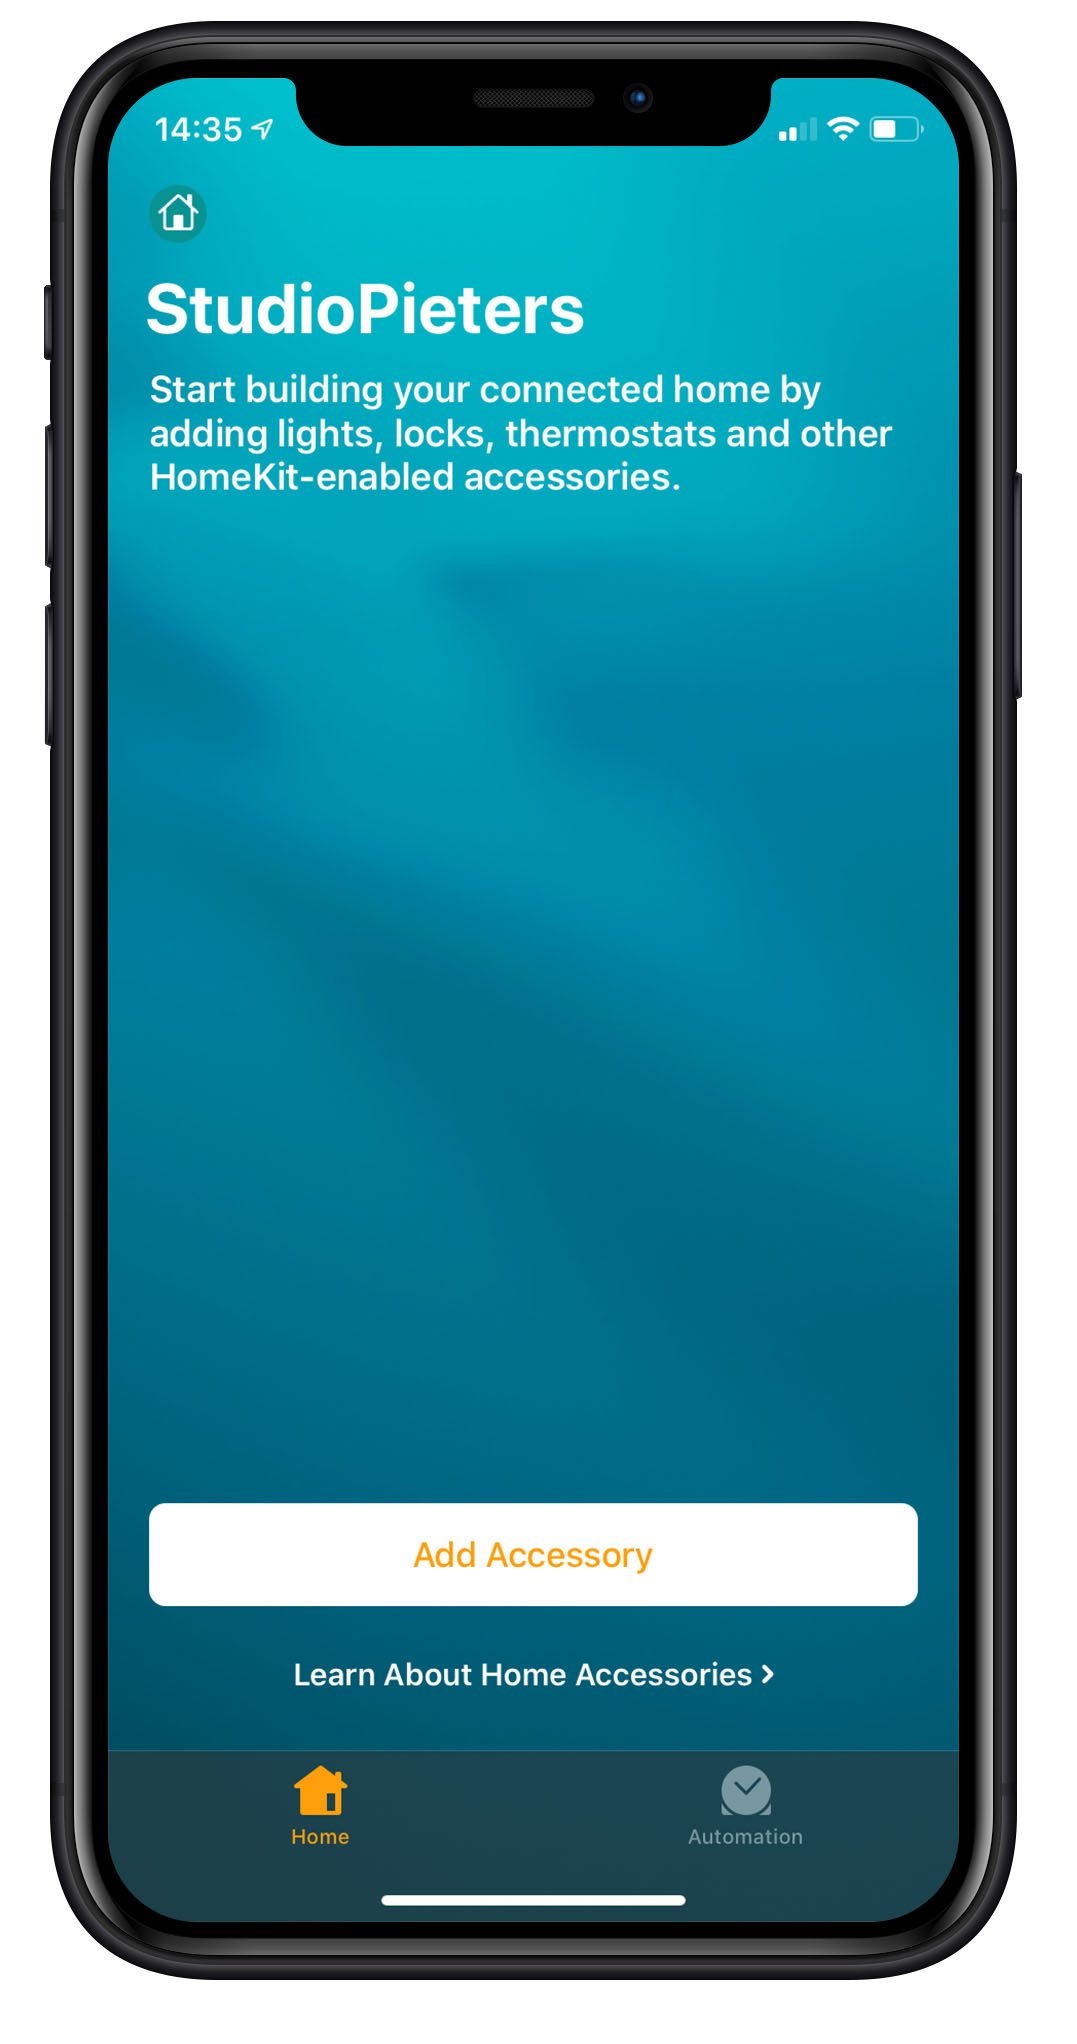
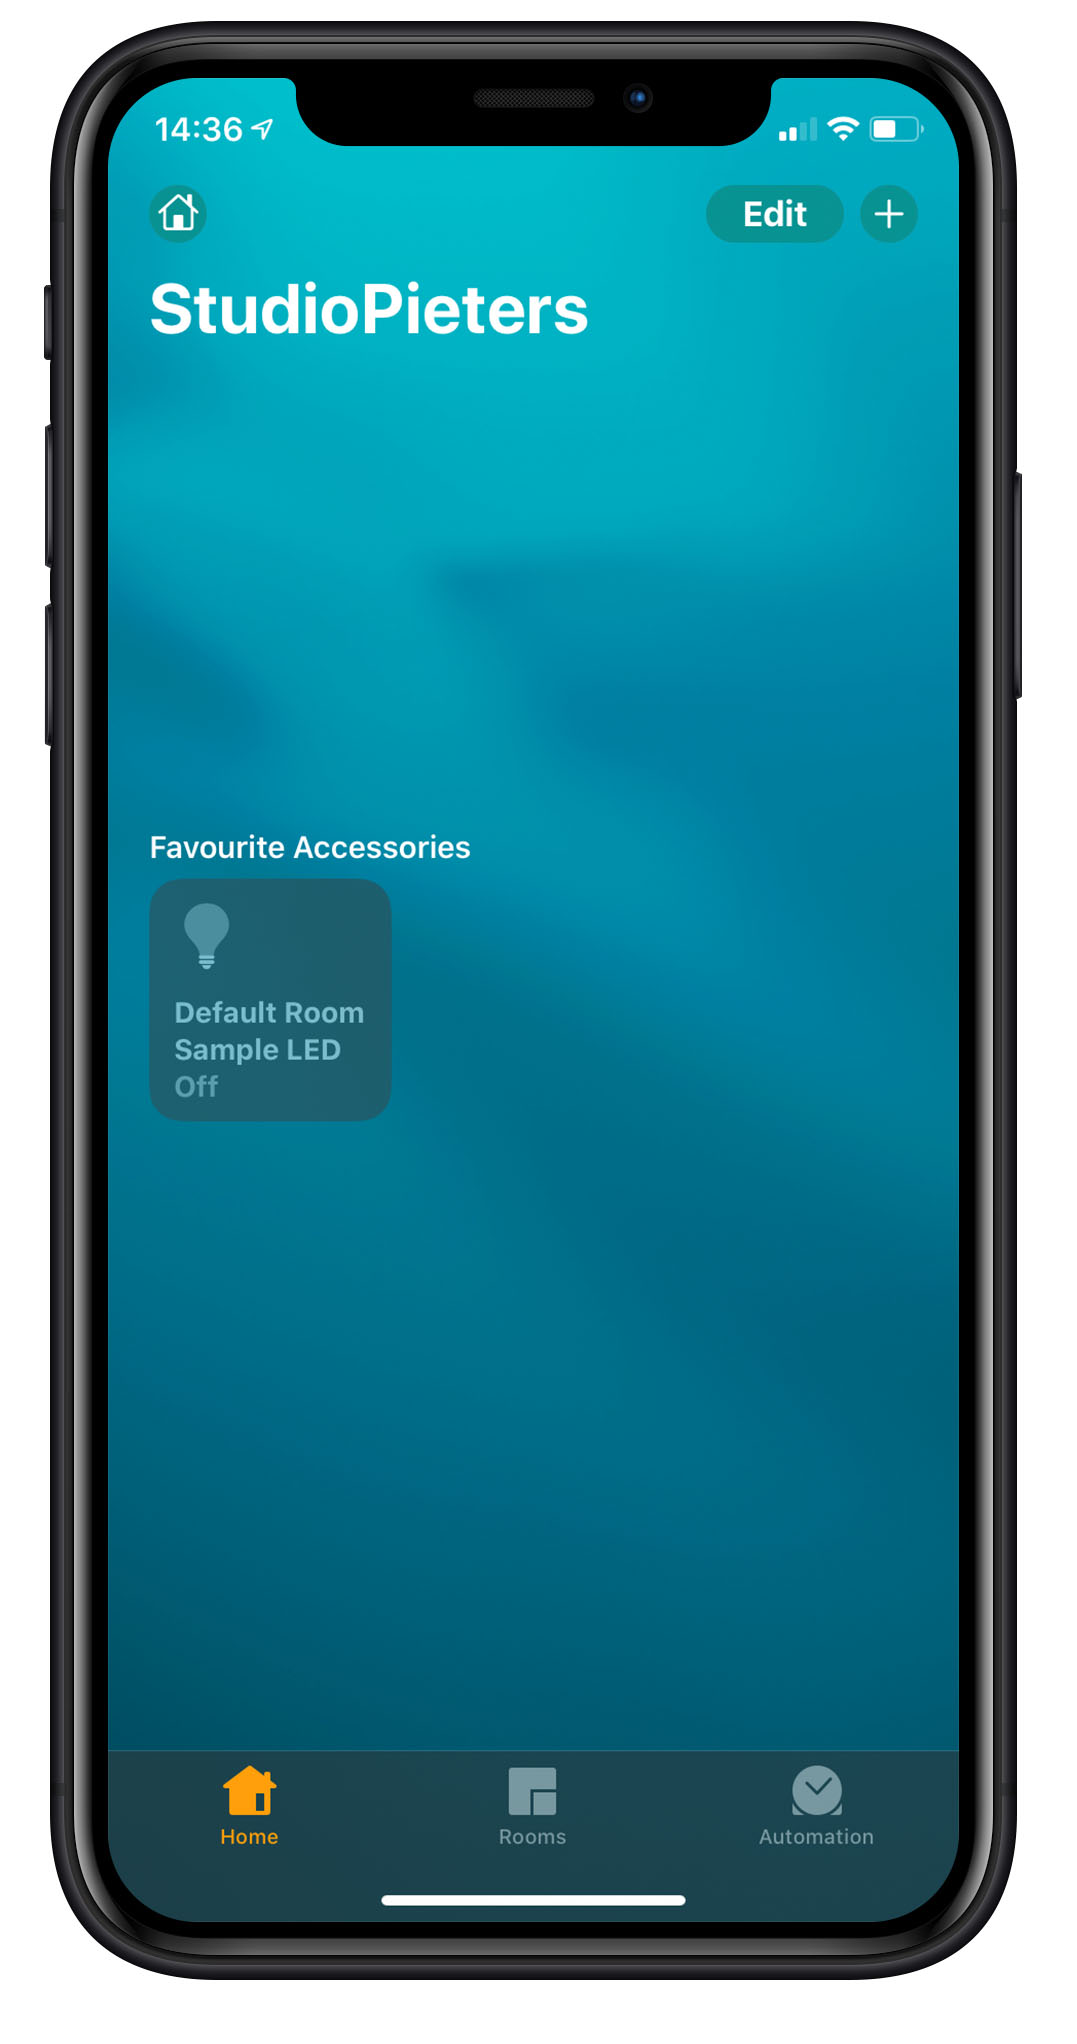
At first we are going to add our new made accessory with EVE Firmware update capability. Click Add Accessory to add you device.
Thes scan the QR-Code for more information about ESP HomeKit QR-Code look here.
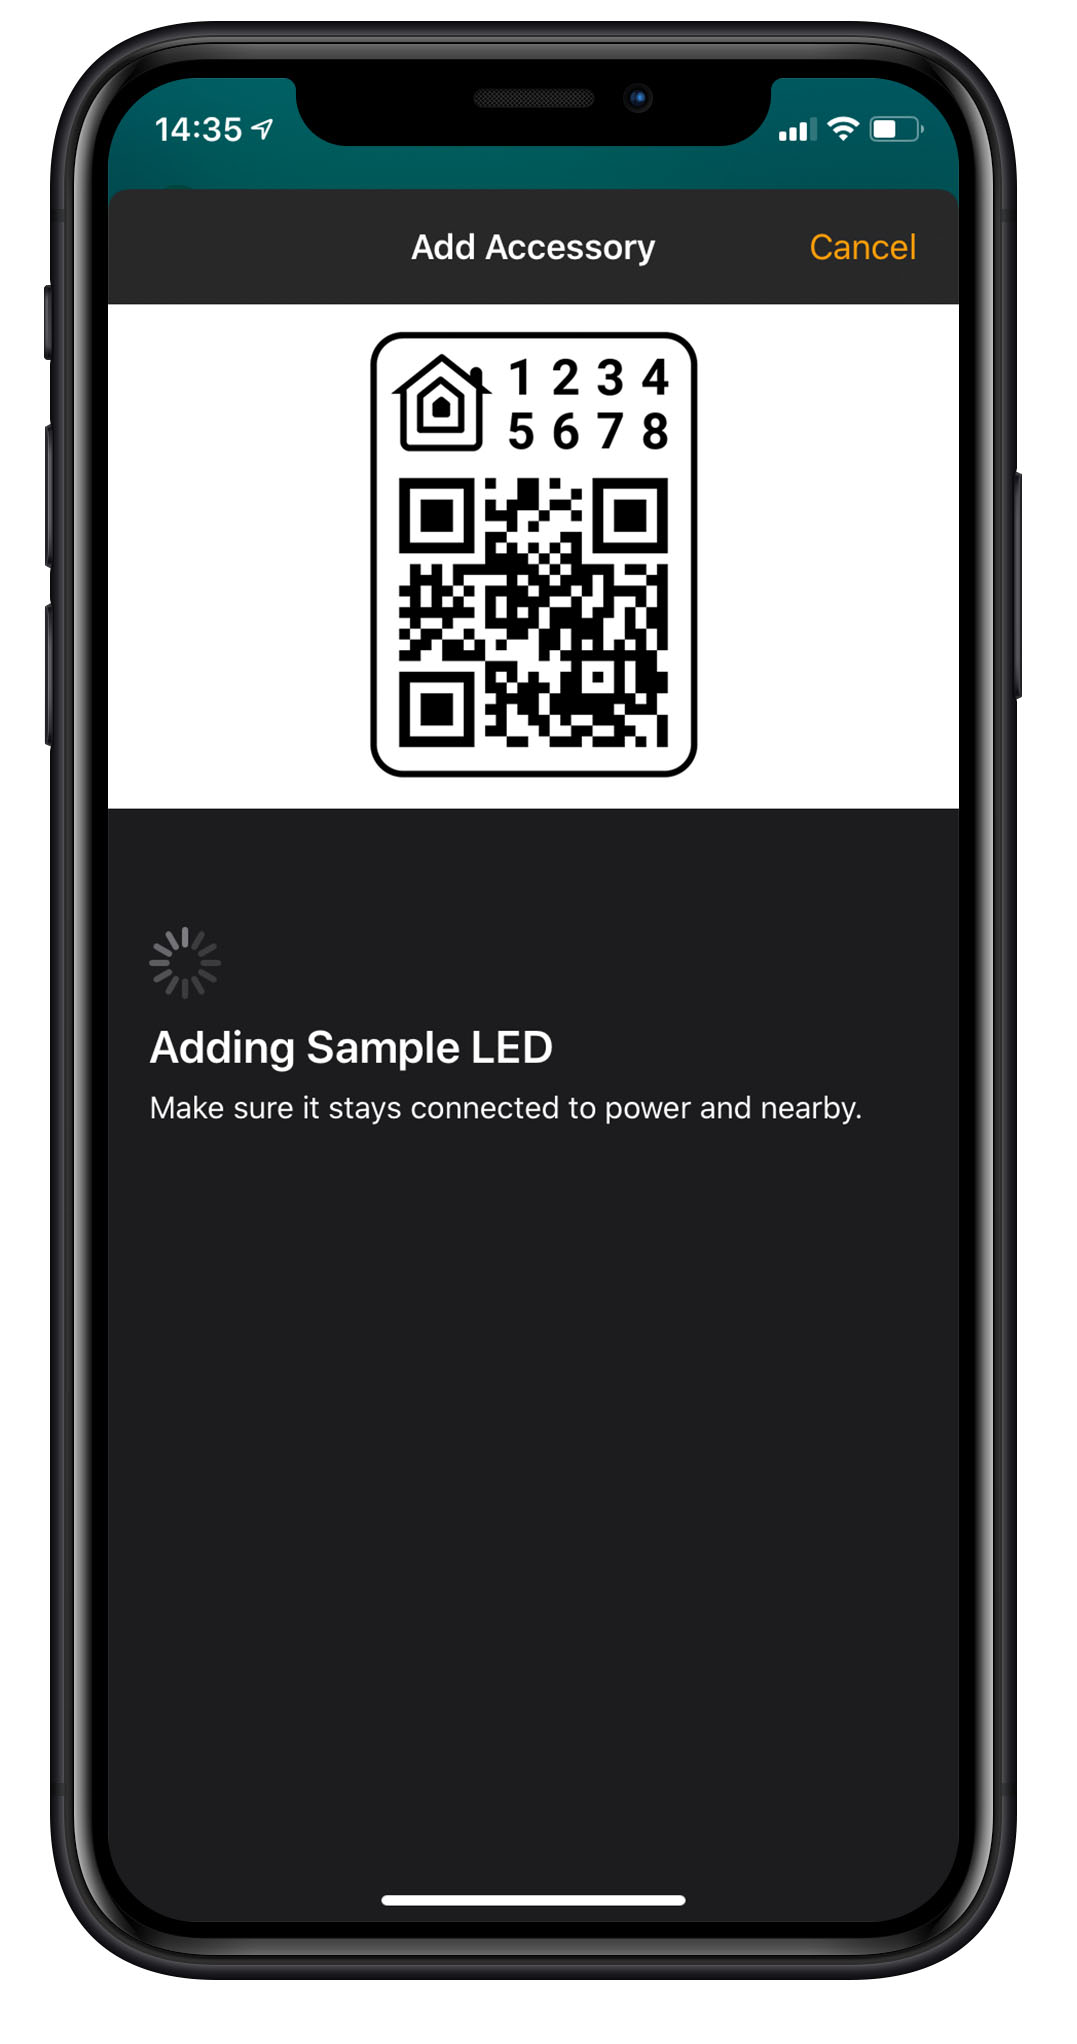
Then you will see that HomeKit tase found your device and is connected successfully, Click Next.
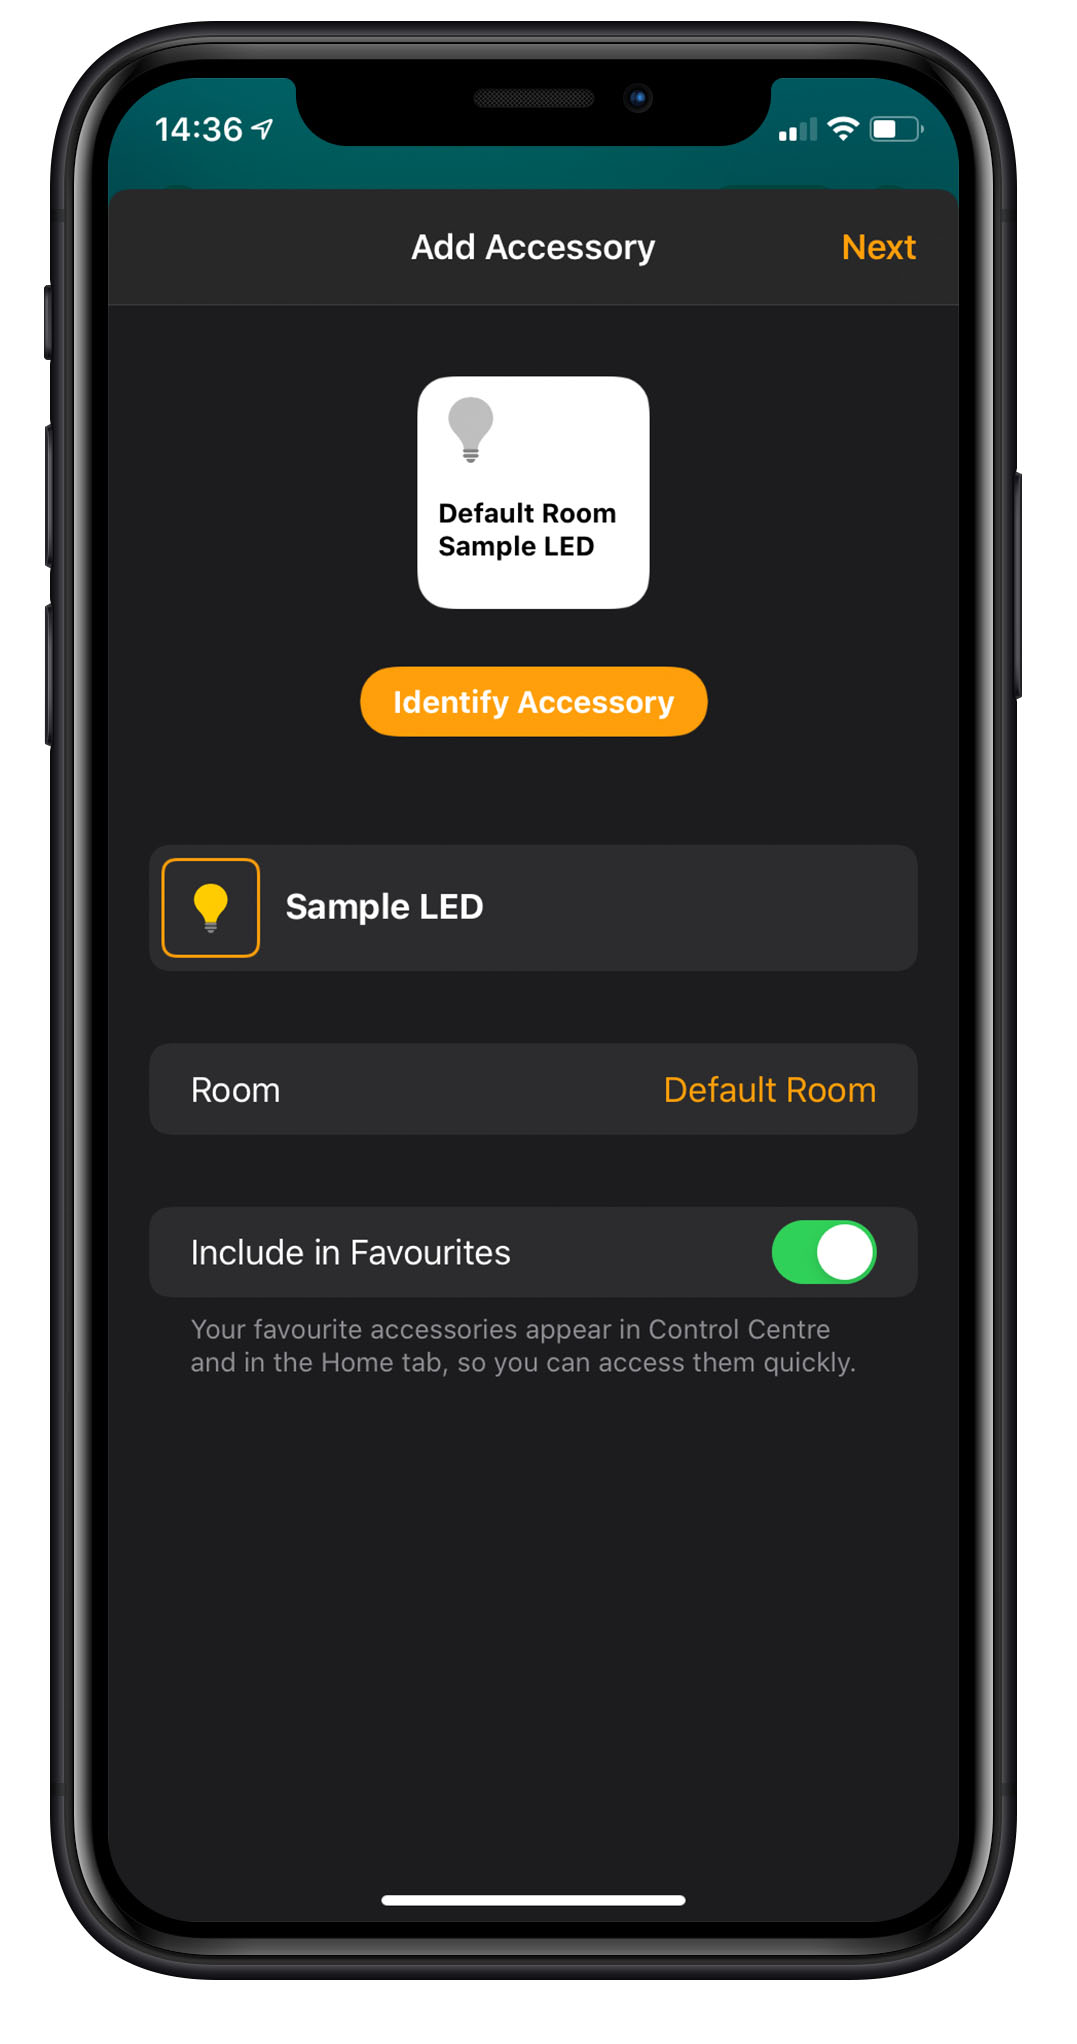
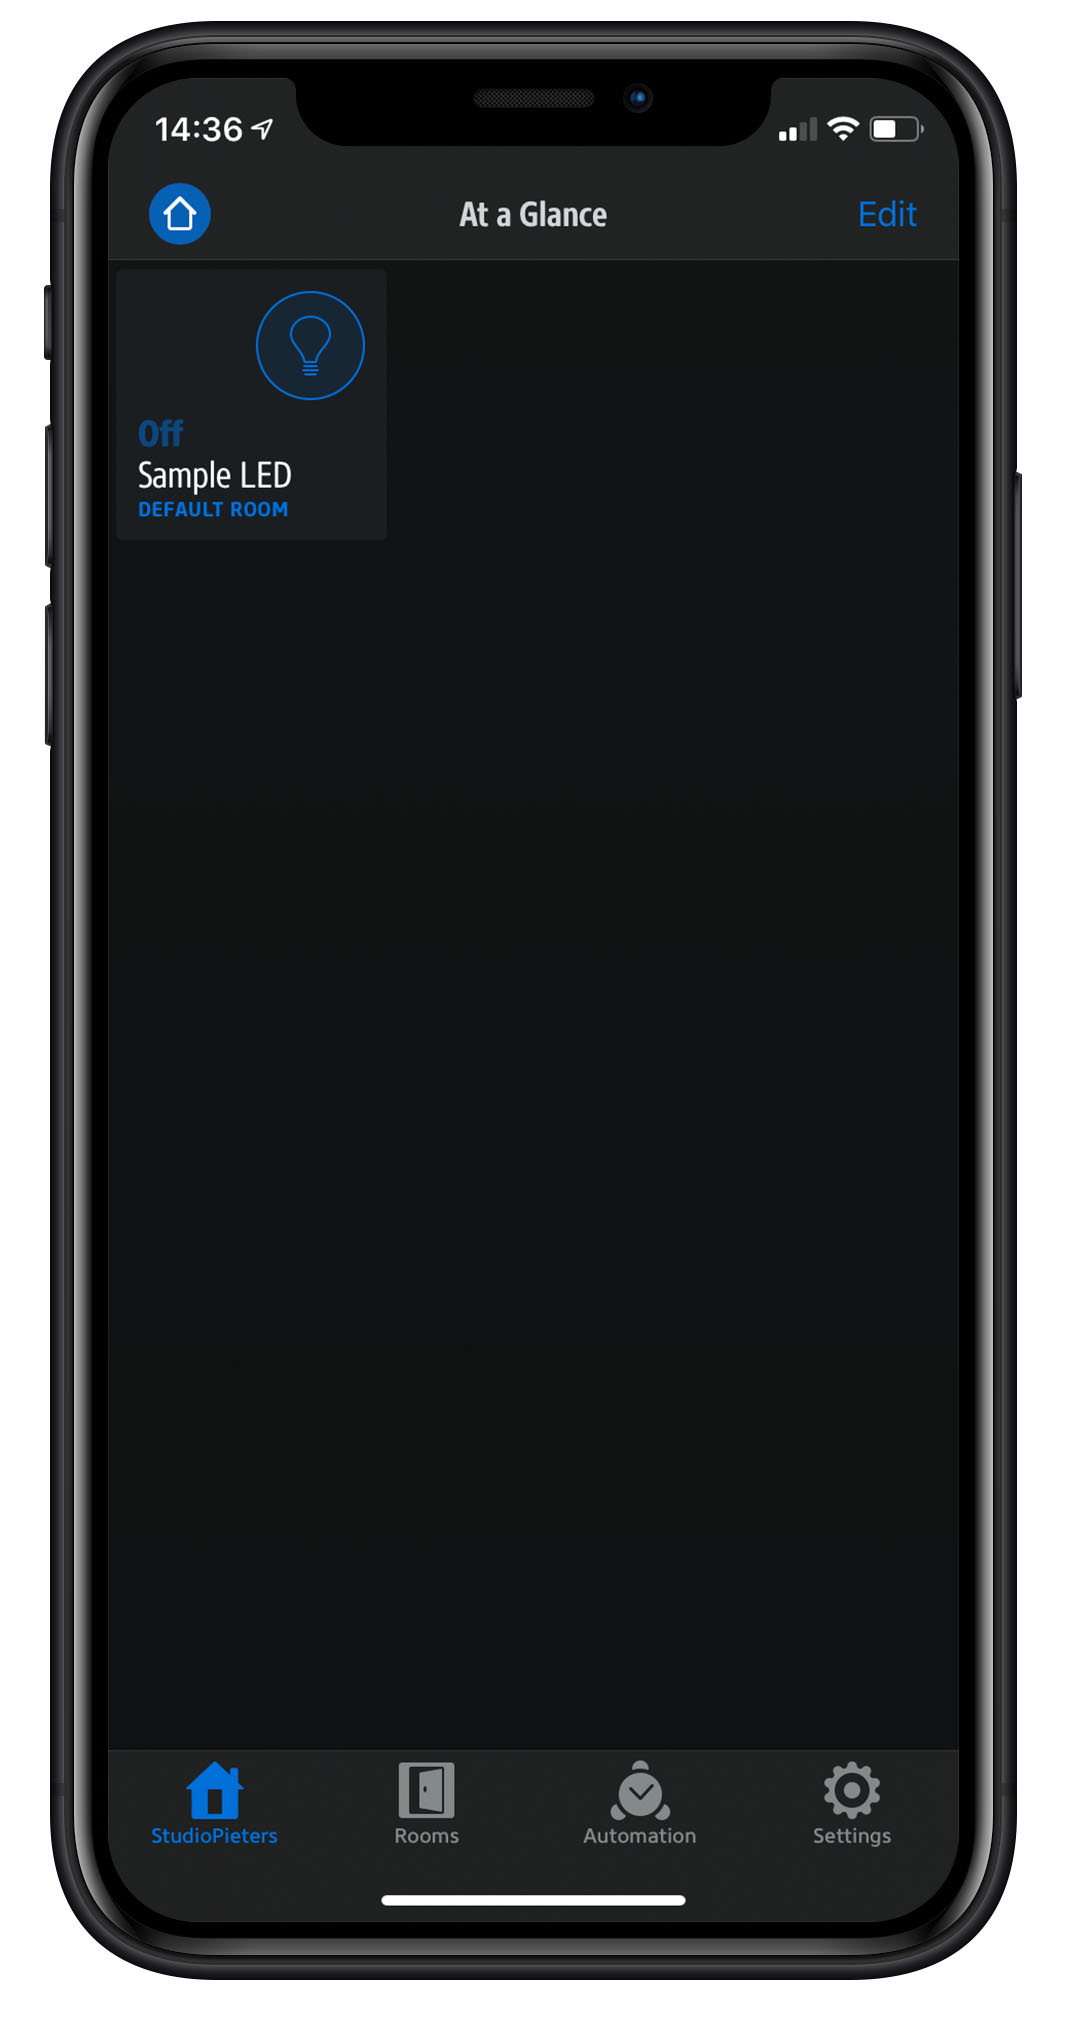
Ik will show you your new added accessory in your default room, select your accessory and open it.
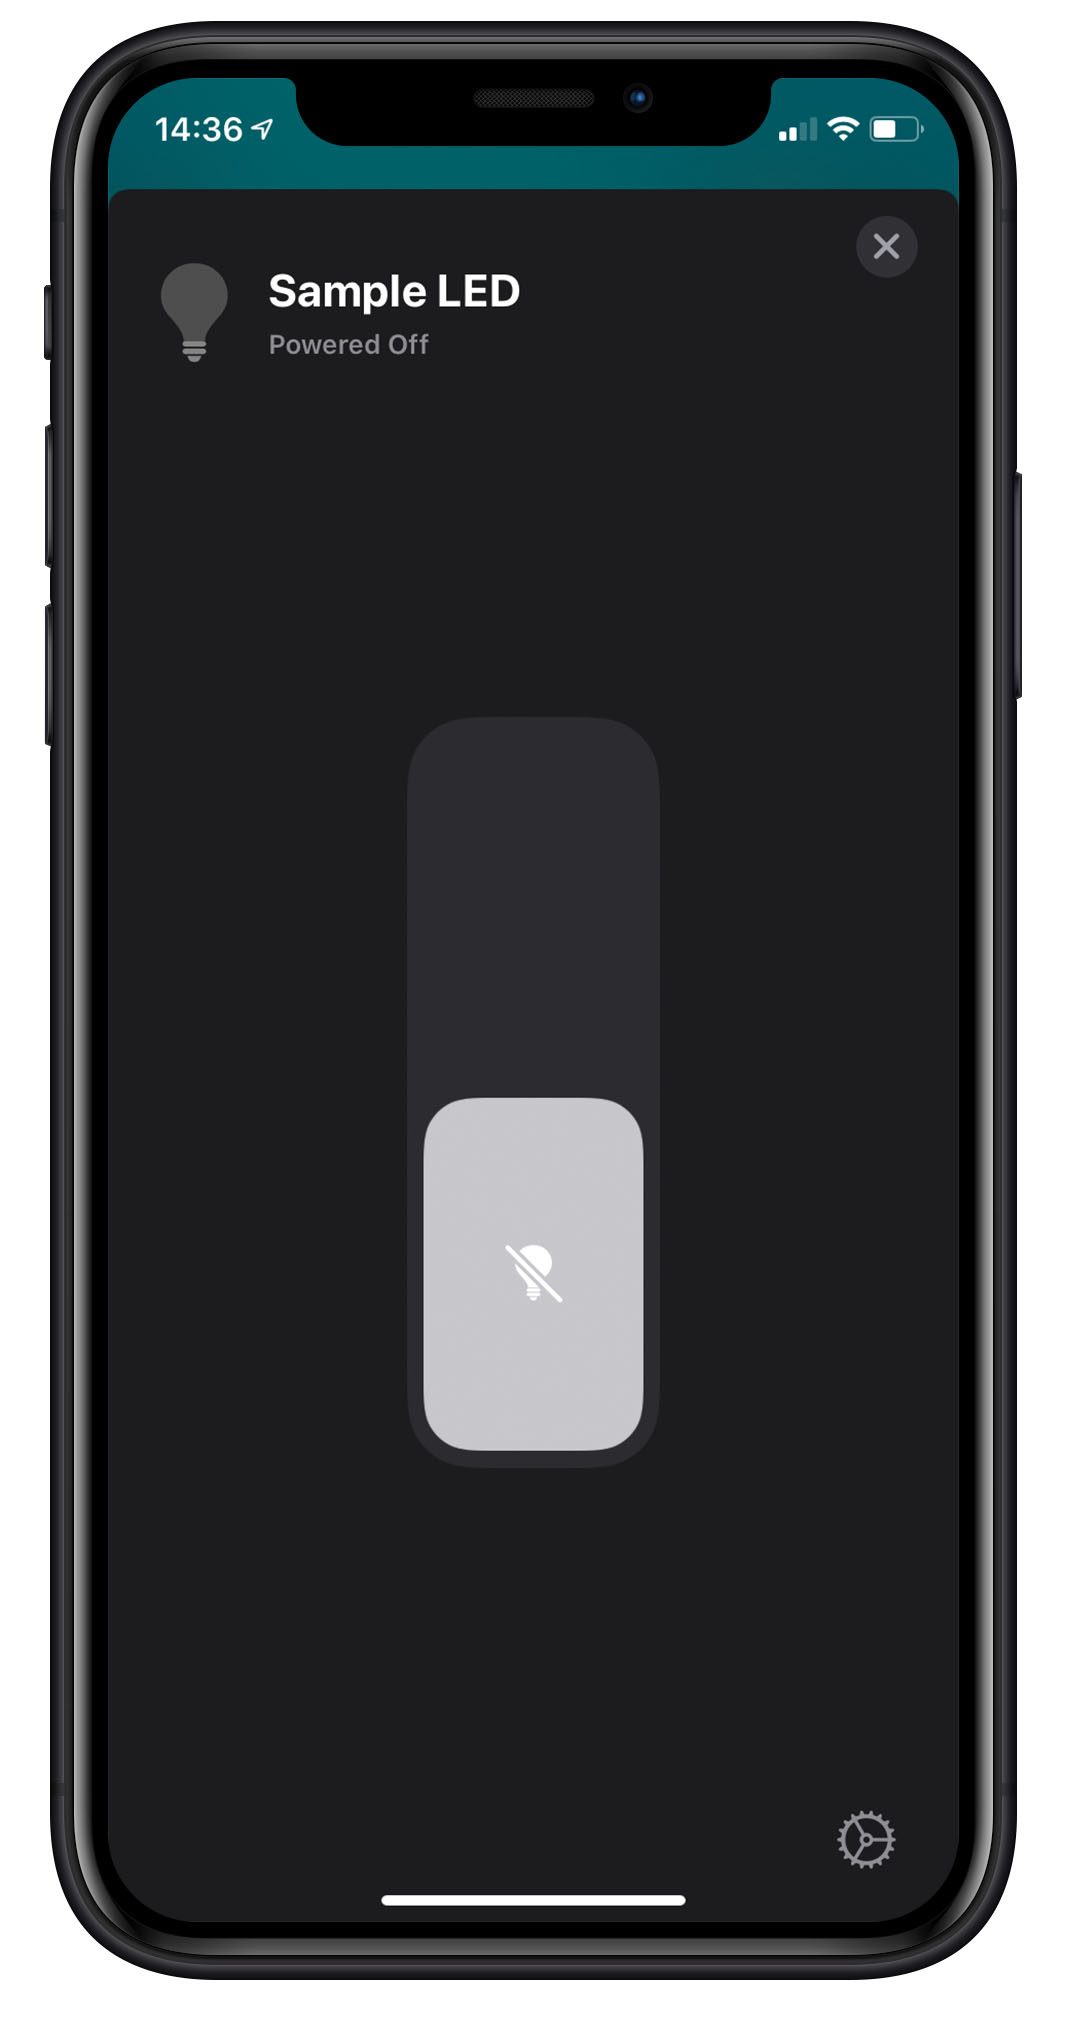
Go to the accessory information screen by tapping the gear icon in the lower right corner.
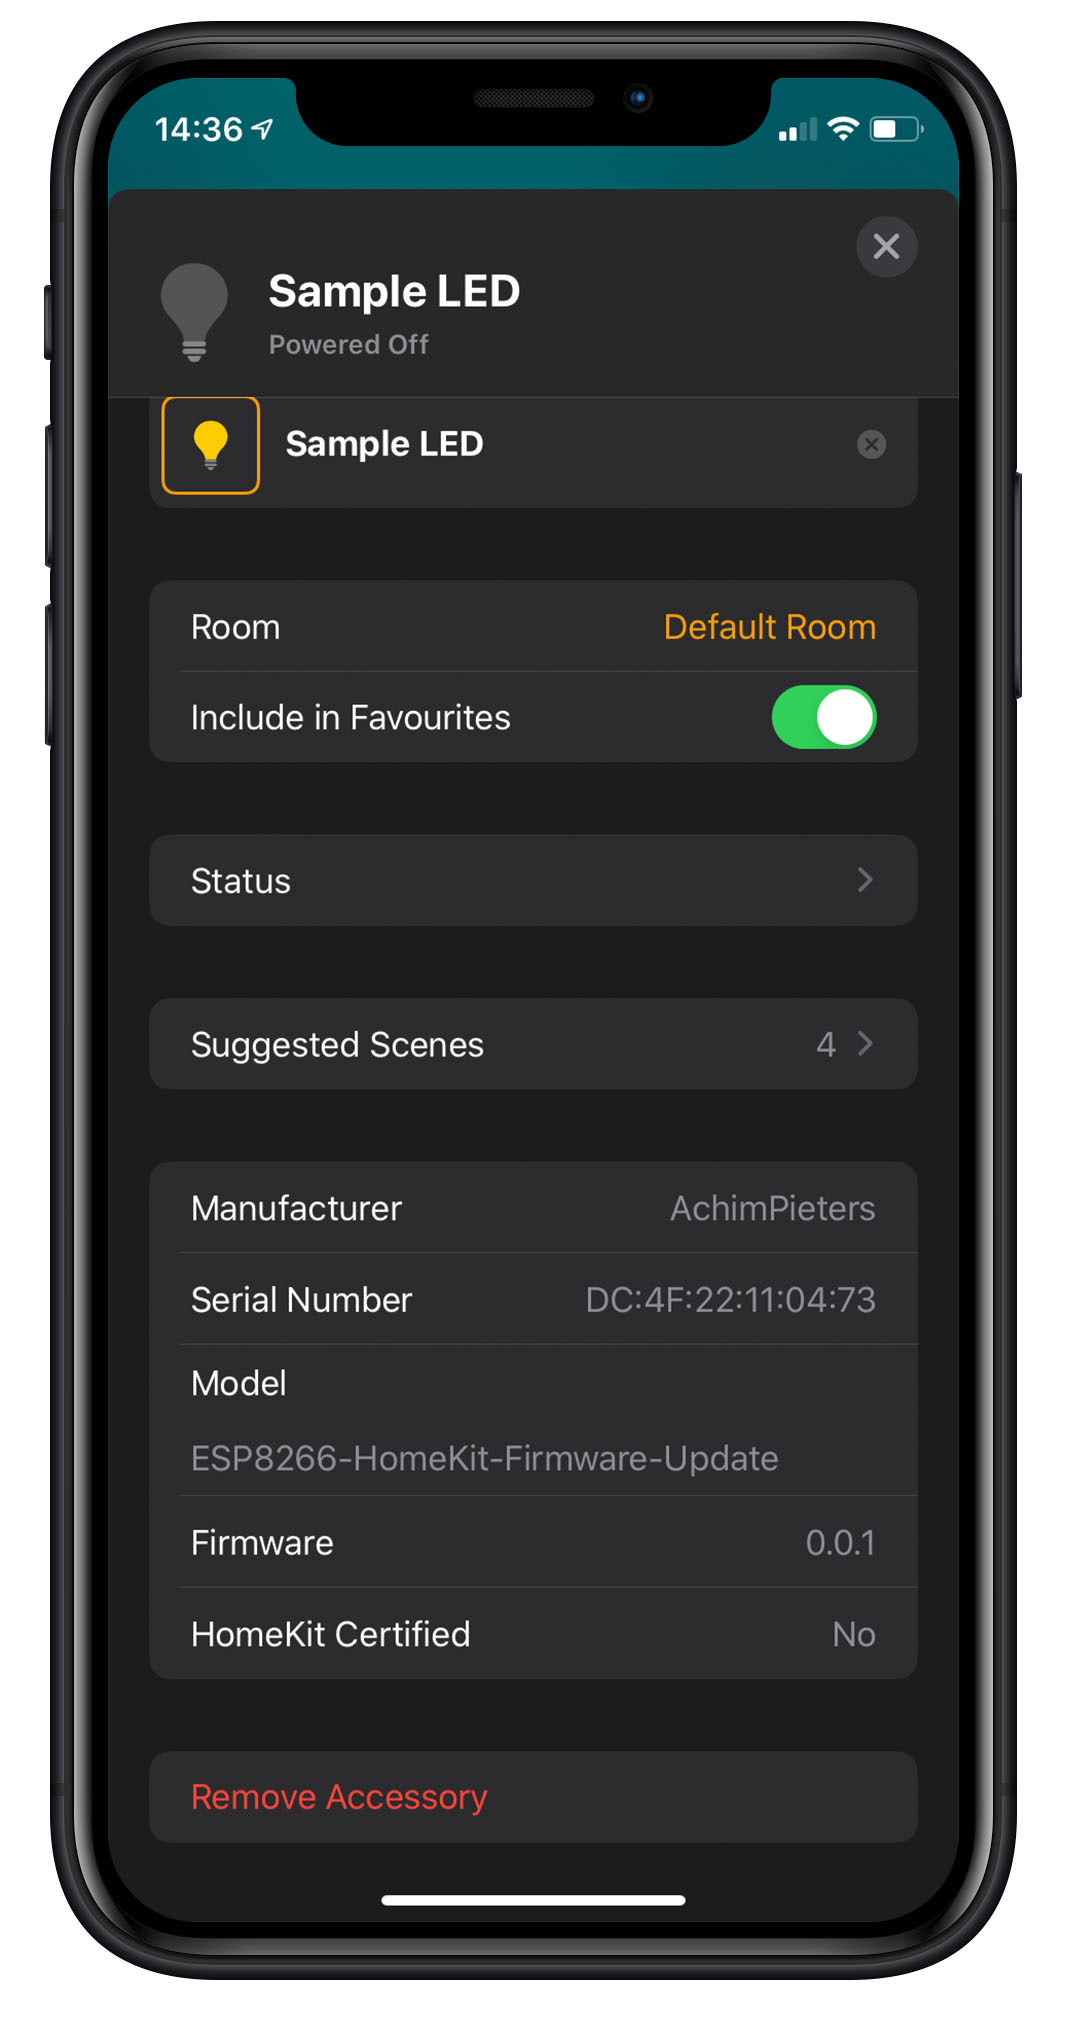
Her you see all information about your newly adde device. As you can see are some line file with information form my git repository.
- Manufacturer: Name of the Git Owner
- Serial Number: Is the Mac address from your ESP module.
- Model: Is the name of the Git repository
- Firmware: This is the release number af the installed version that is release at this moment.
Now it’s time to Release our version 0.0.2 that we placed as a Pre-release on our git. Open your GitHub page and go to release 0.0.2. Remove The tick at This is a pre-release, and the click Update release.
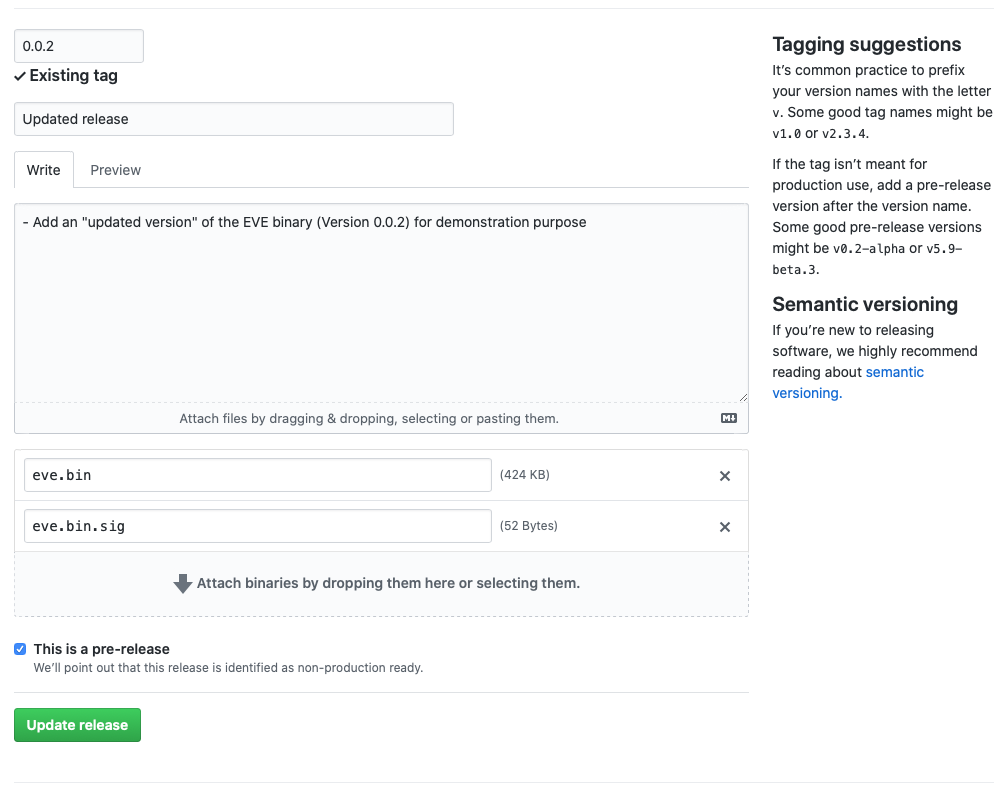
Now you will see that 0.0.2 is no longer a pre-release, but turned into the Latest release.
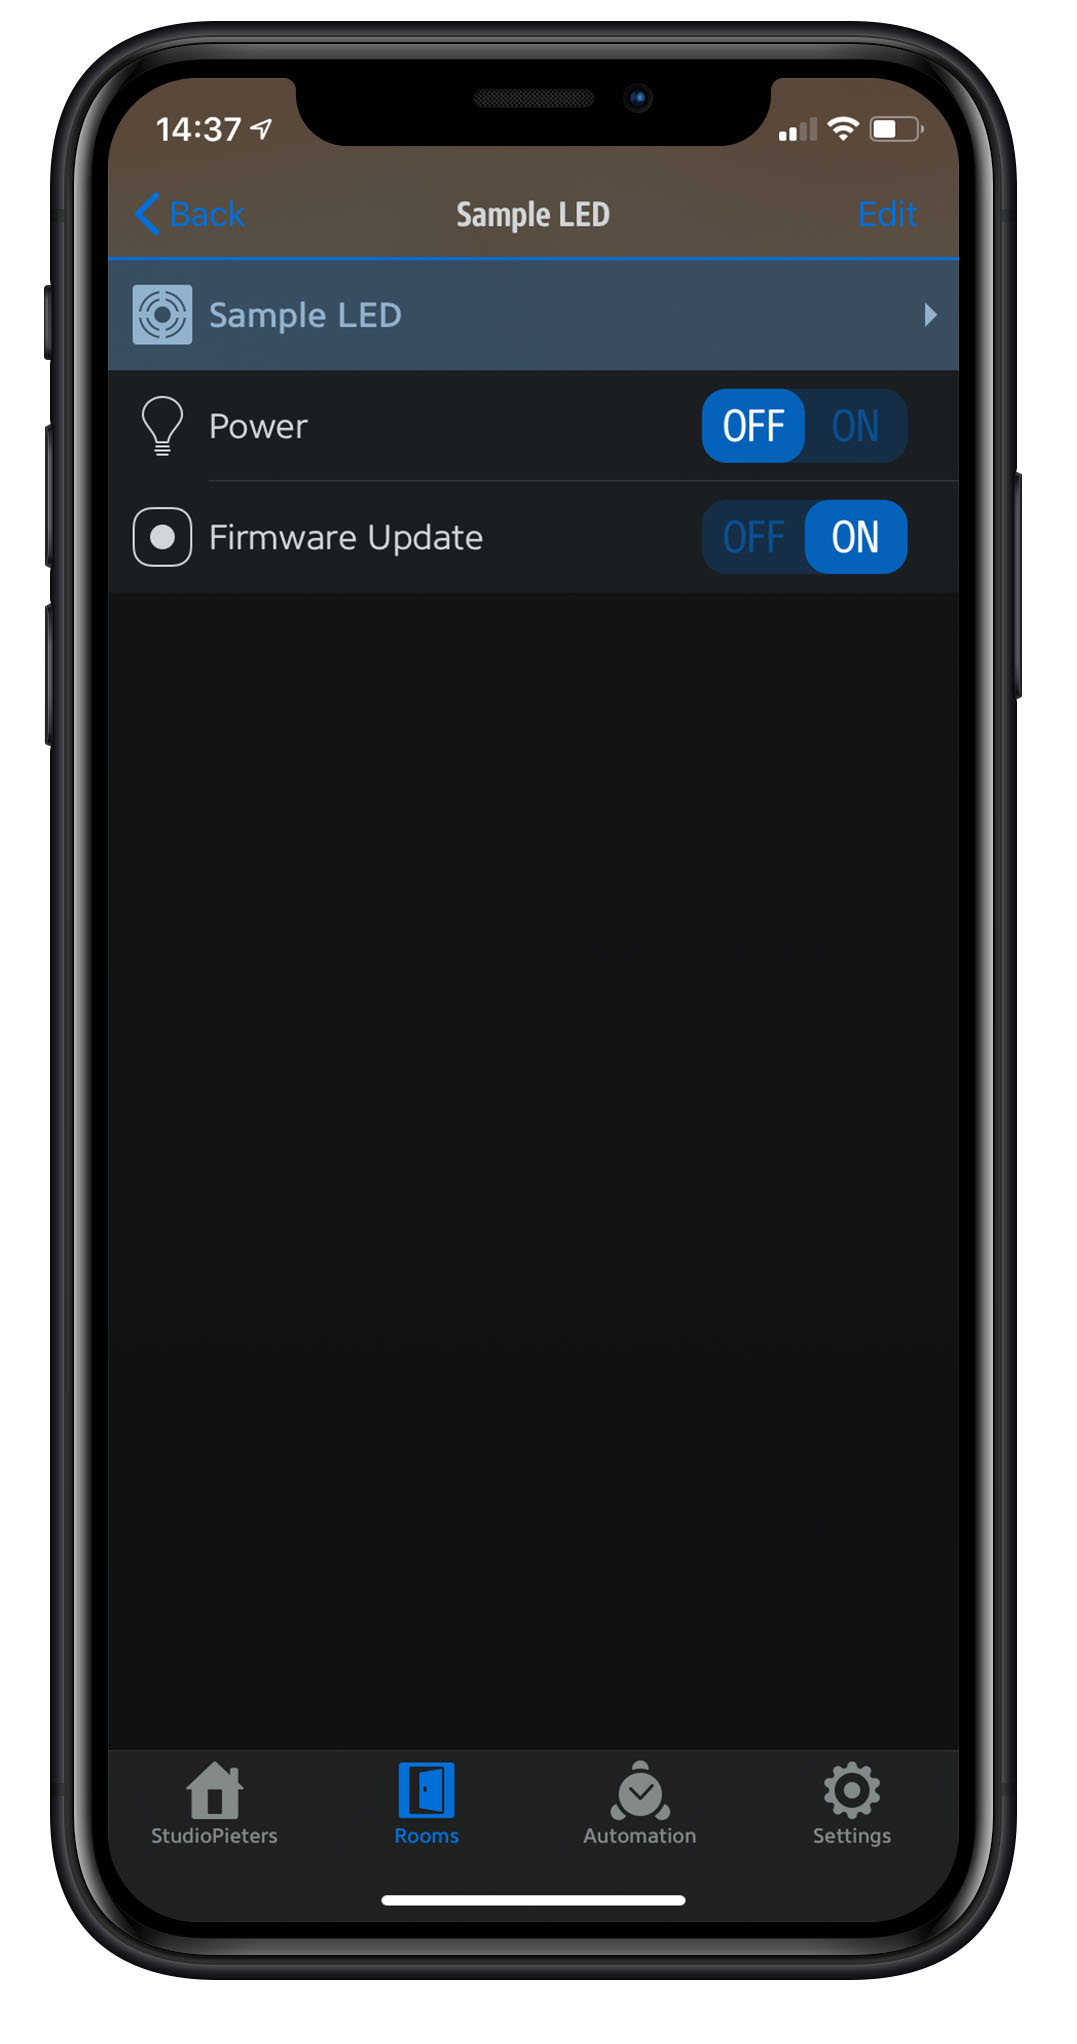
Open your previous installed EVE app. Here also you will see your added accessory just like in HomeKit. Select it to see the accessory properties.
Here you will see a option called Firmware Update, for whom used the EVE app before will notice this is a new feature.
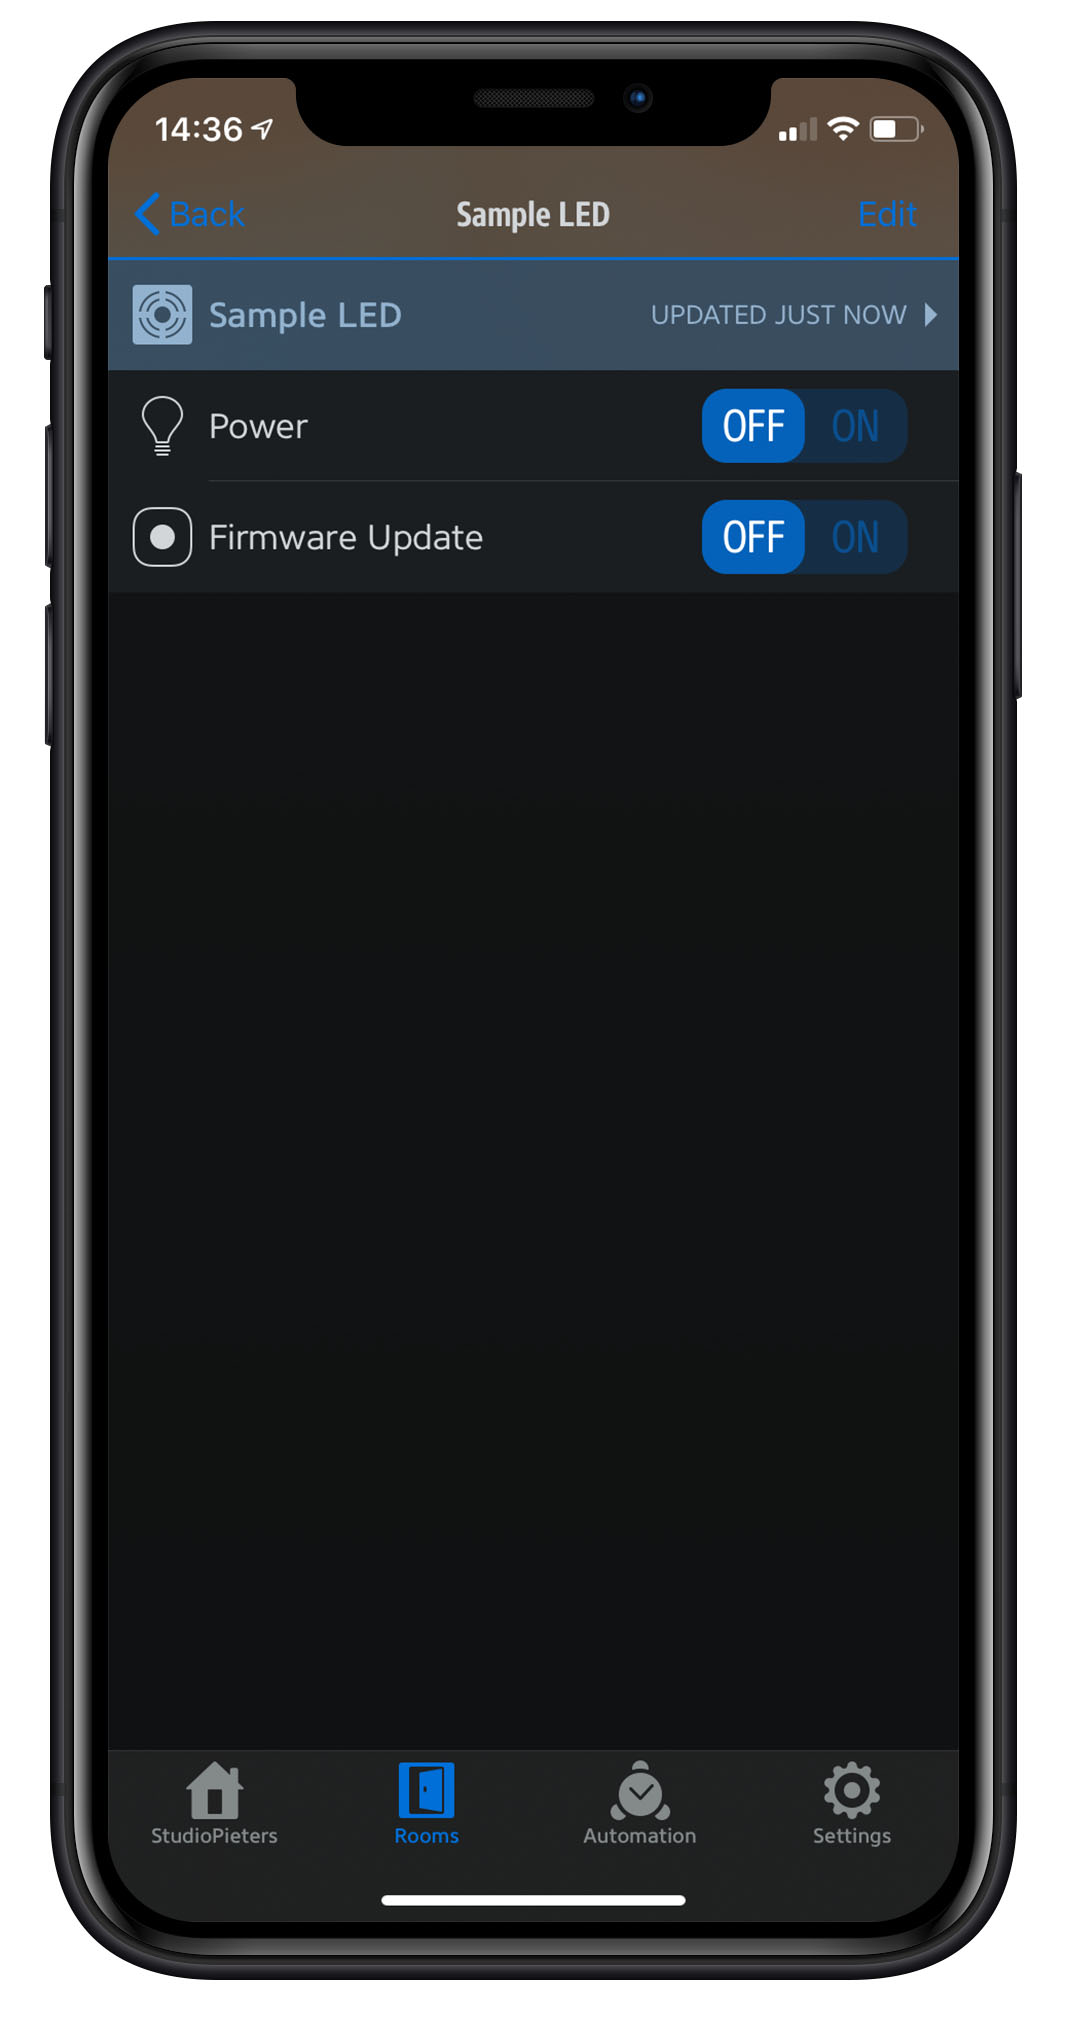
Turn ON the Firmware Update option and wait a few minutes. You will notice when the Firmware update is completed the ON button will automatically turn back to OFF.
Then close the Eve app and open you HomeKit app, once again go to the accessory information screen. As you can see the firmware version is updated to version 0.0.2!


![]()
DO YOU HAVE ANY QUESTIONS? LEAVE A COMMENT DOWN HERE.
Note: To produce and sell HomeKit compatible accessories, your company need to be certified for that (https://developer.apple.com/homekit/, If you’re interested in developing or manufacturing a HomeKit accessory that will be distributed or sold, your company must enroll in the MFi Program.) Espressif have their implementation of HomeKit framework, but it will give you it only if you have MFi certification (notice this text at the bottom of page you mentioned: Please note that the Espressif HomeKit SDK is available to MFi licensees only, and you need to provide the Account Number for verification purposes when requesting the SDK.).This project is a non-commercial implementation of HAP protocol, not meant for commercial use.
REFERENCE
Maxim Kulkin, esp-homekit-demo (2019), Demo of Apple HomeKit accessory server library , https://github.com/maximkulkin/esp-homekit-demo Paul Sokolovsky, esp-open-sdk (2019), Free and open (as much as possible) integrated SDK for ESP8266/ESP8285 chips, https://github.com/pfalcon/esp-open-sdk Espressif Systems, esptool (2019), ESP8266 and ESP32 serial bootloader utility, https://github.com/espressif/esptool HomeACcessoryKid, life-cycle-manager (2019), Initial install, WiFi settings and over the air firmware upgrades for any esp-open-rtos repository on GitHub, https://github.com/HomeACcessoryKid/life-cycle-manager evehome, eve app (2019), Eve works with all HomeKit-enabled accessories. See your home at a glance., https://www.evehome.com/en/eve-app