In my previous blog here I tested the ESP HomeKit Software Development Kit. I am so enthusiastic about this Software Development Kit, that I going to write a few blogs about this genius software. In each Blog I will address a other accessory that you can add to your HomeKit without the need of a bridge. After making the ESP8266 – HomeKit Thermostat it’s time for a ESP8266 – HomeKit Air Quality Sensor.
HomeKit Air Quality Sensor
Indoor air can be five times more polluted than outdoors. But with ESP8266 – HomeKit Air Quality Sensor – you and your loved ones can breathe clean, feel safe, and live healthy. Every day. Furniture, appliances, toys. Cooking, grooming, cleaning. Almost everything produces VOCs – volatile organic compounds – even humans. When contained indoors, VOC emissions quickly rise to harmful levels. With the ESP8266 – HomeKit Air Quality Sensor, you’re always conscious of VOC accumulation, and inspired to keep your air fresh.
Track temperature
High temperatures drain your energy and make it tough to focus and sleep. Low temperatures raise blood pressure and heart rate, plus boost vulnerability to illness. Whether you’re heating or cooling, the ESP8266 – HomeKit Air Quality Sensor will help you keep the perfect balance.
Monitor humidity
Low humidity triggers throat, eye, and skin conditions, while high humidity increases the risk of allergies and asthma. Both extremes damage electronics and furnishings. With the ESP8266 – HomeKit Air Quality Sensor, you’ll know whether to activate your humidifier, dehumidifier, or extractor fan.

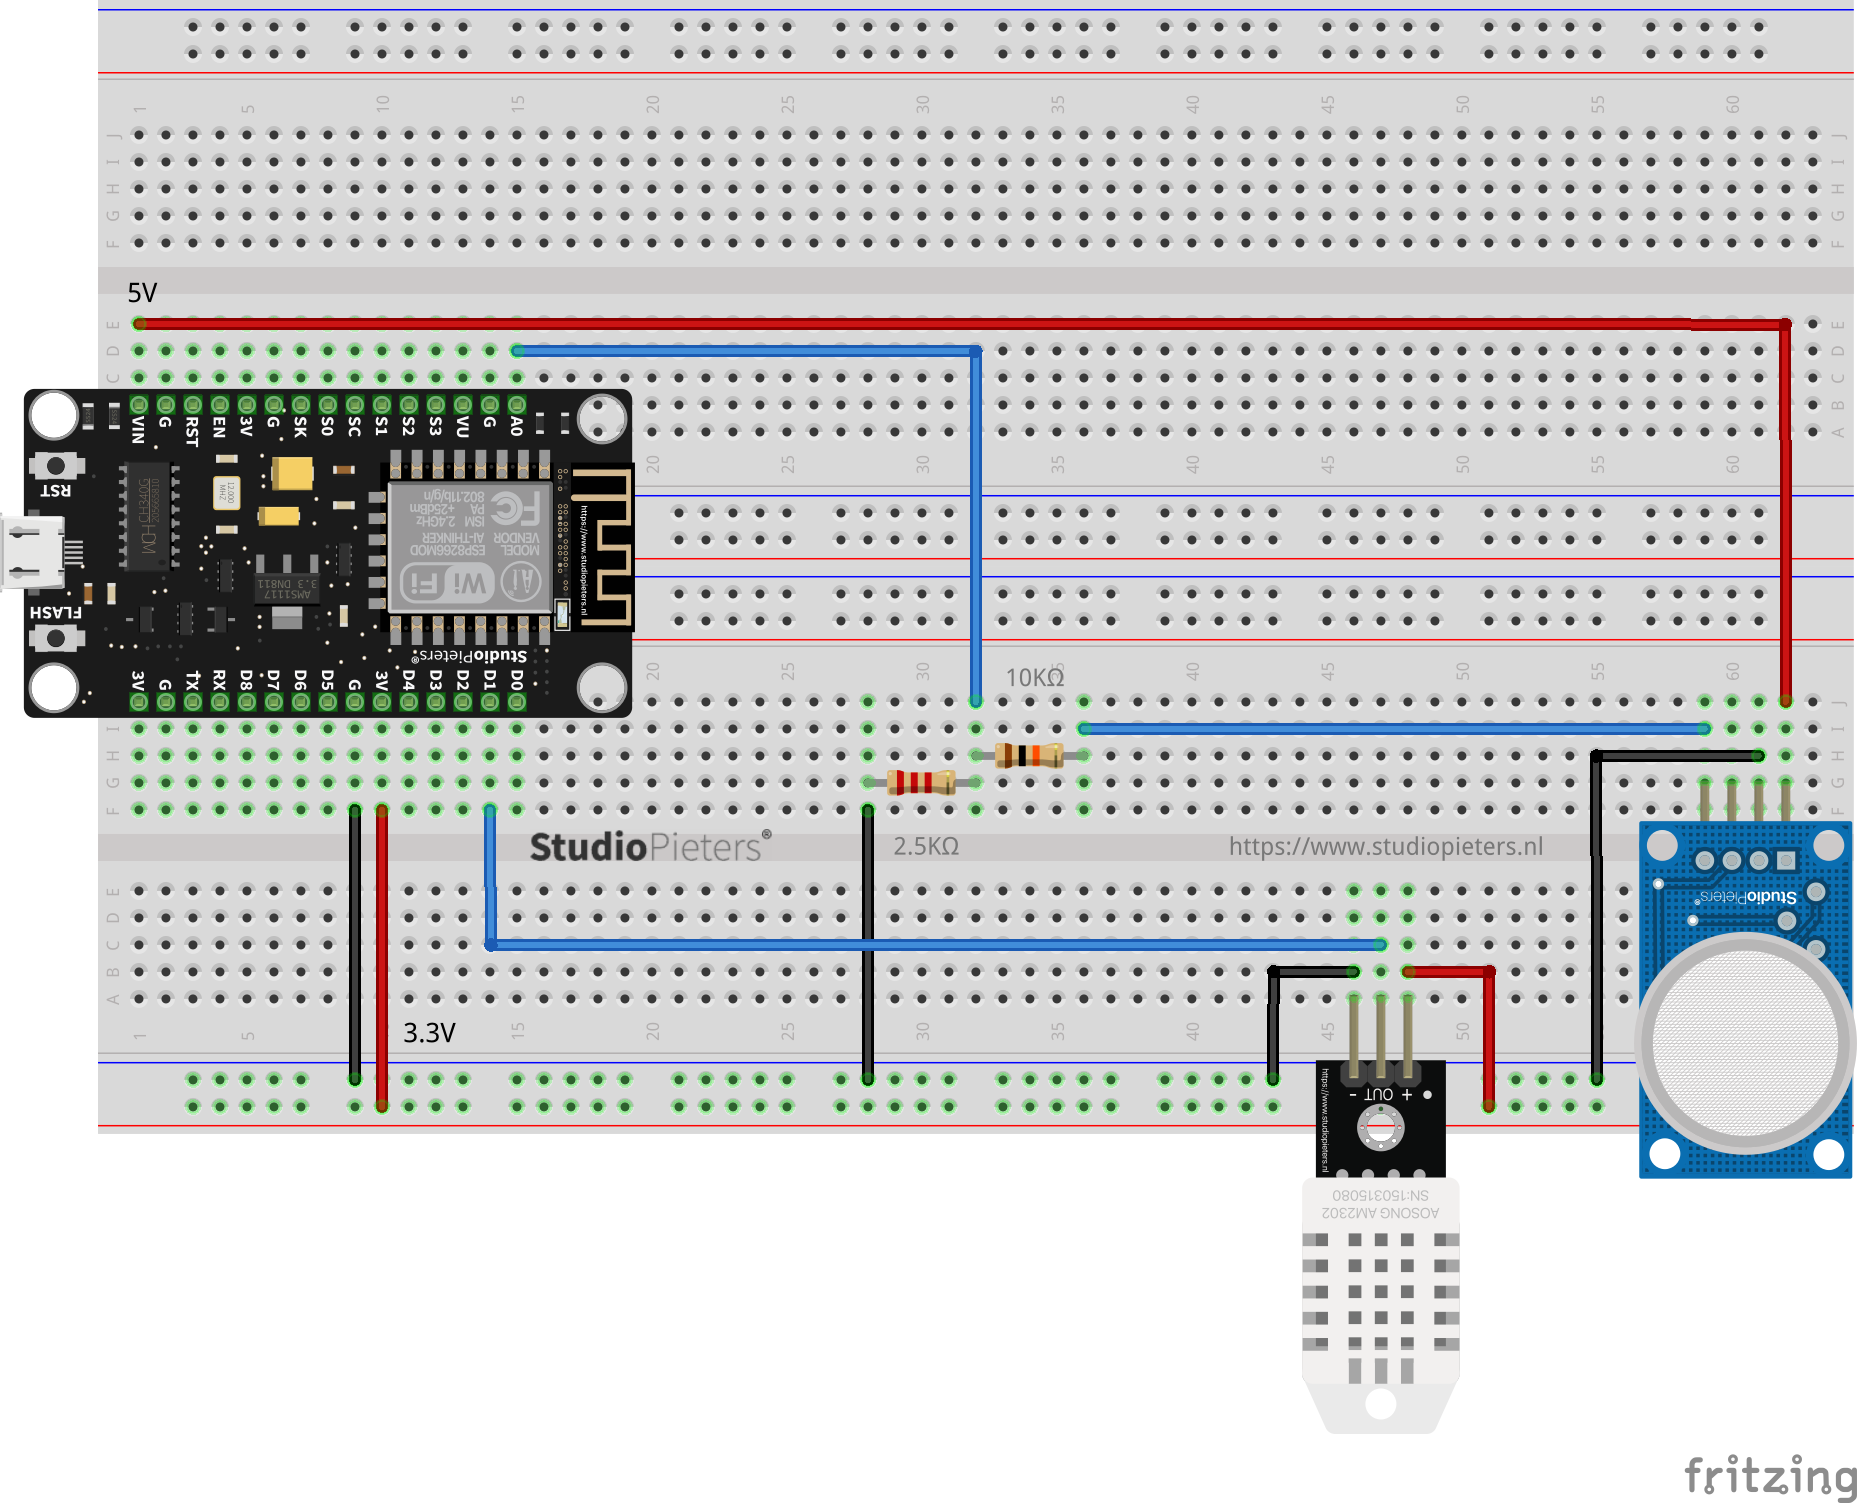
Hardware Preparation
The ESP8266 – HomeKit Air Quality Sensor uses an MQ135 to sense air quality, and a DHT22 for temperature and humidity to help make the sensor more accurate.
The ESP8266 – HomeKit Air Quality Sensor is capable of providing:
- Air Quality PM10 density
- CO Carbon monoxide level (custom characteristic only visbile in Eve)
- LPG (custom characteristic only visbile in Eve)
- CH4 Methane (custom characteristic only visbile in Eve)
- NR+4 Ammonium (custom characteristic only visbile in Eve)

It cannot currently provide:
- O3 Ozone density
- NO2 Nitrogen dioxide
- SO2 Sulphur dioxide density
- PM2.5 density
NOTE: Before you can use the sensor, it has to be calibrated. For this, connect the sensor to your circuit and leave it powered on for 12-24 h to burn it in1. When you are connecting the MQ135 Sensor, you need to add a voltage divider between the sensor and the analog input to scale form 5v to 1v, to get the correct readings.2
1 Air Quality Standards
Humans can be adversely affected by exposure to air pollutants in ambient air. In response, the European Union has developed an extensive body of legislation which establishes health based standards and objectives for a number of pollutants present in the air. These standards and objectives are summarised here. These apply over differing periods of time because the observed health impacts associated with the various pollutants occur over different exposure times.
2 Voltage Divider
A voltage divider is a simple circuit which turns a large voltage into a smaller one. Using just two series resistors and an input voltage, we can create an output voltage that is a fraction of the input. Voltage dividers are one of the most fundamental circuits in electronics.

Software preparation
We have to install esptool.py on our Mac in order to be able to flash our ESP module. To work with esptool.py, you’ll need Python 3.9 or a newer Python installation on your system. We recommend using the latest Python version, so go to Python’s website and install it in your computer.
With Python installed, open a Terminal window and install the latest stable esptool.py release with pip:
pip install esptool
Note: with some Python installations that command may not work and you’ll receive an error. If that’s the case, try to install esptool.py with:
pip3 install esptool
python -m pip install esptool
pip2 install esptool
After installing, you will have esptool.py installed into the default Python executables directory and you should be able to run it with the command esptool.py. In your Terminal window, run the following command:
esptool.py
With esptool.py installed in your computer, you can easily flash your ESP32 or ESP8266 boards with the firmware.

ESP OS Preparation
To run our ESP HomeKit device we need to install LifeCycle Manager 2 And Open RTos.
LifeCycle Manager 2 (LCM)
Initial install, WiFi settings and over the air firmware upgrades for any ESP-open-RTos repository on GitHub.
ESP-open-RTos
A community developed open source FreeRTOS-based framework for ESP8266 WiFi-enabled microcontrollers. Intended for use in both commercial and open source projects.Originally based on, but substantially different from, the Espressif IOT RTOS SDK.
Bin Files
At first you need to download three bin files otaboot.bin, rboot.bin and blank_config.bin. The OTAboot.bin contains the Lifce-Cycle-Manager part. The rboot.bin contains the bootloader for the ESP8266. The blank_config.bin in just a blank config file. Now connect your device to your FTDI adapter in flash-mode.

File name: rboot.bin
Version: 1.4.2
File name: blank_config.bin
Version: 1.4.2
File name: otaboot.bin
Version: 2.1.2
Flashing the device
Go to the directory you made where you put the previously downloaded Root.bin, Blank_config.bin and Otaboot.bin files (e.g Downloads) Open the Terminal app. Click the Finder icon in your dock. Click Go. Click Utilities. Double-click Terminal. Change to the downloads directory.
cd downloads
Use esptool.py to flash it in your device. First, erase flash:
esptool.py erase_flash
Normally, your ESPPort will be something like /dev/cu.usbserial-A50285BI. Then, set your device in flash-mode again, and flash the new firmware:
esptool.py -p /dev/cu.usbserial-A50285BI --baud 115200 write_flash -fs 1MB -fm dout -ff 40m 0x0 rboot.bin 0x1000 blank_config.bin 0x2000 otaboot.bin
Note: If you use an old version of esptool, you must change -fs 1MB to -fs 8m.

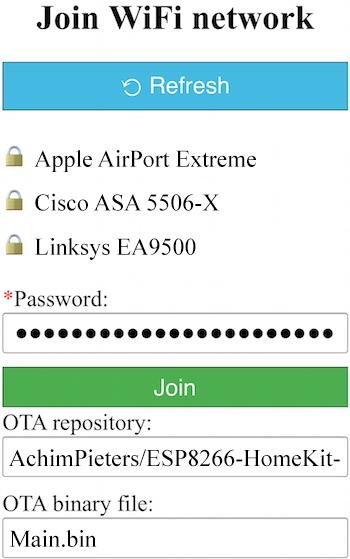
You must configure WiFi network and OTA repository. To configure WiFi settings, device generates its own WiFi in AP mode. You must connect to it in order to setup your WiFi network. Simply take your iOS device, go to Setting -> WiFi, and search a SSID with LCM- followed of last MAC address, connect to it, and wait a few seconds until a web appears showing you all WiFi networks that the device has found. Select yours, and enter password. Don’t touch Join button yet!!
Software Installation
Now, you must configure OTA repository as well. It’s very important that you configure it right, because you can not change it in the future (If you make a mistake, you must erase and flash device again).
OTA repository:
AchimPieters/ESP8266-HomeKit-Air-Quality-Sensor
OTA binary file:
main.bin
To finish initial setup, click Join button and wait about 7 minutes until process finish (While installation is working, device doesn’t show anything, and buttons don’t work). After that, LED turns on for a couple of seconds and you will be able to add your accessory to your HomeKit ecosystem using Home App. LifeCycle Manager 2 will install your HomeKit device on your ESP.

Now you can add your HomeKit Outlet by scanning the QR code below. To make the connection between your ESP8266 – HomeKit Air Quality Sensor and HomeKit takes a few seconds.

Testing the ESP8266 – HomeKit Air Quality Sensor hardware
DO YOU HAVE ANY QUESTIONS? LEAVE A COMMENT DOWN HERE.
Note: To produce and sell HomeKit compatible accessories, your company need to be certified for that (https://developer.apple.com/homekit/, If you’re interested in developing or manufacturing a HomeKit accessory that will be distributed or sold, your company must enroll in the MFi Program.) Espressif have their implementation of HomeKit framework, but it will give you it only if you have MFi certification (notice this text at the bottom of page you mentioned: Please note that the Espressif HomeKit SDK is available to MFi licensees only, and you need to provide the Account Number for verification purposes when requesting the SDK.).This project is a non-commercial implementation of HAP protocol, not meant for commercial use.
REFERENCE
Maxim Kulkin, esp-wifi-config (2019), Library to bootstrap WiFi-enabled accessories WiFi config, https://github.com/maximkulkin/esp-wifi-config Paul Sokolovsky, esp-open-sdk (2019), Free and open (as much as possible) integrated SDK for ESP8266/ESP8285 chips, https://github.com/pfalcon/esp-open-sdk Espressif Systems, esptool (2019), ESP8266 and ESP32 serial bootloader utility, https://github.com/espressif/esptool HomeACcessoryKid, life-cycle-manager (2019), Initial install, WiFi settings and over the air firmware upgrades for any esp-open-rtos repository on GitHub, https://github.com/HomeACcessoryKid/life-cycle-manager maccoylton homekit_wifi_thermostatr (2019),A thermostat accessory for remotely controlling central heating.b, https://github.com/maccoylton/homekit_wifi_thermostat