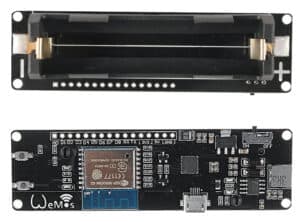
The “WEMOS D1 Esp-Wroom-02” that I got from Ali express is another micro controller development board with an ESP8266 WiFi chip. The board has an integrated 18650 battery charging circuit. There is also a board that has an OLED screen and a directional button built-in. This makes the board an excellent option for mobile applications. And like all the other ESP8266 based boards, this one can be programmed with the familiar Arduino IDE.
WEMOS D1 ESP-WROOM-02 FEATURES
First, let’s take a closer look at the board itself. The black circuit board comes with a 10 pin header that you can solder onto it, if needed. The back of the board has a battery holder that supports flat top 18650 batteries. Other characteristics of the board are:
- Board size: 102 x 30 x 20 mm
- Voltage Input range: 5V – 12V
- Micro USB connection
- Charge Current: 500 mA
- Battery overcharging and over-discharging protection circuit
I found that the information about the board published online usually is incorrect.. For instance, the name of the board implies that it is fitted with the ESP-WROOM-02 WiFi chip. Instead, it has an ESP-12E/F module. Also, most of the sites mention the wrong OLED-libraries and GPIO pin-outs. So below I will write about my own findings and experiences.
WEMOS D1 ESP-WROOM-02 INPUTS AND OUTPUTS
On the board there are the following inputs and outputs available:
- 1 Analog input AD (A0)
- 5 Digital Inputs / Outputs with Interrupt / PWM / I2C / One-wire support :
D3 (GPIO0)
D4 (GPIO2)
D8 (GPIO15)
D9 (GPIO3)
D10 (GPIO1)
BUILT-IN LED’S
The description states that the board has one programmable LED, on pin D0. But I found that the board has 2 programmable LED’s. One is the blue LED on the ESP8266 module, the other one is an additional green led on the breakout board.
- Programmable blue LED on GPIO2 (LED_BUILTIN)
- Programmable green LED on GPIO16
OLED SCREEN¹
The built-in OLED screen has the following specifications:
- Controller: SSD1306
- Resolution: 128 x 64 pixels, size: 0.96 Inch, colour: White
- I2C
- GPIO5: SDA
- GPIO4: SCL
- Address: 0x3C

DIRECTIONAL BUTTON¹
The board has a built-in directional button which supports 5 functions:
- Up (GPIO13)
- Down (GPIO12)
- Left (RESET)
- Right (GPIO0)
- Push (GPIO14)
Unfortunately, the left direction contact of the button is hardwired to the RESET pin of the ESP8266, so this can not be changed without modifying the board.
¹ Only available on the ESP-WROOM-02 with 18650 battery AND OLED display.
GPIO SUMMARY
Summarising, I found the GPIO’s of the ESP are wired as follows:
| GPIO | Function |
| 0 | D3 / Button right¹ |
| 1 | D10 |
| 2 | D4 / LED blue (LED_BUILTIN) |
| 3 | D9 |
| 4 | OLED SCL¹ |
| 5 | OLED SDA¹ |
| 12 | Button down¹ |
| 13 | Button up¹ |
| 14 | Button push¹ |
| 15 | D8 |
| 16 | LED green |
| A0 | AD (ADC) |
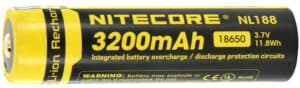
18650 BATTERY HOLDER
The battery holder supports a single flat top 18650 cell. The charging circuit will protect your battery from overcharging and also over-discharging.
Warning: the circuit does not have reversed polarity protection. So be aware to insert the battery the right way. If you insert it reversed, then your board will be damaged.
The polarity is indicated by a + and – printed on the board. The charging circuit has two LED indicators: the green LED indicates charging, the red LED (“Standby”) lights up when there is power but the battery is not charging. When you upload a sketch to the ESP-Wroom-02, you have to remove the battery first, and set the power switch to the “ON” position.
The development board integrates the ESP8266 18650 battery. A standard 3000mah 18650 battery can run for 17 hours or more.
TP5410 5V 1A LiPo Charger & Boost Converter
The mainboard is also a lithium battery shield provides a means of powering your micro-controller project from a single cell (3.7V) lithium battery. The shield contains a DC-DC converter to step-up the batteries 3.7V to 5V supplying your ESP-WROOM-02 with up to 1A of power. When the battery is depleted simply plug the shield into a USB power source using a micro USB cable and it will automatically recharge the battery. Two LED’s on the shield indicate when the battery is charging and when charging has completed.It also has a overcharging protection and over discharging protection.

REFERENCE
Arduino (2020), ARDUINO SOFTWARE, Open-source electronic prototyping platform enabling users to create interactive electronic objects., https://www.arduino.cc/, oneguyoneblog, WEMOS D1 ESP-WROOM-02 AND ARDUINO IDE(2018), USING THE WEMOS ESP-WROOM-02 WITH THE ARDUINO IDE, https://oneguyoneblog.com/2018/12/28/wemos-d1-esp-wroom-02-arduino-ide