In this blog, I’ll show you how to tune your E-steps on your Creality Ender 3 V2 or other 3D printer to get better printing quality. First, I’ll show you how to calibrate the E-steps, which tells the printer how many steps to move the extruder motor to move one millimeter of filament. We’ll start with the E-steps now why is this needed in order for the slicer to do its job accurately, the printer needs to be able to extrude the right amount of filament when needed.

Calibrate E-Steps
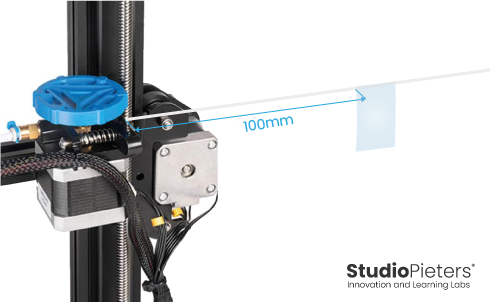
Before we get started you’ll first want to heat up the nozzle to the appropriate temperature for the material and make sure the filament is flowing normally, then measure 100 millimeters from where the filament goes in.
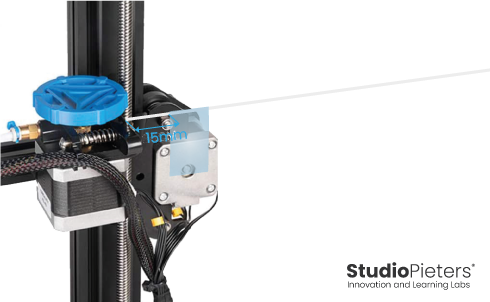
You can mark it with a sharpie or a piece of tape. The place where we measure can be different depending on what printer you have or what upgrades you’ve done. Mine is original, so I’ll measure from the side of the extruder. Now we’ll tell the printer to extrude 90 millimeters and measure the difference. I’m using two different filaments for my calibration. The first one left 15 millimeters and second one 16. That means that we extruded 84 and 85 millimeters when we needed 90.
So we’re under extruding a bit with both filaments. Based on the result, we now calculate the new E-steps number for our printer. Here’s the formula, requested extrude amount divided by measured extrude amounts multiplied by current E-steps. We’ll use the average of our two filaments for the calculation 90 divided by 84 and have multiplied by 93 our current e steps. We get 99.05, and we’ll punch that in to our printer. Remember to store the settings, so we don’t lose them when we shut down the printer.
Average extruded amount = 84 mm + 85 mm / 2 = 84,5 = Measured extruded amount
Requested extrude amount / Measured extruded amount * Current E-steps
90 / 84.5 * 93 = 99.05

Now let’s make sure the new E-steps number is working correctly. The change isn’t always completely linear, so we can do multiple iterations of this calibration to get the perfect number. But, really it isn’t that important, to get this perfect because you’ll still have some variance depending on the material and temperature. I did decide to do another round of calibration, and I still had an average of 1.5 millimeters of difference. So I did a slight adjustment to my E-steps based on that. That’s it!