Number one on my DIY wish list was the replacement of my 3d printer. Santa was good to me this year and got the Creality Ender 3 V2 for Christmas this year. The Creality Ender 3 V2 is one of the most well-known and therefore most supported 3D printers at the moment. There are many manuals, modifications and communities that offer you all the help you need to get started with 3D printing at home as a beginner or advanced. From toys to everyday household items to repairs and building things, the 3D printer seems to be becoming indispensable.

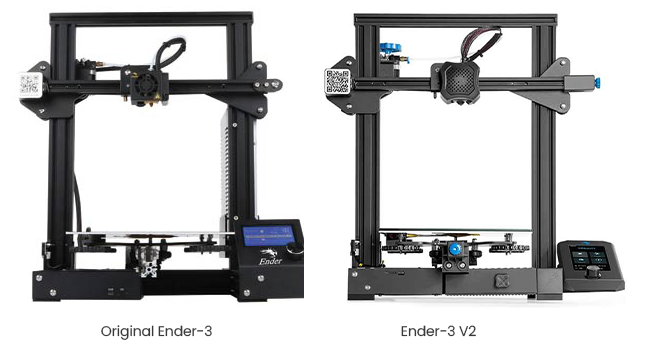
The original Ender-3
Few printers have sold as much as Creality 3D’s Ender-3 and they are extremely popular, especially among tweakers worldwide. It may be a bit of a chicken-and-egg story, but because they’re so popular, you can find tons of modifications and upgrades for this printer. So many modifications are possible because Creality has made both the hardware and of course the Marlin firmware available as open source.
Anyone who takes a look at Github can find the mechanical drawings for the Ender-3 and also the files for the motherboards: the gerber files. One of the reasons so many mods can be made so easily for the Ender-3 is that those full mechanical CAD drawings are available. This makes it easy to create the correct dimensions for parts, as long as nothing changes physically.
In addition to the availability of all adjustments, the price of the Ender-3 has always been a big plus. The printer is regularly on sale at various, whether or not Chinese, web shops and with a little luck you could buy it in its simplest form for 150 or 160 euros. However, it should be clear that the simplest form will not last long for many, because once you start working with 3D printers, you run a serious risk of constantly tinkering and fiddling with the printer to make it print better, make it quieter, useful extras and so on.
Some of the possible upgrades: you can replace the standard bed with a glass plate, upgrade the springs under the bed to stiffer springs, adjust the swivel wheels to level the bed with printed wheels and replace the rails under the bed with linear rails. And that only concerns the bed. For the standard Bowden extruder, you can replace the standard ptfe tube with a Capricorn tube and immediately replace the plastic clip on the extruder motor with an aluminum one. You can replace the hot end with a MicroSwiss hot end, for example, change the extruder head for better resistance to wear by hard filaments, upgrade the fans with quieter variants and use a printed blower to cool your filament from all sides, or of course the complete Bowden setup replaced with a direct drive extruder.
You can also replace the power supply, which is an unnamed 24-volt power supply on the regular Ender-3, with a Meanwell power supply with a quieter fan, move the entire power supply to a place between the frame at the base of the printer, apply LED lighting, print brackets for an octoprint camera and a housing for the accompanying Raspberry Pi or alternative filament roll holders, upgrade the z-axis for more stability and print a tray for your tools that fits in the frame.
Here’s a sampling of common tweaks and upgrades, not to mention the many motherboard options. The standard Melzi boards feature a low-memory microcontroller, so for many modifications that require extra memory for the firmware, the motherboard is replaced. For example, a popular combination is an MKS Gen L or SKR 1.x board with TMC2208 drivers for the stepper motors. This results in a much quieter printer and the option to add automatic bed leveling. Numerous options are available for the latter, from capacitive sensors to mechanical sensors such as a BLtouch. It may be obvious; the Ender-3 V2 has big shoes to fill and there must be good arguments for choosing the V2 over the original.

Similarities and differences
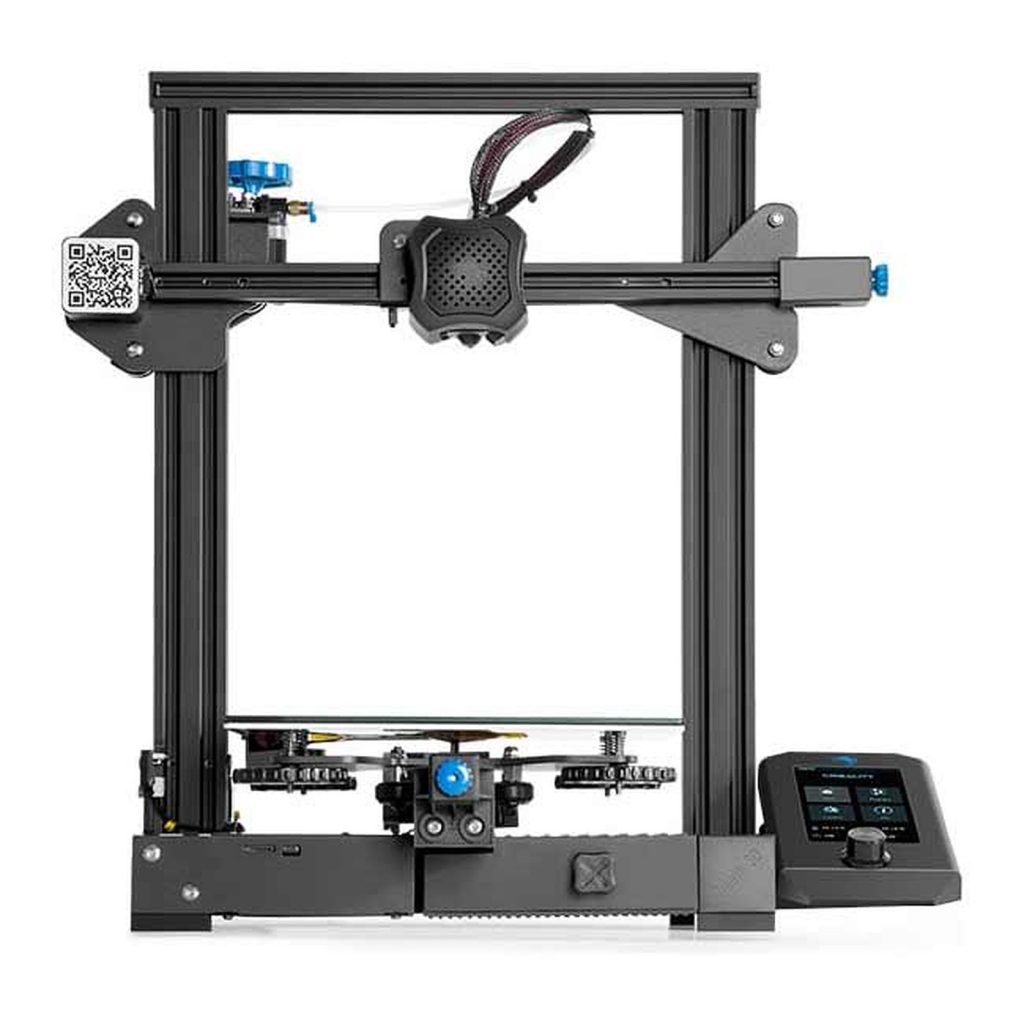
Let’s start with the good news; most mods and upgrades available for the original Ender-3 will likely work on the V2 as well. The printer is in fact almost identical to the original, at least when it comes to physical, mechanical parts. A good example to illustrate this is the aluminum profile of the right upright; there are still the same screw holes for a power supply as with the V1, but with the V2 the power supply is at the bottom. The guides for the z and x axes also appear identical, as does the metal plate for the extruder.
Compared to the original Ender-3, which we call the V1 for convenience, the V2 has a much neater finish. That starts with the power supply, which, as mentioned, is not screwed to the right upright, but is fixed at the bottom of the frame. The lower frame consists of a standard 40mm aluminum profile in an H-shape. As with the V1, the motherboard, a new variant by the way, is located at the front between the legs of the H-frame, with a plastic tray next to it for your tools. That saves you an hour or so of printing, because many Ender-3 owners also print such a tool tray.
The fan and associated motherboard grille are upside down, so there’s no more risk of plastic debris falling into your fan while printing. That too is a welcome upgrade, since many people print a fanguard for the V1. The power supply is mounted transversely on the back of the H-frame, so the printer has a much cleaner look than the V1. The cables come out between the metal housings and the aluminum and, as we are used to, are neatly labeled and nicely length.

With the V1, the Y-stepper with accompanying endstop is completely open, but with the V2 it is neatly provided with a plastic cover. This also applies to the x-axis, but that was also the case with the V1. The two timing belts, GT2 timing belts, can be tensioned by means of a pulley housed in a plastic housing and adjusted with a knurled screw: much easier than a bracket with screws in the profile.
The display has also been changed and is now neatly finished in a plastic housing. The orientation has changed from landscape to portrait. The contrast could be higher; the highlights that indicate which item you selected with the rotary encoder are not too easy to see in sunlight.
A nice change is of course the motherboard. On the V1, that was a Melzi-based board with a fairly limited 1284p controller with 64kB of flash memory and, at least on the motherboard, few available I/O pins. In order to add extra functionality in the limited memory, other features often had to be removed. And in general, to modify the firmware, you first had to burn a bootloader on the board. The V2 uses a 2560 microcontroller with 128kB of memory and has a micro-usb interface instead of mini-usb. However, the main difference that will make you happy out-of-the-box is the stepper drivers. In older variants of the Creality board, these are A4988 drivers, which produce a lot of noise from the stepper motors. The V2 printer comes with Creality’s Silent Board, with TMC2208 drivers, which make the stepper motors work almost inaudibly.
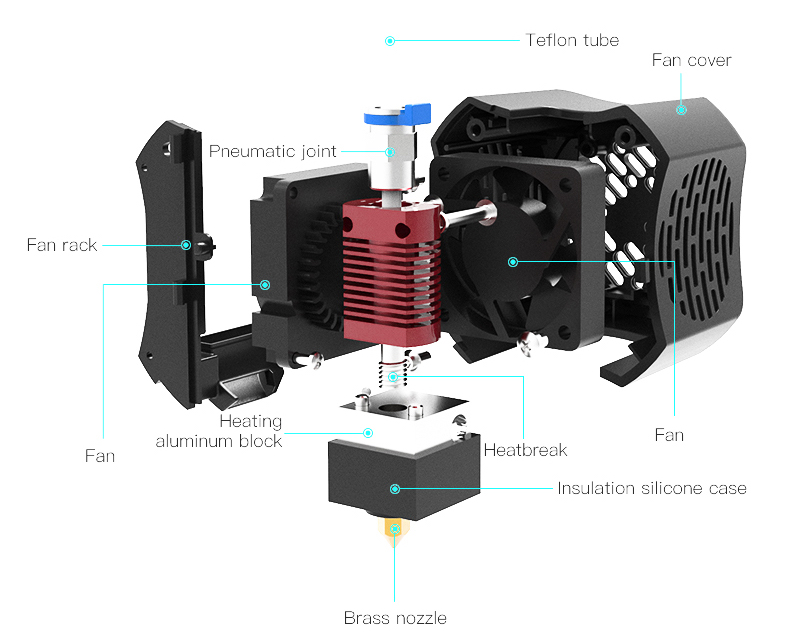
Finally, the hot end has also changed somewhat. Although it appears to be on the same metal carriage, the fanshroud around it has been modified. This way you do not remove the fanshroud from the V2 from the front, but from the rear and only one screw is needed to loosen it. The hot end itself, i.e. the heatsink, heatbreak and extruder, is visually the same as with the Ender-3 V1, but the cooling has been slightly adjusted. That would mean you can make the same upgrades to your hot end as with the V1.
Construction and details
The Ender-3 V2 is actually a kit. Where with the latter printer it was only necessary to attach the gantry to the bottom frame, you have to do some more work with the Ender-3 V2. The assembly is very similar to that of the V1, because as you read earlier, there is not a huge difference between the structural parts of the two printers. You can count on an hour of work to assemble the printer at your leisure. Of course, that could be shorter if this is the eighty-fourth printer you’re putting together, and longer if you’ve never seen an Allen screw before.
The manual is well put together. There is a paper version in the form of a small booklet: a significant improvement over the sparse fold-out poster of the first Ender-3. A digital version of the manual is available on the supplied SD card and an instructional video is also included.
You start by assembling the uprights, noting that no recesses have been made in the bottom profile. So there are no slots for the aluminum profile to fall into, which would help with placement and alignment. Fortunately, the profiles are neatly sawn and the tapped holes for the screws are in the right place, so that the frame still fits neatly together at right angles.
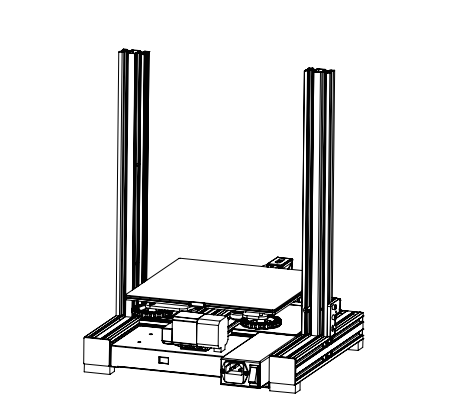
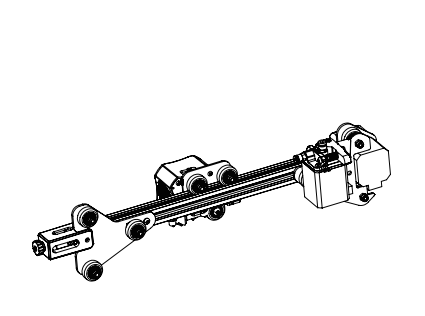
The next step is assembling the gantry, the beam over which the trolley moves. On this x-axis with hot end you mount the stepper motors for the x-axis and the Bowden extruder on one side, and on the other side the roller wheels and the tensioner for the timing belt. The hot end comes fully assembled out of the box and you only have to slide it onto the aluminum profile. Then you mount the single z-motor and associated propeller shaft, and now all you have to do is lower the gantry onto the propeller and the uprights.
The final steps consist of mounting the aluminum crossbar connecting the two uprights. Now it’s time for finishing touches such as securing the control display, mounting the spool holder and plugging in the cables. Attach the z-end stop to the left upright, which you need to adjust to the correct height for the bed. Make sure that you mount the endstop completely perpendicular, because the distance between the lip of the microswitch and the aluminum profile is minimal: a bit crooked and they rub against each other.
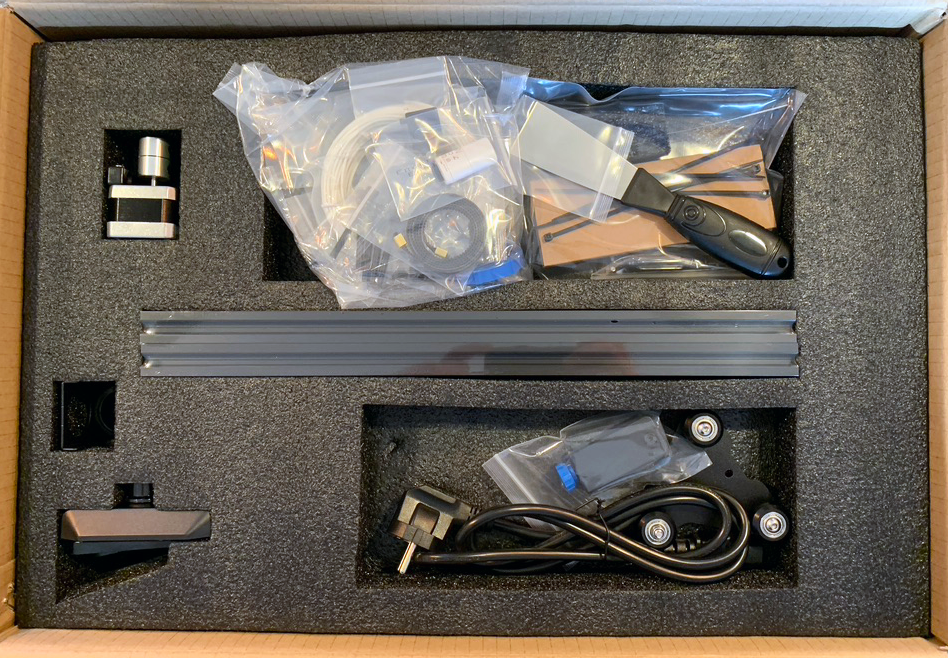
All the tools you need are included as usual and can be stored in the drawer at the bottom of the printer. The accessories are also identical to those of the V1: the putty knife, the micro-SD card reader and the Allen keys are all the same.
The plastic clip on the stepper motor for the x-axis is also the same, but as part of a cleaner and safer product, the y-stepper and associated endstop have also been given a plastic cap. In addition, because the power supply is now inside the frame at the bottom and thanks to the tool tray there is also no hole in the frame between the front legs, the V2 looks much neater than the V1. Certainly, the underside therefore resembles the CR6-SE, although it is even more consumer-friendly. For example, the Ender-3 has open V-slots in the aluminum profile, which contain plastic filler strips in the CR6.

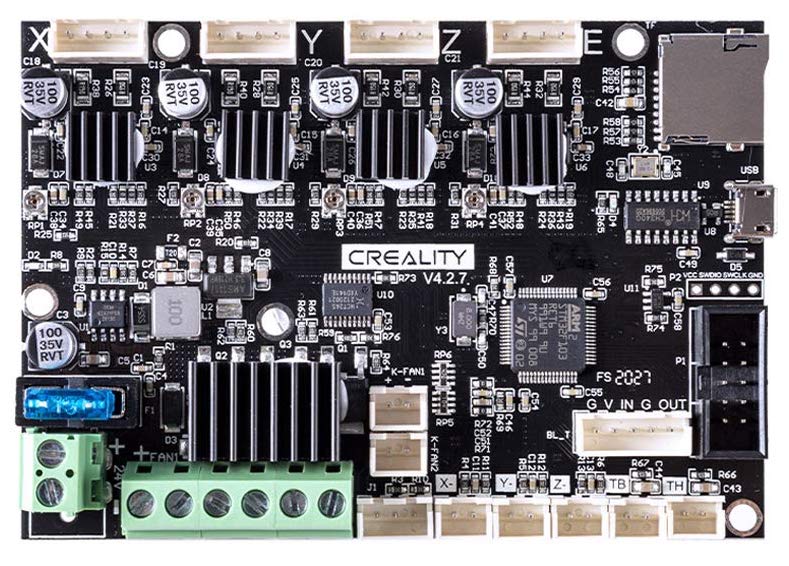
The motherboard in the V2 is new: Creality has had motherboards with silent TMC2208 drivers on them for some time, such as the V1.1.5 with 1284 mcu and the V2.2 mt 2560 mcu. In the V2, the drivers cannot be read out; the tmc interface for eg M122 gcodes is not implemented. If desired, you must read the voltage of the stepper drivers manually with a multimeter and adjust it with a micro-pot.
The board in the Ender-3 V2 has type number 4.2.2 and also TMC2208 drivers on board, but has a 32bit mcu as brain: the stm32f103. That is an ARM controller with a Cortex M3 core at 72MHz on board, 512kB storage and 64kB RAM. Perhaps this is the board that the 32-bit version of the CR6-SE also gets. Another difference with existing 8bit boards from Creality is the 15A fuse that is supposed to protect the board. The USB communication is via a CH340 chip and a nice detail is the preparation for a car bed level sensor such as a BLTouch with a five-pin plug.
The Ender-3 V2 in action
After an hour of tinkering, your printer should be assembled and you can print. Or not, because as with most printers you first have to level the bed, or actually tram. Fortunately, the Ender-3 V2 comes standard with a glass bed, so trampling is quite easy, especially since the chance of a deformed bed with glass is very small. First of all, it is important to have the z-end stop roughly in the right place, so that it is actuated when your print head is near the bed. Then you can use the four adjustment knobs to turn the four corners of the bed up and down. We would have liked to have seen firmer springs under the bed; that too is a mod that runs on many printers and leads to less wiggle and drift of the bed.

It is recommended to do the tramping with a piece of paper between the bed and the printhead, but you can also use a sensor set and use about 0.10mm as a target value. If you’ve already leveled a lot of printers, you can probably do it pretty visually too. The most important aspect is that you adjust each corner and repeat that a few times. Every time you have had an angle, there is a good chance that another distance is no longer correct. Making a few laps around all the corners should help you along the way.
Please note: the correct, equal distance is crucial for your prints and in many cases the most difficult aspect of printing. With the Ender-3 V2 you do this manually.


A quick note on the noise production. Creality has equipped the Ender-3 V2 with the silent tmc2208 drivers, which ensure that you no longer hear the characteristic sound of the stepper motors. In fact, the main source of noise now comes from the fans on the hot end, on the motherboard and in the power supply. Unfortunately, we have to say that the fans used, or the combination of fans and grilles, are not immediately silent. The stock cooling makes at least as much noise as the V1. We measure about 52dB(A) for the V2, where the V1 and the CR6-SE come out at 52dB(A) and 48d(BA) respectively.
There’s no filemanent sensor like the CR6-SE, but since it has to be plugged in as an endstop, it should be a breeze to add it yourself once the motherboard firmware is documented. However, the endstops are only implemented, so you will still have to look for free I/O pins for your sensor. Where some budget printers are supplied with insufficient security measures, the V2 is in any case equipped with a proper Meanwell power supply and the thermal runaway protections for bed and hot end are activated. If something goes wrong with a thermistor or if a heating element should come loose, the temperature cannot just rise to dangerous values thanks to this protection. We have not only read this via the firmware, but also tested it by disconnecting the thermistor during heating. The printer then reboots and no longer heats the bed or hotend.
Once the bed is in order, the filament can go into the printer. Creality supplies a little bit of filament, a loose test roll of about ten meters. A neat roll of 1kg of filament was supplied with the V2, which quickly costs twenty euros. The filament must be fed through the Bowden extruder and pushed through a ptfe tube to the hot end. The V2 has pretty much the same plastic clip as the V1 for pressing the filament against the gear of the stepper motor that moves the filament, and that’s not the world’s finest system. Many Ender-3 owners therefore replace the plastic clip with an aluminum clip, which works a bit more pleasantly. In addition, aluminum is less sensitive to wear; the filament tended to wear grooves in the plastic with the original plastic bracket. This is less easy with an aluminum bracket and the Ender-3 V2 has a copper insert in the plastic to prevent wear. Another small, but not unimportant improvement of the V2 is that the distance between the filament and the lead screw of the z-axis is slightly larger. This way you don’t run the risk of your filament rubbing against the screw thread. There are also various mods for the first version in circulation for this.
It may take some effort to load the filament with the standard hardware of both the V1 and V2. This has become slightly easier with the addition of the rotary wheel on the extruder of the V2. That wheel on the extruder shaft makes it easier to manually turn it to move the filament in or out of the tube. This is again a much-printed upgrade. Many V1 owners also make a guide to help guide the filament to the extruder more easily. Little has changed with that filement path in the V2 and so this can still be a desirable mod. By the way, by not mounting the filament holder on top, but on the side, you can get your filament with a smaller curvature in your extruder. In theory, you will miss the last millimeters of your maximum print height, although in practice you will probably not run into that limitation so quickly.
Print results
Printing with PLA presents no major problems, although the results are of course highly dependent on the filament, temperatures and slicer settings. As with all printers, this interplay is a matter of adjustment. With a retraction of 5mm you still get quite a bit of stringing, but it prevents problems with your filament. The print bed can reach a maximum temperature of 100 degrees Celsius, but for PLA, 60 degrees is more than sufficient. Warming up then takes about five minutes. Creality uses the same power for most printers with the 24V power supply and heaters. In theory, the hot end can be heated up to 275 degrees. For plastics such as PLA, the upper limit is 220 degrees, which you can achieve with ease. Also for the flexible tpe you can heat everything hot enough, but for nylon and abs you are already quite at the top of the temperature range, especially for the bed, especially since it is an open printer. The Ender-3 V2 is therefore mainly suitable for PLA prints, although with careful tweaking you can also use other plastics, just like with the V1.

We printed some standard test prints like “the boat”, a calibration cube and an overhang test. Now the out-of-the-box print quality without much tuning, especially with a printer like the Ender-3, is of course not the end point, but the starting point. Playing with your slicer settings in particular can yield a lot of improvement, but we could conclude that basic factors such as dimensional accuracy are in order.

Conclusion
The big question, of course, is: should you put your original Ender-3 on the street and buy the V2? Since it’s basically the same printer, that doesn’t seem to make much sense. The V2 has some upgrades over the original, but not so shocking that you need to upgrade right away.
Another question is: which printer should you choose if you are going to buy new, the Ender-3, the Ender-3 Pro, the Ender-3X or this new Ender-3 V2? We will calculate for this and we will do that on the basis of the prices that Creality uses on its own website. After all, there are European stocks and Creality sells various upgrades in its store. The stock Ender-3 costs $209. So that’s the basic model with 8-bit motherboard and pei building board. A glass plate costs $23 extra, so the price is $232. The Ender-3 Pro has a magnetic build plate and a Meanwell power supply, and should be slightly improved over the regular Ender-3. You pay 239 dollars for that and you can also order a glass plate if you wish. The Ender-3X is very similar to the regular Ender-3, but comes with a glass plate and a few extra nozzles for $219.
The V2 should cost $269. For that you get the improved Meanwell power supply, a glass plate, a neater finished printer, a 32-bit motherboard with preparation for abl and with silent drivers, a more modern display and slightly more ease of use. If you were to upgrade the V1 to similar functionality, you’ll spend about $30 for a motherboard with TMC2208 drivers, $20 for a glass plate and $30 for a Meanwell LRS-350-24 power supply. Then you still have to find a way to mount your power supply under your printer and you will still miss some upgrades like the screen. This makes the V2 seem like a much better choice to buy new than a V1 or other variant, but if you already have one, you can continue to upgrade it, of course.
This is also possible with the V2, because, as mentioned, the motherboard is prepared for upgrades. Then it is important that you can do it and if Creality releases the source code, it is a lot easier. There are also other upgrades to consider in hardware, because the V2 is not yet perfect. For example, it is a pity that there are no firmer springs under the bed, because that is an upgrade that many consider necessary for the stability of the bed. How the ptfe tube and couplings hold up remains to be seen, but we would have liked to see the signature blue color of Capricorn tubes. And little has changed in the filament path from roll to hot end, while there is often a pain point.

That said, the Ender-3 V2 is a big crowd pleaser. Many upgrades that V1 owners make almost standard are already done from the factory and the printer seems compatible in every way with the vast amount of upgrades and modifications that predate the original. If the price now also becomes attractive and remains well around 200 euro’s, the Ender-3 V2 can last for years again.

Reference:
Creality, Ender-3 V2 3D Printer, https://www.creality3dofficial.eu/products/ender-3-v2-3d-printer