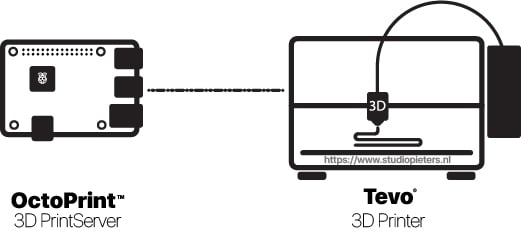
Some time back I ran into OctoPrint TM. I immediately wanted to know more as I saw the potential of this software. With a Raspberry Pi ling around this should be a easy build. So the first thing to do is setup the OctoPrint TM Server and the look for a plugin that Shuts down my hardware when It’s done printing, but more about that later.
What Is OctoPrint TM
So what exactly is OctoPrint TM, and do you need to use it? For many 3D printers, files are uploaded to the printer either through an SD slot or micro-USB. This means you have to stick an SD into your computer, load the g-code onto it, and insert it into the 3D printer every time you want to print something. Even worse, printers without SD slots require a computer to be tethered to it whenever printing.
With OctoPrint TM, there’s no such inconvenience. It works with most every 3D printer to make controlling your 3D printer wireless. Though certainly not a must, thousands of hobbyists love using OctoPrint TM to make their lives easier.
OctoPrint TM allows you to:
- Upload .gcode files from computer to 3D printer wireless.
- Control the printer manually (moving x,y, or z axis and extrusion).
- Monitor print temperature and change printer properties.
- Set up a webcam to view in browser.
- Slice models within OctoPrint TM through CuraEngine.
- Customize with numerous plugins (you can write them yourself).
What Do You Need?
To get started with OctoPrint TM, here’s what you’ll need:
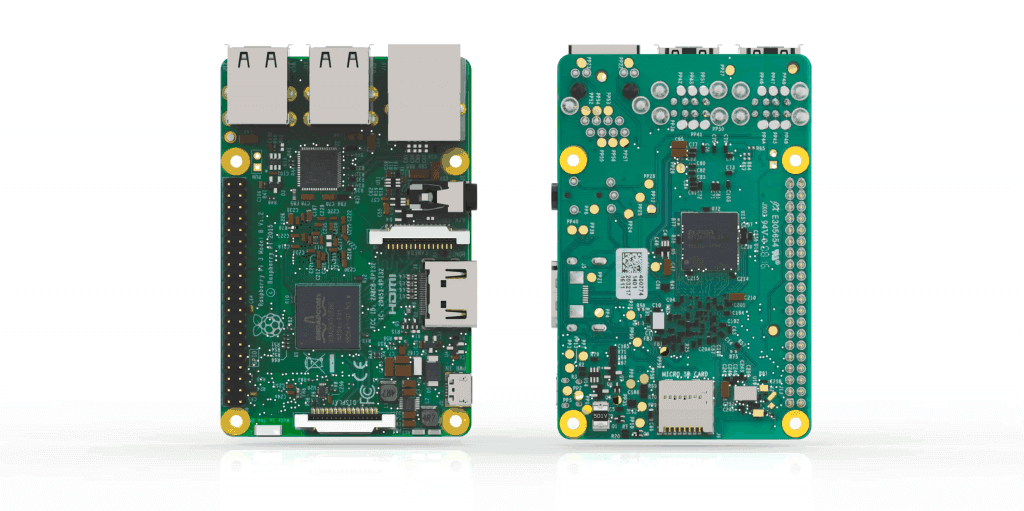
- Any Raspberry Pi (Raspberry Pi Zero W not recommended)
- micro-USB cable and power adapter to power the Pi
- micro-USB cable to connect the Pi to your 3D printer
- micro-SD card (or full-size SD card) that fits in your Pi, along with an SD adapter to plug it into your computer
- USB WiFi adapter to connect the Pi to the Internet (an Ethernet cable to your router will also work here)
And of course, a 3D printer that works with OctoPrint TM.
Flash OctoPi Image
The simplest way to run OctoPrint TM is by using the OctoPi image to boot up your Raspberry Pi.
Download the latest version of OctoPi (0.16 or newer).
Unzip the downloaded image by double-clicking on it. You should have an image file ending in .img. We recommend downloading Etcher (free on MacOS and Windows) to flash the image onto your SD card.
Download etcher
Visit etcher.io and download and install the Etcher SD card image utility. Run Etcher and select the Raspbian image you unzipped on your computer or laptop. Select the SD card drive. Note that the software may have already selected the right drive. Finally, click Burn to transfer Raspbian to the SD card. You’ll see a progress bar that tells you how much is left to do. Once complete, the utility will automatically eject/unmount the SD card so it’s safe to remove it from the computer.

Insert your SD card. If you’re using a micro-SD, put it in an SD card reader / USB card reader and plug that into your computer.
Open up Etcher. Select your SD card and the OctoPi image and click ‘Flash’. Let it run and you’re good to go!
Set Up WiFi Connection
Now that the OctoPi image is installed on your SD card, you need to input your WiFi name and password so your Pi can actually connect to the Internet. If Etcher ejected your SD card when it finished flashing, be sure to re-insert it into your computer. But first we need to download Atom.
Atom
Atom is a free and open-source text and source code editor for macOS, Linux, and Microsoft Windows with support for plug-ins written in Node.js, and embedded Git Control, developed by GitHub. Atom is a desktop application built using web technologies. Most of the extending packages have free software licenses and are community-built and maintained. You can download your free copy here.

Open up your SD file (usually named “boot”). The SD should be located under your devices, where external drives usually show up. There’s a whole mish-mash of files in here, but don’t be intimidated. We’re looking for “octopi-wpa-supplicant.txt“. Open this file with Atom.
# Use this file to configure your wifi connection(s).
#
# Just uncomment the lines prefixed with a single # of the configuration
# that matches your wifi setup and fill in SSID and passphrase.
#
# You can configure multiple wifi connections by adding more 'network'
# blocks.
#
# See https://linux.die.net/man/5/wpa_supplicant.conf
# (or 'man -s 5 wpa_supplicant.conf') for advanced options going beyond
# the examples provided below (e.g. various WPA Enterprise setups).
#
# !!!!! HEADS-UP WINDOWS USERS !!!!!
#
# Do not use Wordpad for editing this file, it will mangle it and your
# configuration won't work. Use a proper text editor instead.
# Recommended: Notepad++, VSCode, Atom, SublimeText.
#
# !!!!! HEADS-UP MACOSX USERS !!!!!
#
# If you use Textedit to edit this file make sure to use "plain text format"
# and "disable smart quotes" in "Textedit > Preferences", otherwise Textedit
# will use none-compatible characters and your network configuration won't
# work!

## WPA/WPA2 secured
#network={
# ssid="put SSID here"
# psk="put password here"
#}

## Open/unsecured
#network={
# ssid="put SSID here"
# key_mgmt=NONE
#}

## WEP "secured"
##
## WEP can be cracked within minutes. If your network is still relying on this
## encryption scheme you should seriously consider to update your network ASAP.
#network={
# ssid="put SSID here"
# key_mgmt=NONE
# wep_key0="put password here"
# wep_tx_keyidx=0
#}

# Uncomment the country your Pi is in to activate Wifi in RaspberryPi 3 B+ and above
# For full list see: https://en.wikipedia.org/wiki/ISO_3166-1_alpha-2
country=GB # United Kingdom
#country=CA # Canada
#country=DE # Germany
#country=FR # France
#country=US # United States

### You should not have to change the lines below #####################
ctrl_interface=DIR=/var/run/wpa_supplicant GROUP=netdev
update_config=1
Most WiFi networks are WPA/WPA 2 secured. In the first “network” block, remove the first ‘#’ from the four lines.
## WPA/WPA2 secured
network={
ssid="put SSID here"
psk="put password here"
}
Type in the WiFi network name in the “ssid” line (e.g. “MyHomeNetwork”). Type in the WiFi password in the “psk” line (e.g. “NetworkPassword”). Make sure to keep the quotes around each one.
Note: If you want to let OctoPrintTM connect to multiple networks (e.g. home WiFi and phone hotspot), simply copy and paste the network block (4 lines) and fill in the details.
Near the bottom, enter your country code. If you’re in the UK, this is done for you. If you live in another country, enter a ‘#’ at the beginning of the first country line (UK) and remove the ‘#’ in front of the line with your country.
# Uncomment the country your Pi is in to activate Wifi in RaspberryPi 3 B+ and above
# For full list see: https://en.wikipedia.org/wiki/ISO_3166-1_alpha-2
#country=GB # United Kingdom
#country=CA # Canada
#country=DE # Germany
#country=FR # France
#country=US # United States
country=NL # Netherlands
Make sure those blocks match with the pictures above, especially with the ‘#’ matching up. Save the file and eject the SD card from your computer.
Connect to Your Raspberry Pi
It’s time to put all the pieces together. In this step, you’ll boot up your Pi and connect your Pi to your 3D printer. Insert the micro-SD into the SD slot on your Pi. Then insert the WiFi adapter into a USB port on your Pi. Plug the micro-USB cable into your 3D printer and the USB end into your Pi. Power up your Pi by plugging the power cable into the micro-USB. Plug the other end to your power adapter. Turn on the power for your Pi and 3D printer.
Web Interface Setup
After the Pi boots up, you should be able to access OctoPrint TM through your local network. You’re almost there…
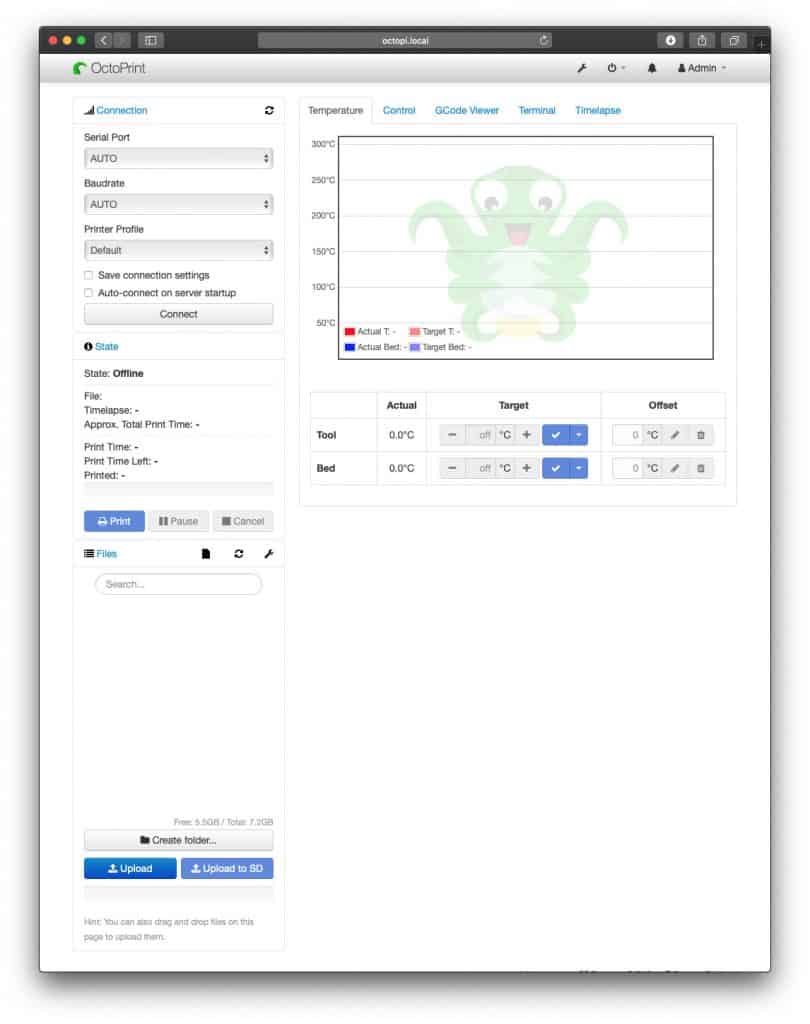
Type in “http://octopi.local” on any browser (make sure your computer is connected to the same network as the Pi). You should see the OctoPrint TM interface and a setup wizard pop up. Follow along and be sure to set up a username and password for your OctoPrint TM. Connect to your printer by opening up the Connection panel on the left. With the options set to “AUTO”, hit Connect. If this doesn’t work, try manually setting the serial port and baud rate until it does. Once you’re connected, try moving your printer head around by hitting the arrows under the ‘Control’ panel.
Congratulations! You’ve successfully set up OctoPrint TM! Give yourself a pat on the back and have fun 3D printing!

REFERENCE
Gina Häußge, OctoPrint TM (2019), The snappy web interface for your 3D printer., https://octoprint.org Tian Ooi, OctoPrint Setup (2019), 2019 How to Install OctoPi on a Raspberry Pi, https://all3dp.com/2/octoprint-setup-guide-how-to-set-up-octoprint