For an upcoming project I need a Library for a Tower Pro™ servo motor 9G (SG90). Since this is a project for HomeKit, it must work under ESP Open RTOS. Because I couldn’t find a suitable library, I decided to make one myself.

Tower Pro™ Micro servo S9 (SG90)
Let’s take a look at the hardware first. A servo is a general term for a closed control system. A closed control system uses the feedback signal to adjust the speed and direction of the motor to achieve the desired result.
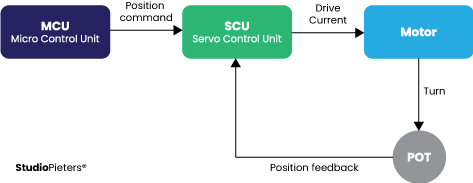
RC servo motor works on the same principle. It contains a small DC motor that is connected to the output shaft through the gears. The output shaft drives a servo arm and is also connected to a potentiometer (pot).
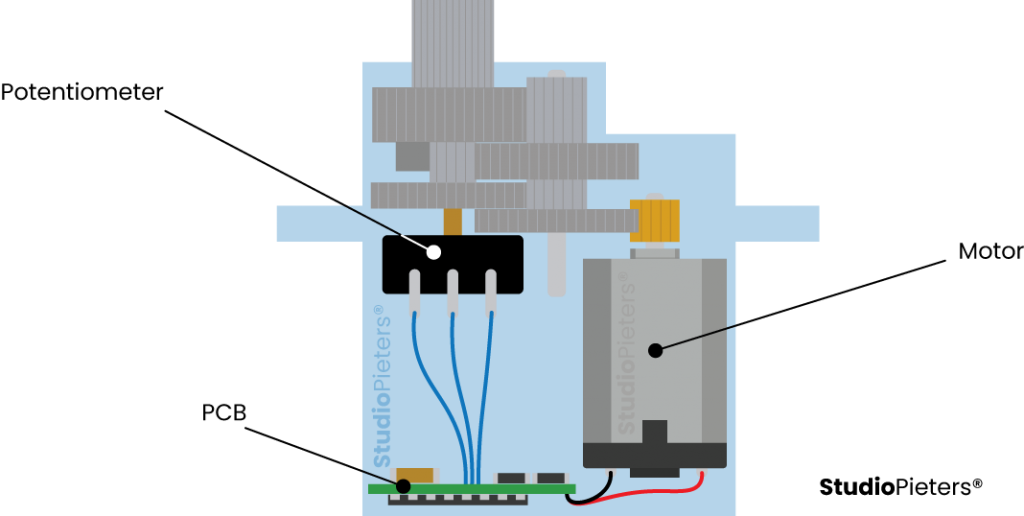
The potentiometer provides position feedback to the servo control unit where the current position of the motor is compared to the target position. According to the error, the control unit corrects the actual position of the motor to match the target position.
Servo Motor position
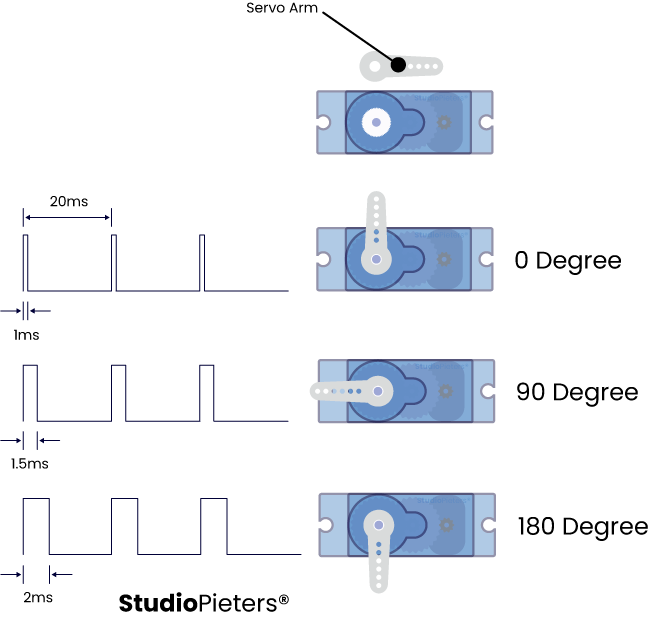
You can control the servo motor by sending a series of pulses to the signal line. A conventional analog servo motor expects to receive a pulse approximately every 20 milliseconds (the signal should be 50 Hz). The length of the pulse determines the position of the servomotor.
Examples
If the pulse is high for 1ms, then the servo angle will be zero. If the pulse is high for 1.5ms, then the servo will be at its center position. If the pulse is high for 2ms, then the servo will at 180 degrees. Pulses ranging between 1ms and 2ms will move the servo shaft through the full 180 degrees of its travel. The duration of the pulses may sometimes vary with different brands and they can be 0.5ms for 0 degrees and 2.5ms for 180 degrees.
Servo Motor Pinout
Servo motors typically have three connections, her is the PIN Out of the Tower Pro™ Micro Servo S9 (SG90). he wires varies between servo motors, but the red wire is always 5V and GND will either be black or brown. The control wire is usually orange or yellow.

ESP Open RToS
Because the HomeKit SDK depends on ESP Open RToS we need to build the library to work with this OS. ESP Open RToS is a community developed open source FreeRTOS-based framework for ESP8266 WiFi-enabled microcontrollers. Intended for use in both commercial and open source projects. Originally based on, but substantially different from, the Espressif IOT RToS SDK.
RTOS – Servo library
Allows ESP8266 & ESP32 boards to control a servo . This library can control a many types of servos. It makes use of the ESPXX PWM timers.

The file Servo.c contains all that’s needed to to control your servo. First you need to define the GPIO pin of your choice. Then the file calculates the angle of position of your servo. Hereafter trough the command calc_duty_from_angle(angle) it can be set to the required angle in degrees.
/**

   Copyright 2022 Achim Pieters | StudioPieters®

   Permission is hereby granted, free of charge, to any person obtaining a copy
   of this software and associated documentation files (the "Software"), to deal
   in the Software without restriction, including without limitation the rights
   to use, copy, modify, merge, publish, distribute, sublicense, and/or sell
   copies of the Software, and to permit persons to whom the Software is
   furnished to do so, subject to the following conditions:

   The above copyright notice and this permission notice shall be included in all
   copies or substantial portions of the Software.

   THE SOFTWARE IS PROVIDED "AS IS", WITHOUT WARRANTY OF ANY KIND, EXPRESS OR
   IMPLIED, INCLUDING BUT NOT LIMITED TO THE WARRANTIES OF MERCHANTABILITY,
   FITNESS FOR A PARTICULAR PURPOSE AND NON INFRINGEMENT. IN NO EVENT SHALL THE
   AUTHORS OR COPYRIGHT HOLDERS BE LIABLE FOR ANY CLAIM, DAMAGES OR OTHER LIABILITY,
   WHETHER IN AN ACTION OF CONTRACT, TORT OR OTHERWISE, ARISING FROM, OUT OF OR IN
   CONNECTION WITH THE SOFTWARE OR THE USE OR OTHER DEALINGS IN THE SOFTWARE.

 **/


#include <FreeRTOS.h>
#include <esp/uart.h>
#include <esp8266.h>
#include <pwm.h>
#include <stdio.h>
#include <stdlib.h>
#include <task.h>
#include "servo.h"

//Define your PWM Pin here
#define PWM_GPIO 13

// My SG90 works on 500µs ~ 2650µs (spec: 500µ ~ 2400µ)
uint16_t calc_duty_from_angle(int angle) {
  return (0.025 + (0.1325 - 0.025) * (double)angle / 180) * UINT16_MAX;
}

void servo_init() {
  printf("pwm_init(1, [%d])\n", PWM_GPIO);

  uint8_t pins[1] = {PWM_GPIO};
  pwm_init(1, pins, false);

  printf("pwm_set_freq(50)     # 50 Hz\n");
  pwm_set_freq(50);
}

void rotate_task(void *angle_ptr) {
  static bool running = false;
  int angle = *((int*)angle_ptr);
  free(angle_ptr);

  while (running) {
    vTaskDelay(100 / portTICK_PERIOD_MS);
  }
  running = true;

  printf("rotate servo to angle %d\n", angle);
  pwm_set_duty(calc_duty_from_angle(angle));
  pwm_start();
  vTaskDelay(500 / portTICK_PERIOD_MS);
  pwm_stop();
  vTaskDelay(50 / portTICK_PERIOD_MS);

  running = false;
  vTaskDelete(NULL);
}

void servo_rotate_to_angle(int angle) {
  int *angle_ptr = malloc(sizeof(int));
  *angle_ptr = angle;
  xTaskCreate(rotate_task, "rotate_task", 256, angle_ptr, 2, NULL);
}
PWM Pins
ESP8266 allows software PWM in all I/O pins: GPIO0 to GPIO16. PWM signals on ESP8266 have 10-bit resolution. The ESP32 LED PWM controller has 16 independent channels that can be configured to generate PWM signals with different properties. All pins that can act as outputs can be used as PWM pins (GPIOs 34 to 39 can’t generate PWM). You can change the PWM pin in servo.c. The default PWM pin is GPIO13.
Example File
First we call the library tough #include “servo.h” then we create a task to preform called void servo_task(void *arg). Then we can set the position we want by calling servo_rotate_to_angle(180); the 180 is 180 degrees. then we wait en set de servo to 0 degree by calling the command servo_rotate_to_angle(0);. That’s It!
/**

   Copyright 2022 Achim Pieters | StudioPieters®

   Permission is hereby granted, free of charge, to any person obtaining a copy
   of this software and associated documentation files (the "Software"), to deal
   in the Software without restriction, including without limitation the rights
   to use, copy, modify, merge, publish, distribute, sublicense, and/or sell
   copies of the Software, and to permit persons to whom the Software is
   furnished to do so, subject to the following conditions:

   The above copyright notice and this permission notice shall be included in all
   copies or substantial portions of the Software.

   THE SOFTWARE IS PROVIDED "AS IS", WITHOUT WARRANTY OF ANY KIND, EXPRESS OR
   IMPLIED, INCLUDING BUT NOT LIMITED TO THE WARRANTIES OF MERCHANTABILITY,
   FITNESS FOR A PARTICULAR PURPOSE AND NON INFRINGEMENT. IN NO EVENT SHALL THE
   AUTHORS OR COPYRIGHT HOLDERS BE LIABLE FOR ANY CLAIM, DAMAGES OR OTHER LIABILITY,
   WHETHER IN AN ACTION OF CONTRACT, TORT OR OTHERWISE, ARISING FROM, OUT OF OR IN
   CONNECTION WITH THE SOFTWARE OR THE USE OR OTHER DEALINGS IN THE SOFTWARE.

 **/

#include <stdio.h>
#include <FreeRTOS.h>
#include <esp/uart.h>
#include <esp8266.h>
#include <task.h>
#include "servo.h"

void servo_task(void *arg) {

        while (true) {
                servo_rotate_to_angle(180);
                vTaskDelay(10 / portTICK_PERIOD_MS);
        }
        vTaskDelay(1000 / portTICK_PERIOD_MS);
        servo_rotate_to_angle(0);
        vTaskDelay(10 / portTICK_PERIOD_MS);
}

void user_init(void) {
        uart_set_baud(0, 115200);
        xTaskCreate(servo_task, "Servo Task", 4096, NULL, tskIDLE_PRIORITY, NULL);
}
Download the Library
You can download the library at my Github here:

Reference
ESP Open RToS, open source FreeRTOS-based framework for ESP8266 WiFi-enabled microcontrollers., https://github.com/SuperHouse/esp-open-rtos datasheetspdf, SG90 Servo Datasheet PDF, https://datasheetspdf.com/pdf-file/791970/TowerPro/SG90/1 lastminuteengineers, How Servo Motor Works & Interface It With Arduino, https://lastminuteengineers.com/?s=servo