I have some Philips® hue lightning bulbs in my home. To operate these lights they need permanent power, wall switches have to be always on. So when I go to bed and turn off the wall switch the light will never shine again if the hue bridge try to switch on the light, for example in the morning to wake up you softly with a “warm light”. If you want to control your bulbs with a switch, you have to buy the Philips® Hue Tap or dimmer switches, which are very expensive, especially if you need one for each room.
hue Switch
The solution is the using of an ESP8266 to make a Philips® Hue Switch. This tiny controller are available for a few bucks. When using the Deep Sleep modus of the ESP8266 and the use of a battery it will work for a long time. (but more about that later).
How does it works
Every time you press the reset button the ESP wake up, connect with your WLAN, get the status of the lamp, if it is on it switches off or vice versa, after this command it falls into deep sleep. First I will show you how to program a ESP8266-01 and a ESP8266-12F as I use these the most. First we need to install some software so we can communicate with our ESP module.

Installing and Configuring
To get yourself a working environment go over these steps:
- Download the Arduino IDE.
- Go to File –> Preferences and add the link http://arduino.esp8266.com/stable/package_esp8266com_index.json to the Additional Boards Manager URLS.
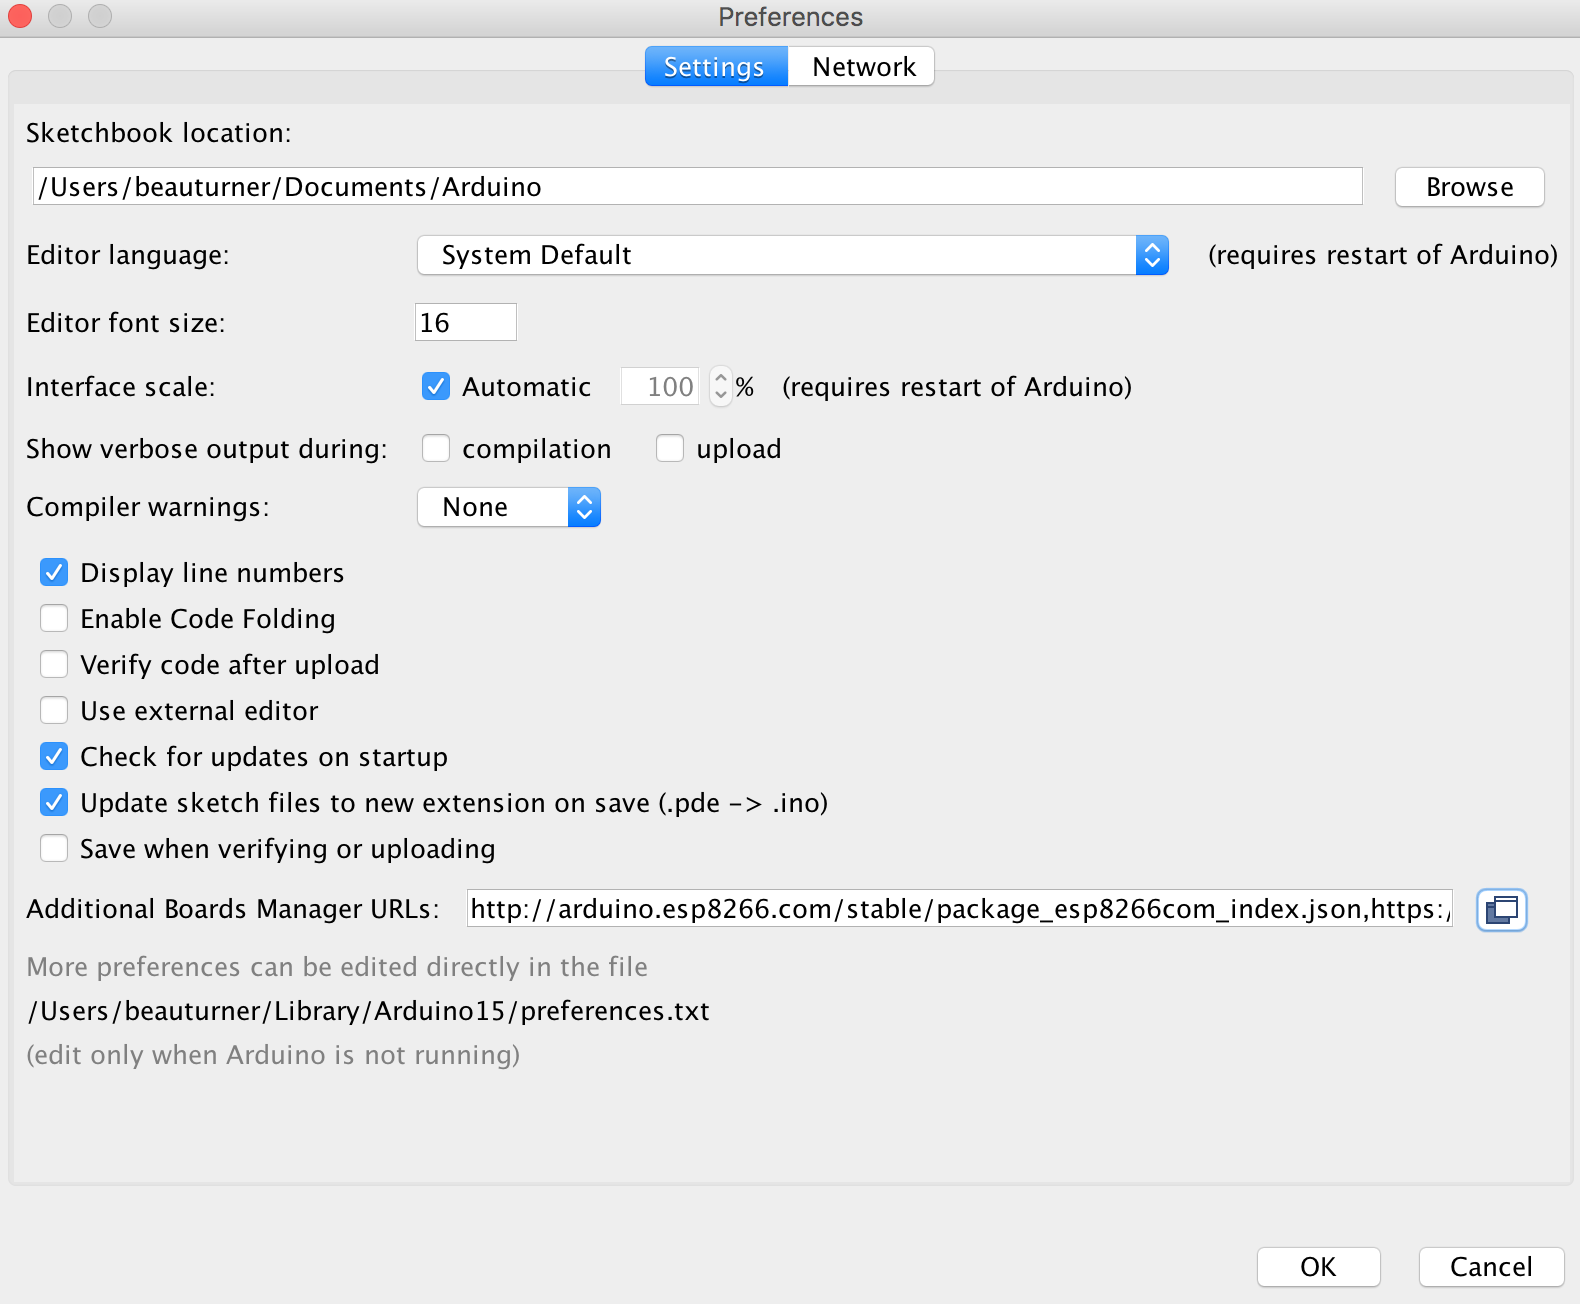
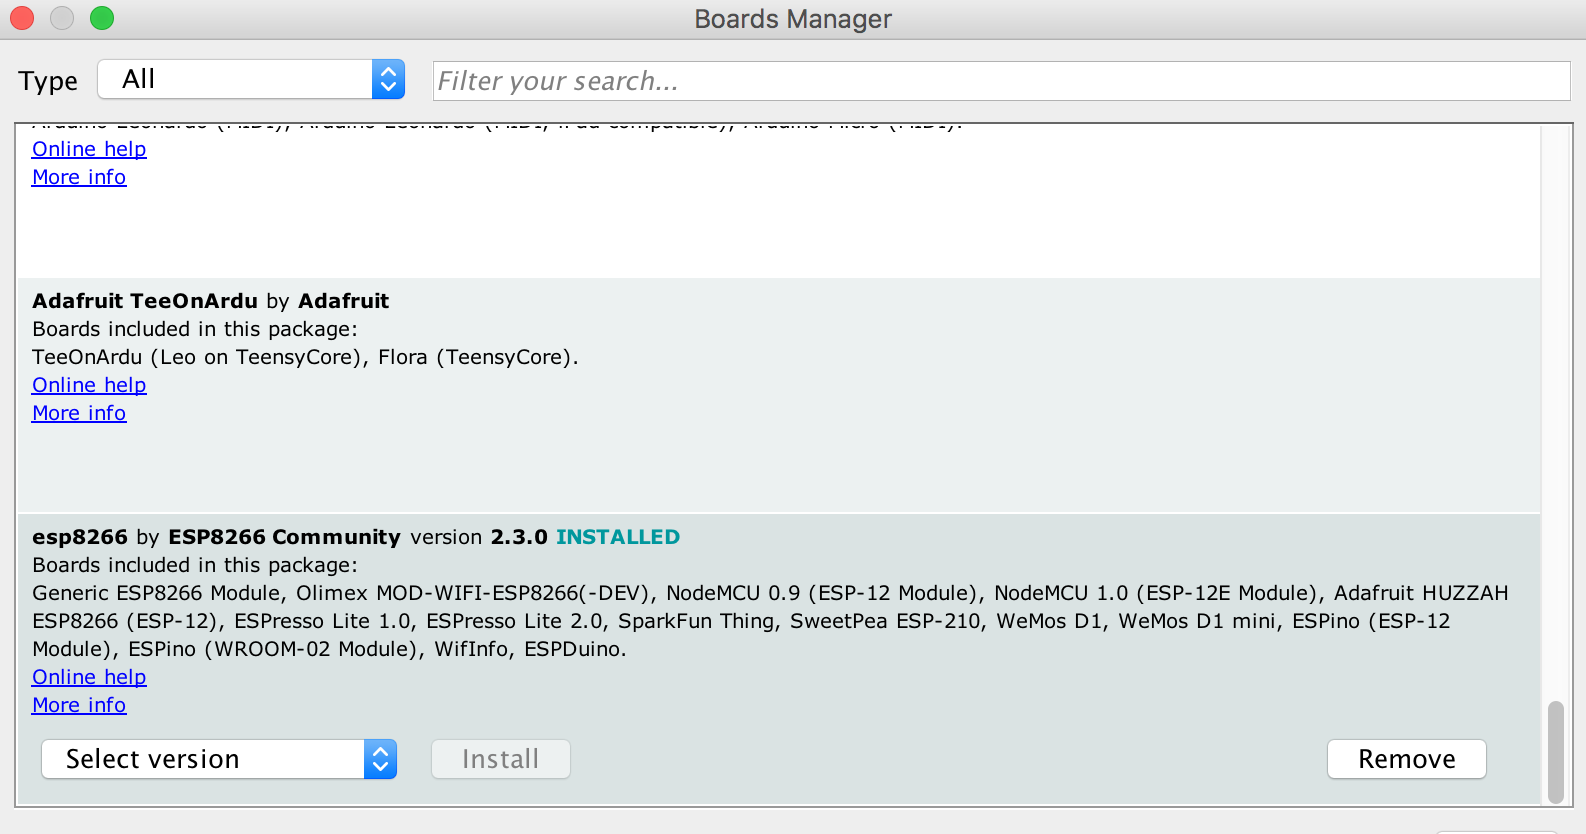
Go to Tools –> Board –> Boards manager
You should now have the esp8266 as an option there since you’ve added it to the Additional Boards. Select it and press Install.
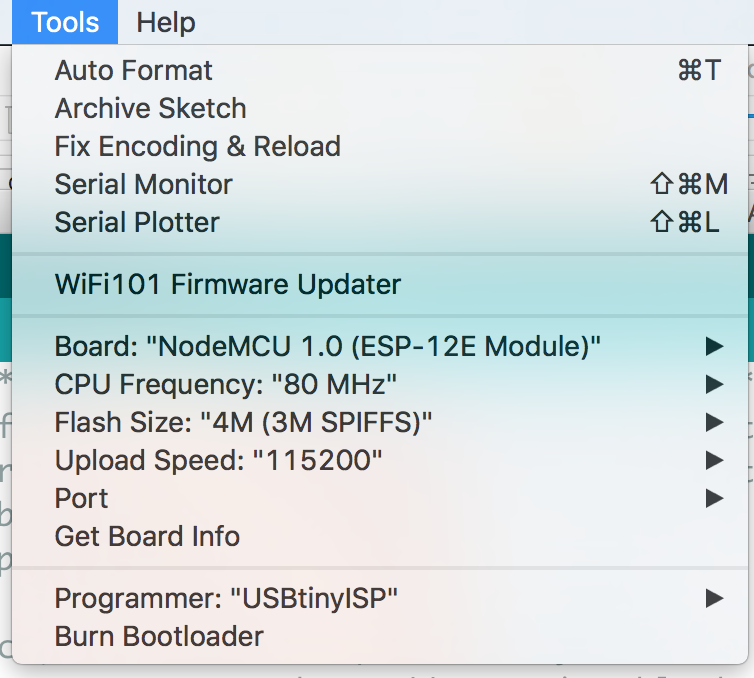
Now, You have the ESP8266 boards configure. Choose the board you have, “Generic ESP8266 Module” if you got the regular module and “Generic ESP-12E Module)” if you have the ESP-01 module.
Choose the ESP8266 USB port when you connect your ESP module and you’re done!
And that’s it, you are ready. From what I understood by digging through the files, the new code interpreting the common Arduino functions into a clear c++ code, then using the ESPTool to create a new firmware and flash it on the ESP8266.
Writing a program to the ESP8266
Flashing a program to the ESP8266 is a bit more annoying than flashing an Arduino. When flashing the Arduino, all you have to do is press the reset button and release while you upload a program (or even not doing anything if you have FTDI such as in Arduino UNO,NANO, MICRO, etc.) and the Arduino will start uploading. With the ESP8266 you have to reset the micro-controller and start it in flashing mode using the GPIO0-to-Ground.
ESP8266-01 Scheme
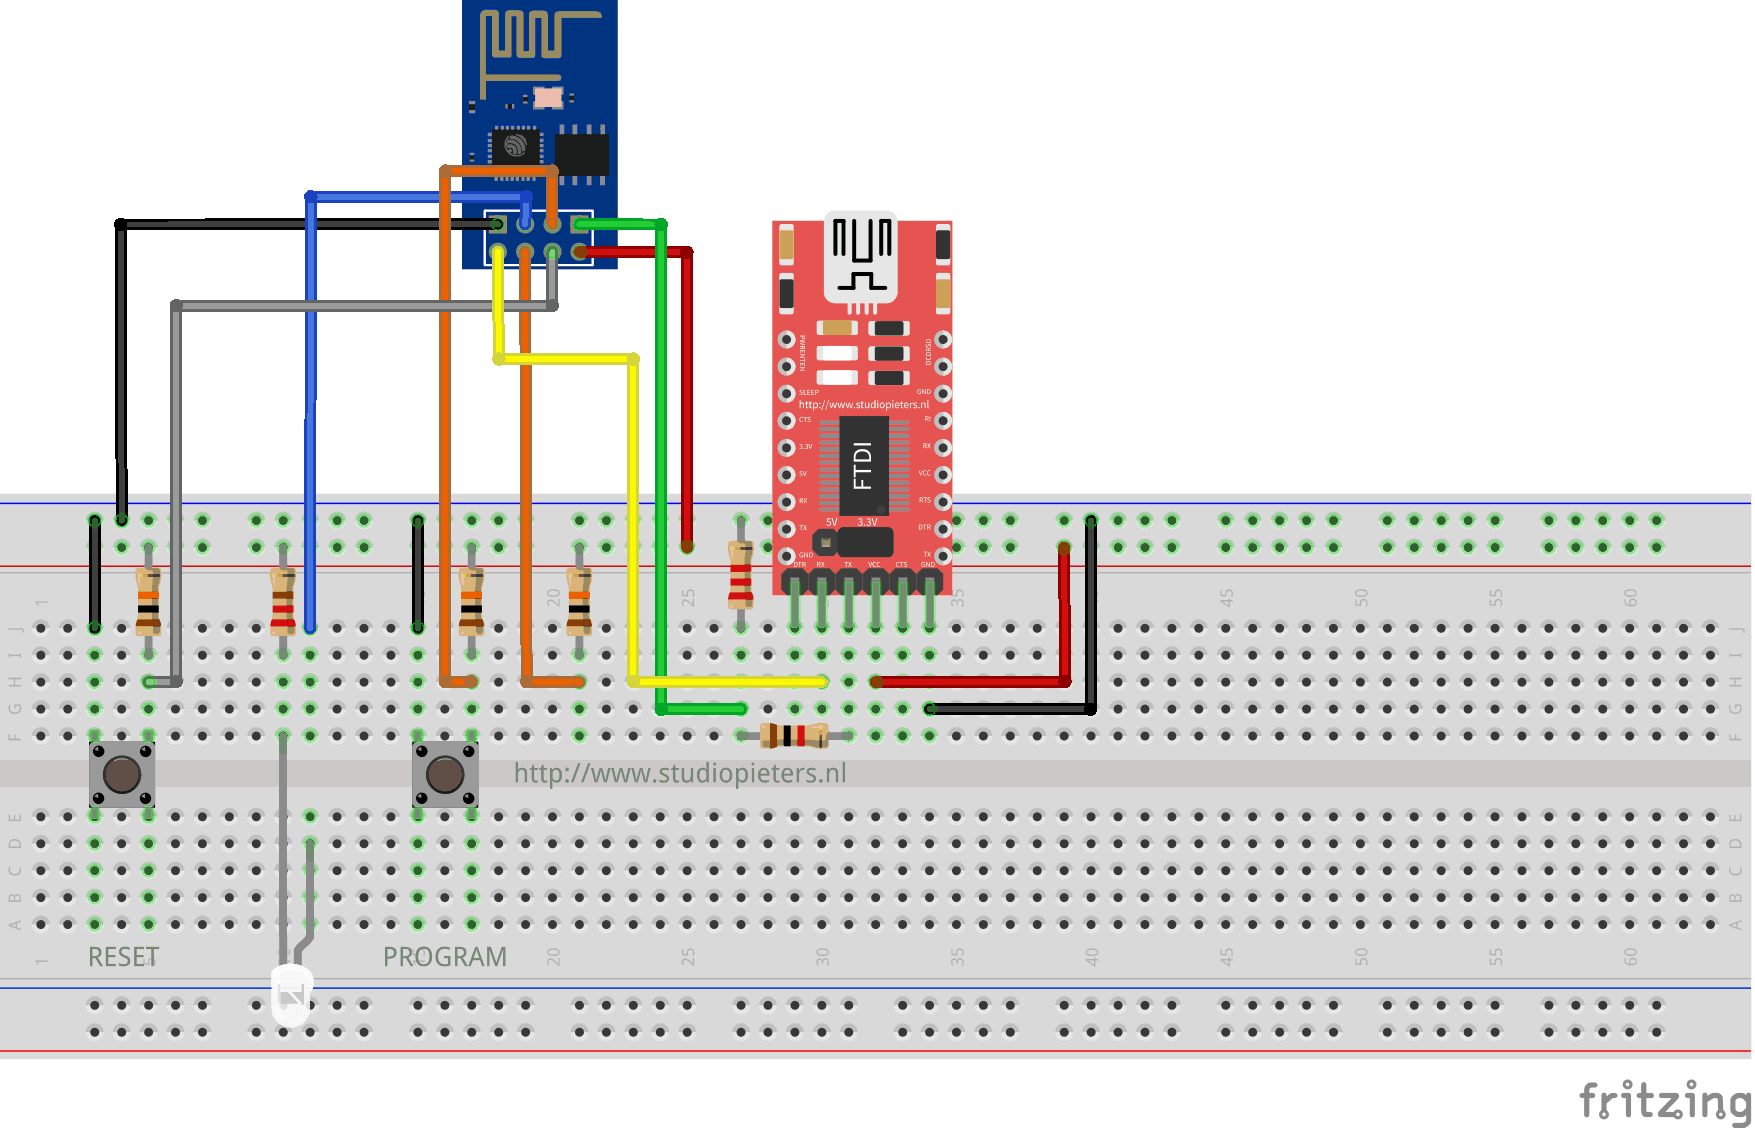
ESP8266-12F Scheme
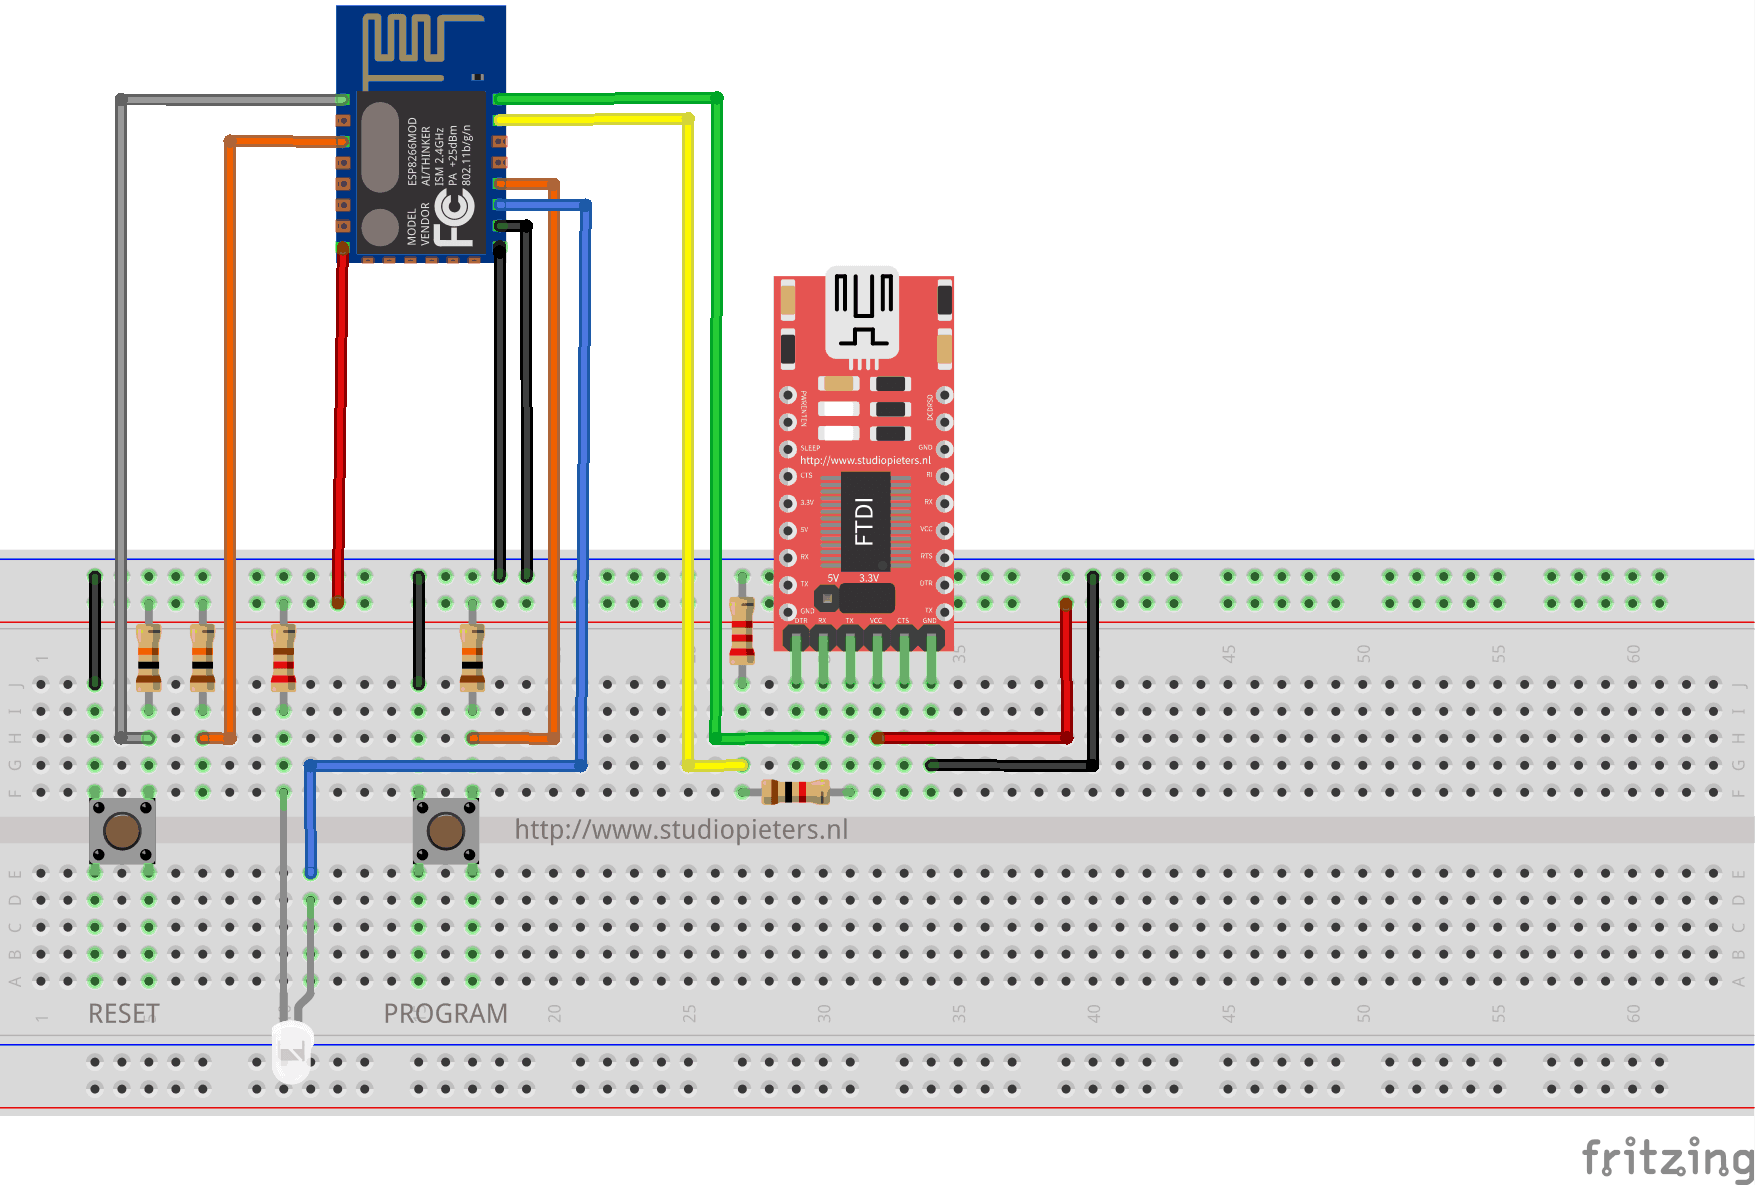
The sketch shows the ESP8266 connected to FTDI Programmer with a voltage regulator onboard.
NOTE: Be Sure that you have the Jumper placed on the 3.3V setting and not the 5V setting because this will destroy your ESP module!

As you can see two buttons have been added. The Left button, when pressed, connects the RESET pin to the ground and when it is released, connects the RESET pin to the VCC through a pull-up resistor.
The Right button, when pressed, connects the PROGRAM pin to the ground and when it is released, connects the PROGRAM pin to the VCC through a pull-up resistor.
I also added A LED when the ESP is in PROGRAMMING STATE state the LED is ON. When The ESP is in “NORMAL” state the LED is OFF. Using this two buttons you can do all the tasks you need with the ESP8266:
- Working on NORMAL mode – Both buttons are released.
- RESETTING the ESP8266 – Press the RESET button and release.
- Start in FLASH MODE – Press both buttons, release the RESET button and then release the PROGRAM button.
Programming your ESP module
Now your ready to program your ESP module. You can connect the USB cable from the FTDI programmer to your computer and open Arduino IDE.
The code
/* Project name: ESP8266 - Philips® hue Switch
   Project URI:  https://www.studiopieters.nl/esp8266-philips-hue-switch/
   Description: Switch to use with the Philips® Hue bridge
   Version: 2.3.3
   License: MIT Copyright 2019 StudioPieters®
*/

#include <ESP8266WiFi.h>
#include <SPI.h>

IPAddress ip(192, 168, 178, 1);
IPAddress gateway(192, 168, 178, 1);
IPAddress subnet(255, 255, 255, 0);

int light = 1;                                   // Number of the Hue light to be switched

const char hueHubIP[] = "192.168.178.100";       // Hue hub IP
const char hueUsername[] = "7CAFB8485183FFC588A6BAB16A2FEE4LSUOJ4CME";  // hue bridge username

const int hueHubPort = 80;


const char ssid[] = "SSID";                      // Network SSID (name)
const char pass[] = "password";                  // Network password


boolean onOffState = false;                       // To store actual on/off state of lights as reported by Hue bridge

WiFiClient client;


void getHue()
{
  if (client.connect(hueHubIP, hueHubPort))
  {
    client.print("GET /api/");
    client.print(hueUsername);
    client.print("/lights/");
    client.print(light);
    client.println(" HTTP/1.1");
    client.print("Host: ");
    client.println(hueHubIP);
    client.println("Content-type: application/json");
    client.println("keep-alive");
    client.println();
    while (client.connected())
    {
      if (client.available())
      {
        client.findUntil("\"on\":", "\0");
        onOffState = (client.readStringUntil(',') == "true");
        break;
      }
    }
    client.stop();
  }
}


void setHue(String command)
{
  if (client.connect(hueHubIP, hueHubPort))
  {
    client.print("PUT /api/");
    client.print(hueUsername);
    client.print("/lights/");
    client.print(light);
    client.println("/state HTTP/1.1");
    client.println("keep-alive");
    client.print("Host: ");
    client.println(hueHubIP);
    client.print("Content-Length: ");
    client.println(command.length());
    client.println("Content-Type: text/plain;charset=UTF-8");
    client.println();                             // Blank line before body
    client.println(command);
    client.stop();
  }
}


void setup()
{


  WiFi.config(ip, gateway, subnet);
  WiFi.begin(ssid, pass);

  while (WiFi.status() != WL_CONNECTED)
  {
    delay(1);

  }

}


void loop()
{

  getHue();                                       // Lights 1 status


  if (onOffState == true)                         // If lights are on, send "Off" command

  {
    String command =  "{\"on\": false}";
    setHue(command);
  }

  else                                            // If lights are off, send "On" command

  {
    String command =  "{\"on\": true}";
    setHue(command);


  }


  ESP.deepSleep(0);
}
After opening the attached sketch with the Arduino IDE you have to do some settings depending to you local WIFI.
For a faster connecting/switching we use a static IP-address.
IPAddress ip(192,168,178,1);
IP-address of you local WiFi router where the hue bridge is connected
IPAddress gateway (192, 168, 178, 216);
IP-address of your switch, be aware of using a high address in the range of 200-250 that is not used for other devices
IPAddress subnet(255,255,255,0);
the number of your light that is switched
int light = 1; //
the IP-address of the Hue bridge
const char hueHubIP[] = "192.168.178.57";
you have to create an authorized username in the hue bridge, look at this tutorial down below.
const char hueUsername[] = "hue bridge username"
The Philips Hue hub Port is always “80”
const int hueHubPort = 80;
and finally fillin your SSID and password of your WiFi so it can connect to it.
const char ssid[] = "SSID"; // network SSID (name)
Creating a philips® Hue Bridge username
At first make sure your bridge is connected to your network and is functioning properly. Test that the smartphone app can control the lights on the same network.

Then you need to discover the IP address of the bridge on your network. You can do this in a few ways.
- Use a UPnP discovery app to find Philips® hue in your network.
- Use our broker server discover process by visiting https://discovery.meethue.com
- Log into your wireless router and look Philips® hue up in the DHCP table.
Once you have the address load the test app by visiting the following address in your web browser.
https://<bridge ip address>/debug/clip.html
You should see an interface like this.
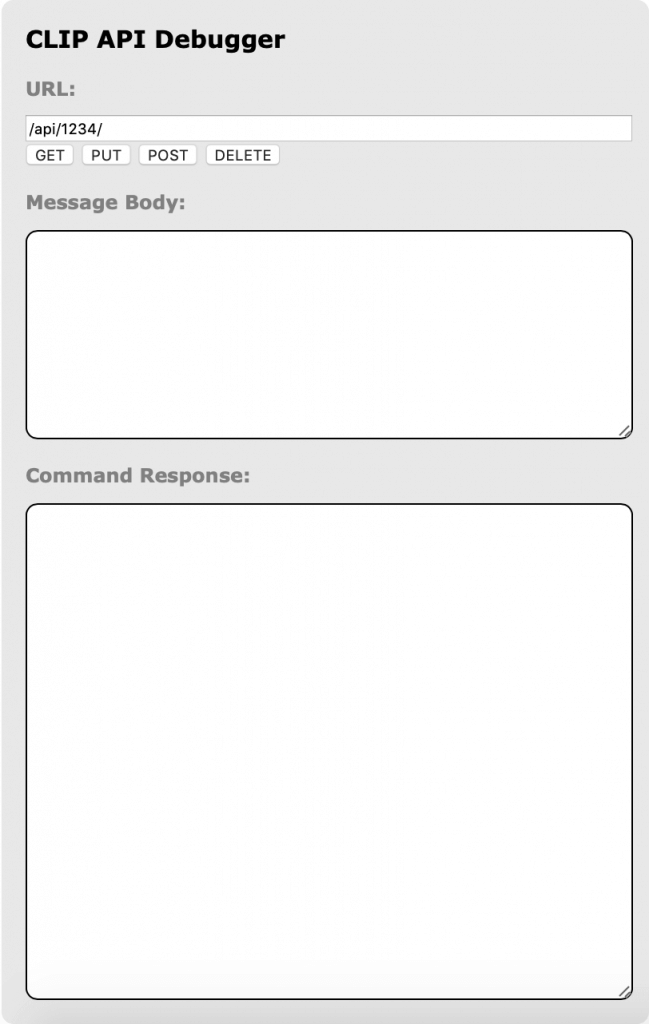
Using this debugger utility you can populate the components of an HTTPS call – the basis of all web traffic and of the hue Restful interface.
1. URL: this is actually the local address of a specific resource (thing) inside the hue system. It could be light, a group of lights or many more things. This is the object you’ll be interacting with in this command.
2. A body: this is the part of the message which describes what you want to change and how. Here you enter, in JSON format, the resource name and value you’d like to change/add.
3. A method: here you have a choice of the 4 HTTPS methods the hue call can use.
GET: this is the command to fetch all information about the addressed resource
PUT: this is the command to modify an addressed resource
POST: this is the command to create a new resource inside the addressed resource
DELETE: this is the command to deleted the addressed resource
4. Response: In this area you’ll see the response to your command. Also in JSON format.
So let’s get started…
First let’s do a very simple command and get information about your hue system.
Fill in the details below leaving the body box empty and press the GET button.
| URL: | /api/newdeveloper |
| Method | GET |
You should see a response like below:
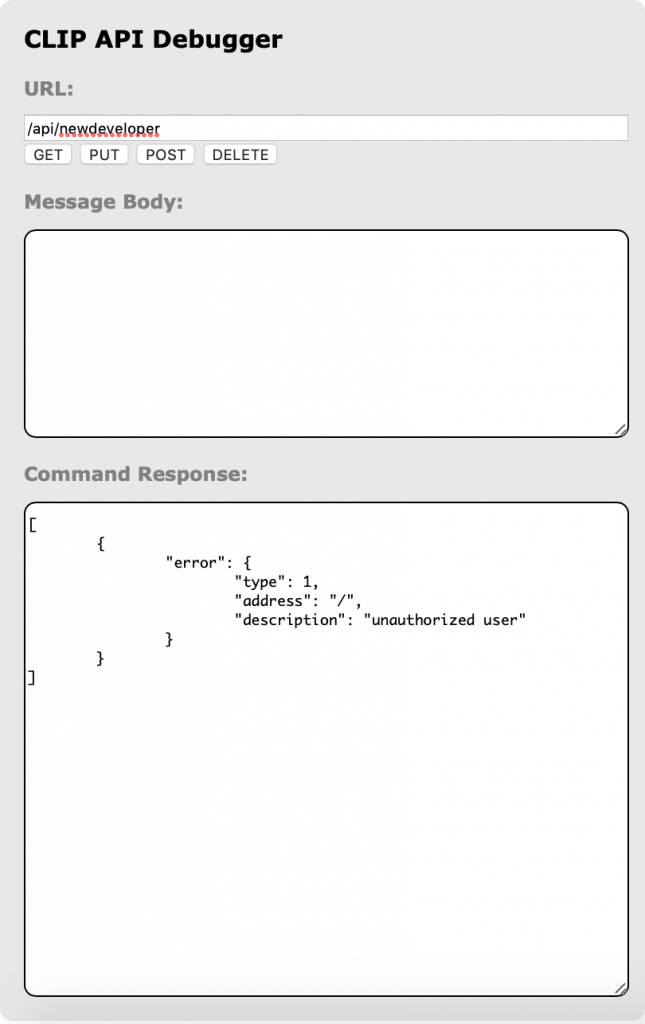
Congratulations you’ve just sent you first CLIP command!

Now this is the command to fetch all information in the bridge. You didn’t get much back and that’s because you’re using an unauthorized username “new developer”.
We need to use the randomly generated username that the bridge creates for you. Fill in the info below and press the POST button.
| URL: | /api |
| Message Body: | {“devicetype”: “my_hue_app#iphone studiopieters”} |
| Method | POST |
This command is basically saying please create a new resource inside /API (where usernames sit) with the following properties.
When you press the POST button you should get back an error message letting you know that you have to press the link button.
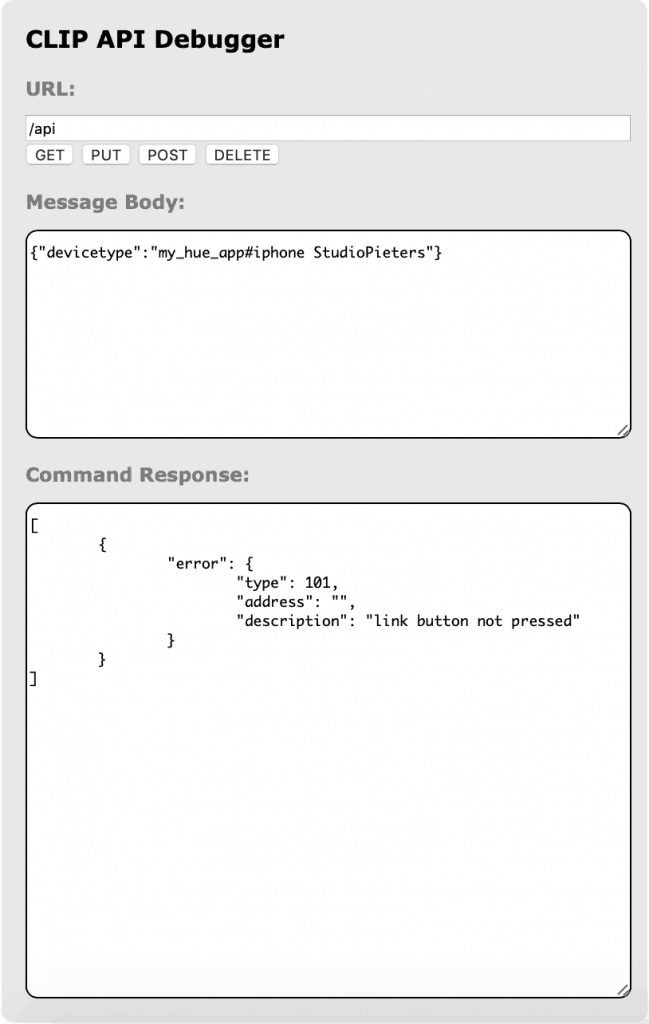
This is our security step so that only apps you want to control your lights can. By pressing the button we prove that the user has physical access to the bridge.
Go and press the button on the bridge
and then press the POST button again and you should get a success response like below.
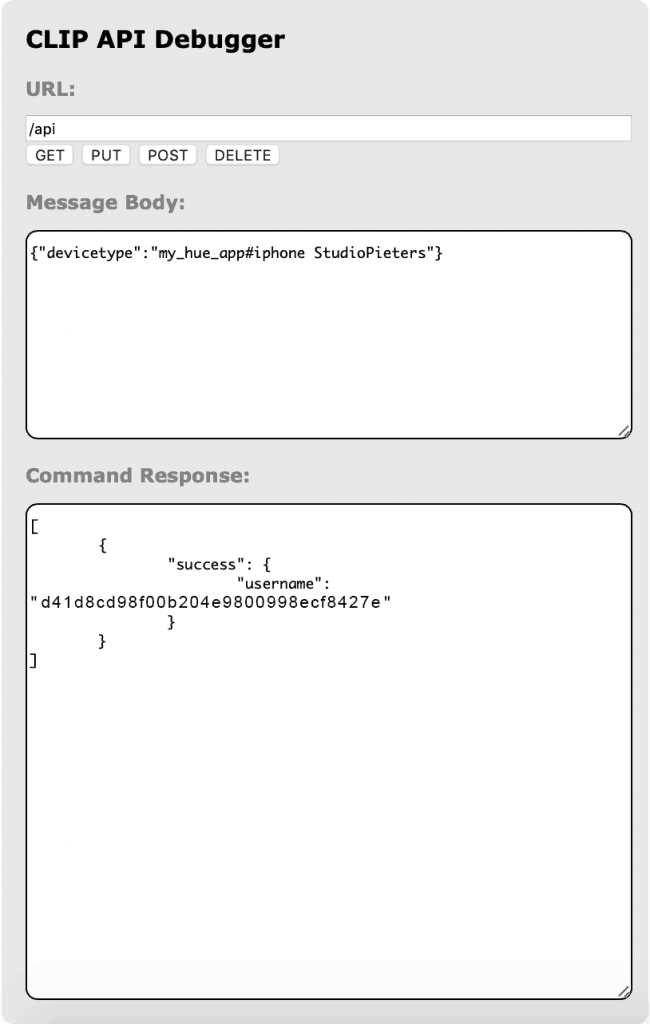

which we’ll use from now on! Now if you do the first GET command again you should get a whole lot more information about what lights you have and their states. This data is all in JSON format so can be easily processed by your applications.
Turning a light on and off
Okay now that we have a username with permission to use the system lets start having some fun.
Each light has its own URL. You can see what lights you have with the following command:
| URL: | https://<bridge ip address>/api/<username>/lights |
| Method | GET |
You should get a JSON response with all the lights in your system and their names.
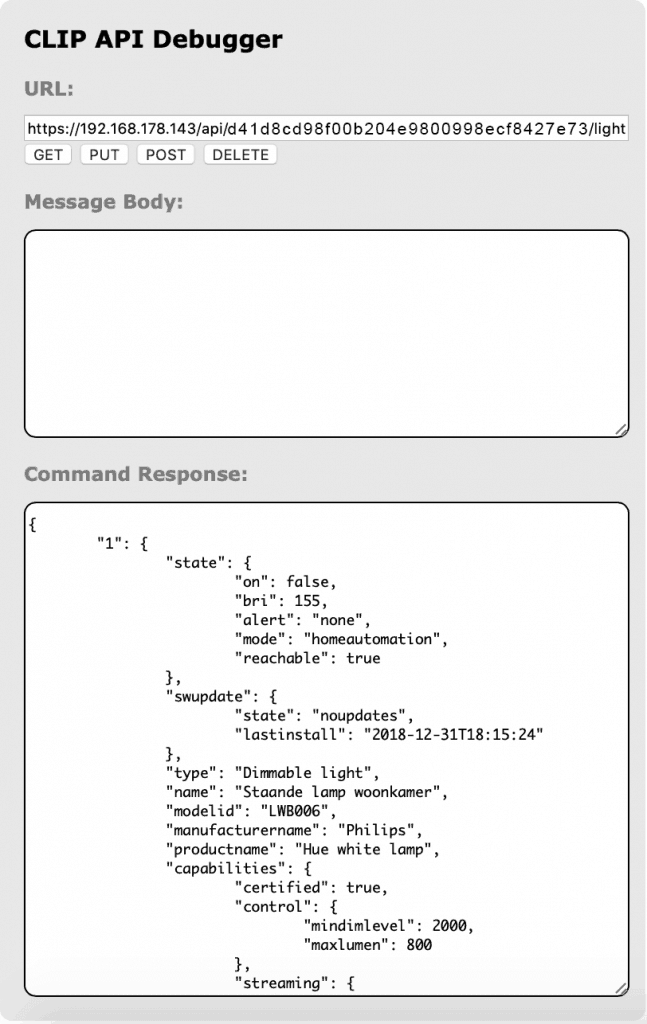
Now let’s get information about a specific light. The light with id 1.
| URL: | https://<bridge ip address>/api/<username>/lights/1 |
| Method | GET |

In this response you can see all of the resources this light has. The most interesting ones are inside the state object as these are the ones we’ll have to interact with to control the light.

Lets’ start with the “on” attribute. This is a very simple attribute that can have 2 values: true and false. So let’s try turning the light off.
| URL: | https://<bridge ip address>/api/<username>/lights/1/state |
| Body: | {“on”:false} |
| Method | PUT |
Looking at the command you are sending we’re addressing the “state” object of light one and telling it to modify the “on” value inside it to false (or off). When you press the PUT button the light should turn off. Change the value in the body to true and the light will turn on again.

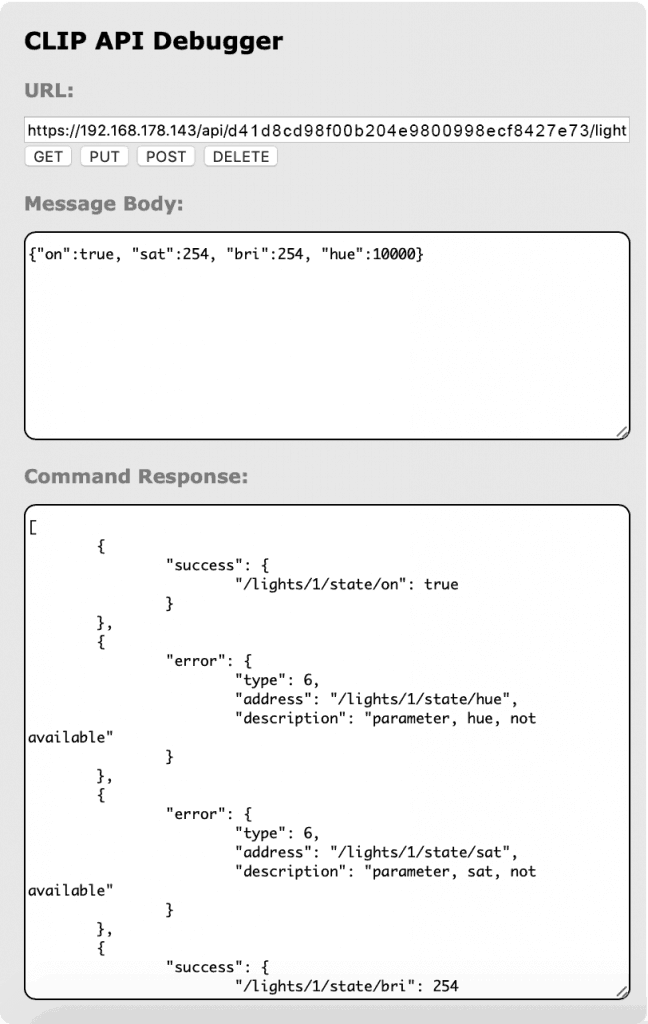
Now let’s do something a bit more fun and start changing some colors. Enter the command below.
| URL: | https://<bridge ip address>/api/<username>/lights/1/state |
| Body: | {“on”:true, “sat”:254, “bri”:254, “hue”:10000} |
| Method | PUT |
We’re interacting with the same “state” attributes here but now we’re modifying a couple more attributes. We’re making sure the light is on by setting the “on” resource to true. We’re also making sure the saturation (intensity) of the colors and the brightness is at its maximum by setting the “sat” and “bri” resources to 254. Finally we’re telling the system to set the “hue” (a measure of color) to 10000 points (hue runs from 0 to 65535). Try changing the hue value and keep pressing the PUT button and see the color of your light changing running through different colors.
Now you understand the basics of the commands you can send to hue through this tool – but we can also send the commands as part of an app.

The test
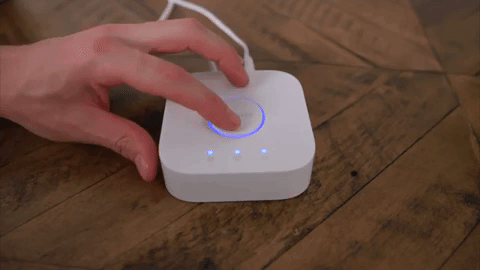
After changing these settings you are ready for upload ! Leave your setup as it is, and use the FTDI programmer connected as power supply. Now simply press the reset button to turn on and off your hue light. Here in the little movie I used a 16850 battery to test the setup.
YES IT WORKS!
Now that we have the basic hardware and software working, It’s time to see if we can power it upon one or two batteries in part II.
DOWNLOAD ALL FILES FOR THIS PROJECT ON GITHUB.

DO YOU HAVE ANY QUESTIONS? LEAVE A COMMENT DOWN HERE.
REFERENCE
Philips® Hue (JAN 1 2019), Change the way you experience light forever., https://www2.meethue.com, Instructables (OKT 11 2017), By Gelstronic, Poor Man’s Hue Switch , https://www.instructables.com/id/Poor-Mans-Hue-Switch/