Need to add a HomeKit device you build, but don’t have the QR code? HomeKit-enabled accessories come with a specific QR code and an 8-digit number for the setup process. In this blog, I will show you how to create your HomeKit QR Code and how to add extra security options.

HomeKit QR Code
First, have a look at the HomeKit QR Code. First, the 8-digit number for the setup process.
The 8-digit number is the most basic way to add your own made HomeKit device to the HomeKit App. This means that if you have the 8-digit number, you can add the device to the HomeKit App manually.
If you have the 8-digit number and the QR Code, you can add the device to the HomeKit App by simply Scanning the QR Code. The QR Code includes the 8-digit number.
Then there is a thirty option, in the Setup ID. If you have more than one device that you intend on pairing with a QR Code, you’ll need to ensure each has a unique Setup ID. This is the 4-character Setup ID you set for your HomeKit device from within your Code. This Setup ID is not visible on the QR Code image. The QR Code includes the 8-digit number and the Unique Setup ID.
Code
Before we can generate our QR Code, we need to add some lines of code. First, we have to select the Category of our device. These categories are predefined by Apple.

Value Accessory Category
1 Other
2 Bridges
3 Fans
4 Garage Door Openers
5 Lighting
6 Locks
7 Outlets
8 Switches
9 Thermostats
10 Sensors
11 Security Systems
12 Doors
13 Windows
14 Window Coverings
15 Programmable Switches
16 Reserved
17 IP Cameras
18 Video Doorbells
19 Air Purifiers
20 Heaters
21 Air Conditioners
22 Humidifiers
23 Dehumidifiers
24-27 Reserved
28 Sprinklers
29 Faucets
30 Shower Systems
31 Reserved
32 Remotes
32+ Reserved
In this case we are creating a Lightbulb, if we look at the table above it will fit the Accessory Category Lighting, so we have to add this to our HomeKit Setup by adding homekit_accessory_category_Lighting. See the code below.
homekit_accessory_t *accessories[] = {
        HOMEKIT_ACCESSORY(.id = 1, .category = homekit_accessory_category_Lighting, .services = (homekit_service_t*[]) {
                HOMEKIT_SERVICE(ACCESSORY_INFORMATION, .characteristics = (homekit_characteristic_t*[]) {
                        HOMEKIT_CHARACTERISTIC(NAME, "Lightbulb"),
                        HOMEKIT_CHARACTERISTIC(MANUFACTURER, "StudioPieters®"),
                        HOMEKIT_CHARACTERISTIC(SERIAL_NUMBER, "C39LDDQZFFD"),
                        HOMEKIT_CHARACTERISTIC(MODEL, "HKSP1LI/G"),
                        HOMEKIT_CHARACTERISTIC(FIRMWARE_REVISION, "0.0.1"),
                        NULL
                }),
Then we have to add an 8-digit number for the setup process. This is called .password.
The following are examples of setup codes that must not be used due to their trivial, insecure nature: 00000000, 11111111, 22222222, 33333333, 44444444, 55555555, 66666666, 77777777, 88888888, 99999999, 12345678 and 87654321
Then we have to add 4 characters for the unique Setup ID. This is called .setupid.
The letters have to be in capital letters. It can be any combination of letters and digits.
homekit_server_config_t config = {
        .accessories = accessories,
        .password = "323-71-678",
        .setupId = "1QJ8",
};
QR Code generation
Now that we have configured our main code, we have all the three data we need to make our HomeKit QR Code.
Category = 5 Lighting
Setup code = 323-71-678
Setup ID = 1QJ8
We only need the QR generation tool itself. Open the Terminal app. Click the Finder icon in your dock. Click Go. Click Utilities. Double-click Terminal. And type:
git clone --recursive https://github.com/maximkulkin/esp-homekit.gitThen we need to install some prerequisites.

Phyton 3
We can install Python 3 via the official website of Python. There are universal package installers available to install Python 3 on the required device.
Note: pip gets automatically installed in such cases also.
Install Pip 3 manually
Python provides the ensurepip module to install pip on devices if already not installed. It ensures that pip is installed into the existing Python installation.
Click the Finder icon in your dock. Click Go. Click Utilities. Double-click Terminal. And type:
python -m ensurepip
To upgrade the version of pip to the latest version available on ensurepip, we have to pass the --upgrade option.
python -m ensurepip --upgradePillow
The Python Imaging Library adds image processing capabilities to your Python interpreter. This library provides extensive file format support, an efficient internal representation, and fairly powerful image processing capabilities. The core image library is designed for fast access to data stored in a few basic pixel formats. It should provide a solid foundation for a general image processing tool.
pip3 install Pillow
QR Code
A Quick Response code is a two-dimensional pictographic code used for its fast readability and comparatively large storage capacity. The code consists of black modules arranged in a square pattern on a white background. The information encoded can be made up of any kind of data (e.g., binary, alphanumeric, or Kanji symbols)
pip3 install qrcode
Making a new QR Code
Go to the esp-homekit folder, you cloned from GitHub. Then you need to generate The code using the supplied script:
tools/gen_qrcode 5 323-71-678 1QJ8 qrcode.png
It will generate a QR Code like this one here.
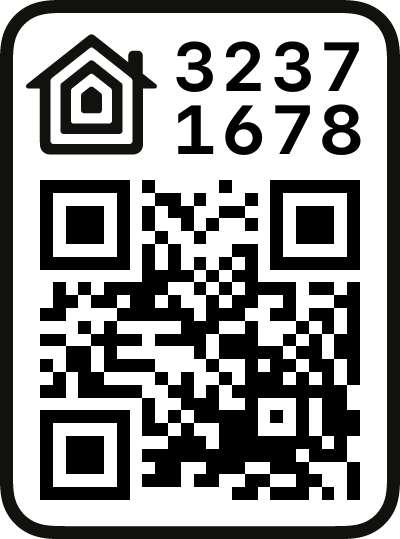

QR Code image
You probably noticed that the QR Code contains extra graphics, such as Apple’s HomeKit logo in the upper left. This is purely cosmetic and not required by the Home App for pairing. Similarly, having the device’s 8-digit Setup Code shown in big numerals in the upper right is also cosmetic and not needed for pairing. Though, it may be handy if you have problems scanning the QR Code and want to manually type the Setup Code into the Home App.
The only portion of the full graphic actually scanned by the Home App is the QR Code itself, which means you can create a HomeKit-compatible QR Code using any generic QR Code generator that allows you to input arbitrary text. The text you’ll need to input to such a QR Code generator is of course the Setup Payload. There is a relatively straightforward algorithm you can follow to produce the correct Setup Payload text for each of your own made devices.

How to add HomeKit accessories in Home app with a QR Code
To add an accessory to the Home app, use your iPhone, iPad, or iPod touch. You can’t add accessories to the Home app on Mac. Before you set up your accessory, check these things:
- Make sure that the accessory is powered on and nearby.
- Check the accessory’s manual to see if it needs additional hardware to work with HomeKit.
Then follow these steps:
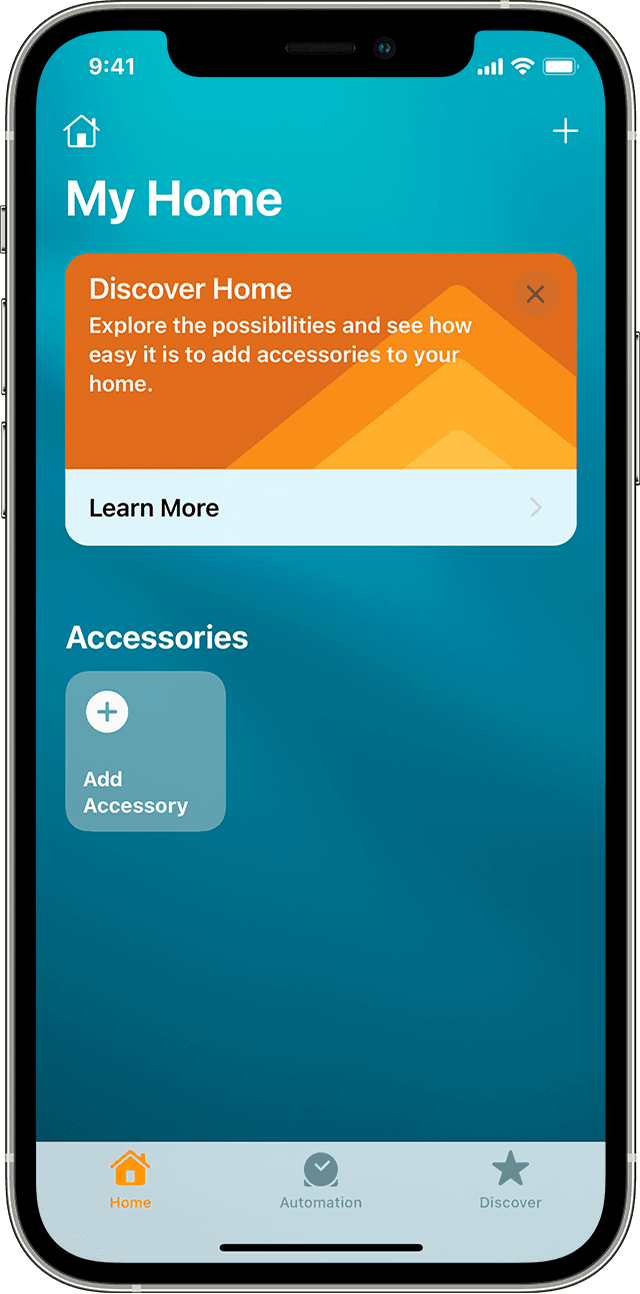
- Open the Home app and tap Add Accessory
 or Add
  .
. - Tap Add Accessory
 .
. - Use the camera on your iPhone, iPad, or iPod touch to scan the eight-digit HomeKit code, or QR code on the accessory or accessory documentation. If you have an iPhone 7 or later and see
 on your accessory, hold your iPhone near the accessory to add it.
 - When your accessory appears, tap it. If asked to Add Accessory to Network, tap Allow.
- Name your accessory and assign it to a room to help you identify it in the Home app and control it with Siri.
- Tap Next, then tap Done.
How to manually add HomeKit accessories in Home app
- Open the Home app and tap Add Accessory or Add .
- If it isn’t showing up as a nearby device, tap I Don’t Have a Code or Cannot Scan
- Under Manual Code tap Enter Code
- Tap your accessory to add it to your HomeKit setup