To Keep track of the current time you need a seperate module, because the arduino can’t do this for you. Therfore I found a DS3231 this is an “Extremely Accurate I²C-Integrated RTC/TCXO/Crystal”. This Real Time Clock (RTC) is the most precise you can get in a small, low power package.

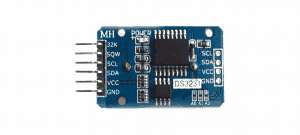
DS3231
Most RTC’s use an external 32kHz timing crystal that is used to keep time with low current draw. And that’s all well and good, but those crystals have slight drift, particularly when the temperature changes. This RTC is in a beefy package because the crystal is inside the chip! And right next to the integrated crystal is a temperature sensor. That sensor compensates for the frequency changes by adding or removing clock ticks so that the timekeeping stays on schedule.
This is the finest RTC you can get, and now we have it in a compact, breadboard-friendly breakout. With a coin cell plugged into the back, you can get years of precision timekeeping, even when main power is lost. Great for datalogging and clocks, or anything where you need to really know the time.
DS3231 Power Pins:
Vin – this is the power pin. Since the RTC can be powered from 2.3V to 5.5V power, you do not need a regulator or level shifter for 3.3V or 5V logic/power. To power the board, give it the same power as the logic level of your microcontroller – e.g. for a 5V micro like Arduino, use 5V.
GND – common ground for power and logic.
DS3231 I2C Logic pins:
SCL – I²C clock pin, connect to your microcontrollers I²C clock line. This pin has a 10K pullup resistor to Vin.
SDA – I²C data pin, connect to your microcontrollers I²C data line. This pin has a 10K pullup resistor to Vin.
Other Pins:
BAT – this is the same connection as the positive pad of the battery. You can use this if you want to power something else from the coin cell, or provide battery backup from a different separate batery. VBat can be between 2.3V and 5.5V and the DS3231 will switch over when main Vin power is lost.
32K – 32KHz oscillator output. Open drain, you need to attach a pullup to read this signal from a microcontroller pin.
SQW – optional square wave or interrupt output. Open drain, you need to attach a pullup to read this signal from a microcontroller pin.
RST – This one is a little different than most RST pins, rather than being just an input, it is designed to be used to reset an external device or indicate when main power is lost. Open drain, but has an internal 50K pullup. The pullup keeps this pin voltage high as long as Vin is present. When Vin drops and the chip switches to battery backup, the pin goes low.
Arduino Usage
You can easily wire this breakout to any microcontroller, we’ll be using an Arduino. For another kind of microcontroller, just make sure it has I²C.
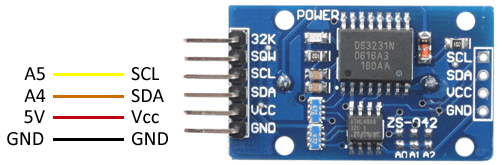
Connect Vin to the power supply, 3-5V is fine. Use the same voltage that the microcontroller logic is based off of. For most Arduinos, that is 5V.
Connect GND to common power/data ground.
Connect the SCL pin to the I²C clock SCL pin on your Arduino. On an 328 based Arduino, this is also known as A5, on a Mega it is also known as digital 21 and on a Leonardo/Micro, digital 3.
Connect the SDA pin to the I²C data SDA pin on your Arduino. On an 328 based Arduino, this is also known as A4, on a Mega it is also known as digital 20 and on a Leonardo/Micro, digital 2.
The DS3231 has a default I²C address of 0x68 and cannot be changed.
Download RTCLib
To begin reading data, you will need to download the RTCLib. You can do that by visiting the github repo and manually downloading it here. Place the RTCLib library folder your arduinosketchfolder/libraries/ folder. Restart the Arduino IDE.
Load the Example file
Open File – Examples – RTClib – DS3231 and upload to your Arduino wired up to the RTC. Upload to your Arduino and check the serial console @ 9600 baud. After a few seconds, you’ll see the report that the Arduino noticed this is the first time the DS3231 has been powered up, and will set the time based on the Arduino sketch. Unplug your Arduino plus RTC for a few seconds (or minutes, or hours, or weeks) and plug back in. Next time you run it you won’t get the same “RTC lost power” message, instead it will come immediately and let you know the correct time! From now on, you wont have to ever set the time again: the battery will last 5 or more years.
Reading the Time
Now that the RTC is merrily ticking away, we’ll want to query it for the time. Lets look at the sketch again to see how this is done.
void loop () {
    DateTime now = rtc.now();

    Serial.print(now.year(), DEC);
    Serial.print('/');
    Serial.print(now.month(), DEC);
    Serial.print('/');
    Serial.print(now.day(), DEC);
    Serial.print(" (");
    Serial.print(daysOfTheWeek[now.dayOfTheWeek()]);
    Serial.print(") ");
    Serial.print(now.hour(), DEC);
    Serial.print(':');
    Serial.print(now.minute(), DEC);
    Serial.print(':');
    Serial.print(now.second(), DEC);
    Serial.println();
There’s pretty much only one way to get the time using the RTClib, which is to call now(), a function that returns a DateTime object that describes the year, month, day, hour, minute and second when you called now().

There are some RTC libraries that instead have you call something like RTC.year() and RTC.hour() to get the current year and hour. However, there’s one problem where if you happen to ask for the minute right at 3:14:59 just before the next minute rolls over, and then the second right after the minute rolls over (so at 3:15:00) you’ll see the time as 3:14:00 which is a minute off. If you did it the other way around you could get 3:15:59 – so one minute off in the other direction.
Because this is not an especially unlikely occurrence – particularly if you’re querying the time pretty often – we take a ‘snapshot’ of the time from the RTC all at once and then we can pull it apart into day() or second() as seen above. Its a tiny bit more effort but we think its worth it to avoid mistakes!
We can also get a ‘timestamp’ out of the DateTime object by calling unixtime which counts the number of seconds (not counting leapseconds) since midnight, January 1st 1970
Serial.print(" since midnight 1/1/1970 = ");
Serial.print(now.unixtime());
Serial.print("s = ");
Serial.print(now.unixtime() / 86400L);
Serial.println("d");
Since there are 60*60*24 = 86400 seconds in a day, we can easily count days since then as well. This might be useful when you want to keep track of how much time has passed since the last query, making some math a lot easier (like checking if its been 5 minutes later, just see if unixtime() has increased by 300, you dont have to worry about hour changes).
DOWNLOAD ALL FILES FOR THIS PROJECT ON GITHUB.

DO YOU HAVE ANY QUESTIONS? LEAVE A COMMENT DOWN HERE.
REFERENCE
Lady Ada (FEB 05 2015), Adafruit DS3231 Precision RTC Breakout, https://learn.adafruit.com/adafruit-ds3231-precision-rtc-breakout/overview.