
The ESP32-C6 Super Mini is one of the most advanced microcontroller boards available today. Designed for performance, efficiency, and next-generation connectivity, it powers everything from smart home devices to cutting-edge IoT systems. Whether you’re a hobbyist or a professional developer, the ESP32-C6 gives you everything you need to build smarter, faster, and more efficiently.
What is the ESP32-C6?
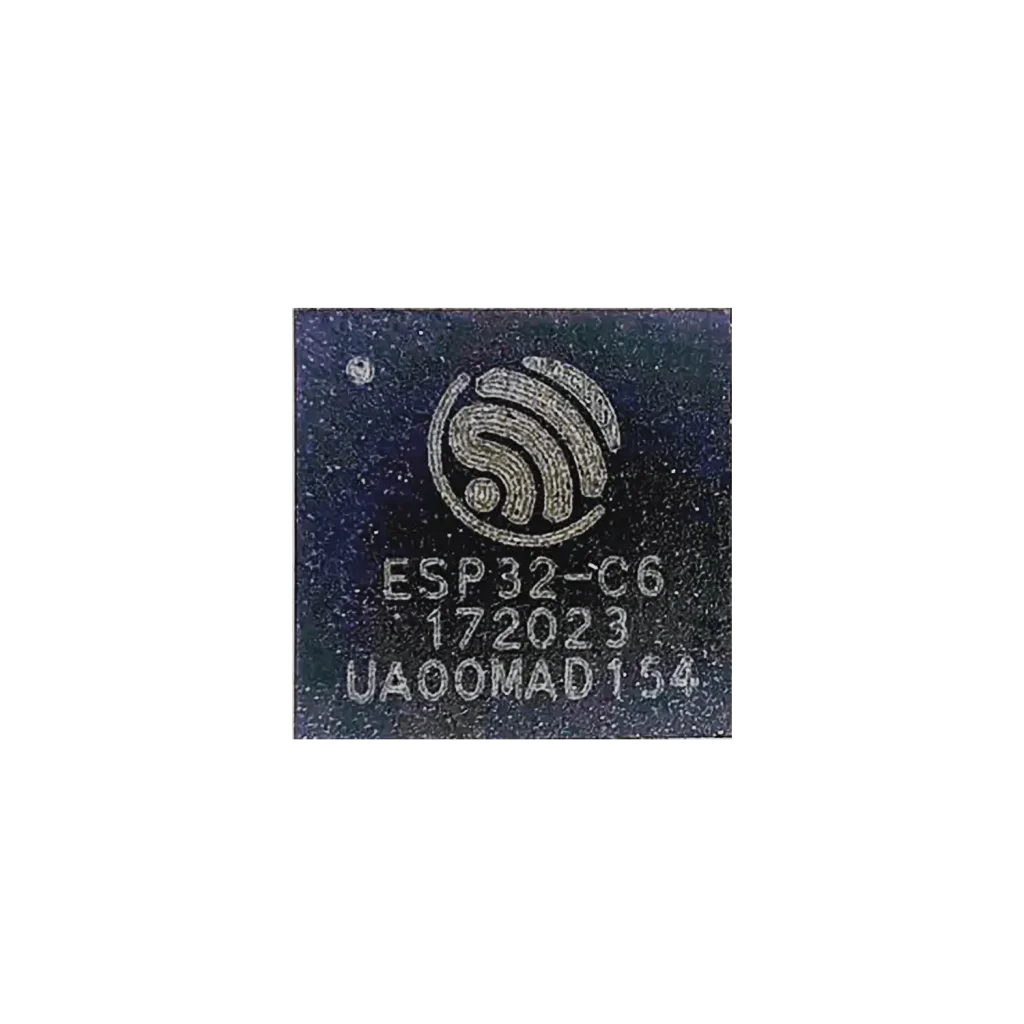
System-on-Chip (SoC)
At the heart of the ESP32-C6 lies a powerful SoC developed by Espressif Systems. It features a 32-bit RISC-V single-core processor running up to 160 MHz, combined with modern wireless capabilities such as:
- WiFi 6 (2.4 GHz)
- Bluetooth LE 5
- IEEE 802.15.4 (for Thread / Zigbee)
This makes the ESP32-C6 ideal for low-power, highly connected IoT applications where performance and efficiency matter.
Matter, Thread & Zigbee Support
One of the biggest missing pieces in many ESP32-C6 guides is its support for next-gen IoT standards:
- Matter
- Thread
- Zigbee



Why this matters:
- Matter enables interoperability between Apple, Google, and Alexa ecosystems
- Thread provides a low-power mesh network (ideal for battery devices)
- Zigbee offers compatibility with existing smart home ecosystems
The ESP32-C6 is one of the first ESP chips that can act as a future-proof smart home controller.
⚠️ Important:
The ESP32-C6 has a single 802.15.4 radio, which means:
- Thread and Zigbee cannot be used simultaneously
- You must choose one protocol depending on your application
This is a hardware limitation of the chip.
WiFi 6 (Important nuance)
While the ESP32-C6 supports WiFi 6, it is important to understand:
- Only 2.4 GHz
- Focus on efficiency, not speed
- Features like Target Wake Time improve battery usage
This is designed for IoT stability and power savings — not high throughput.
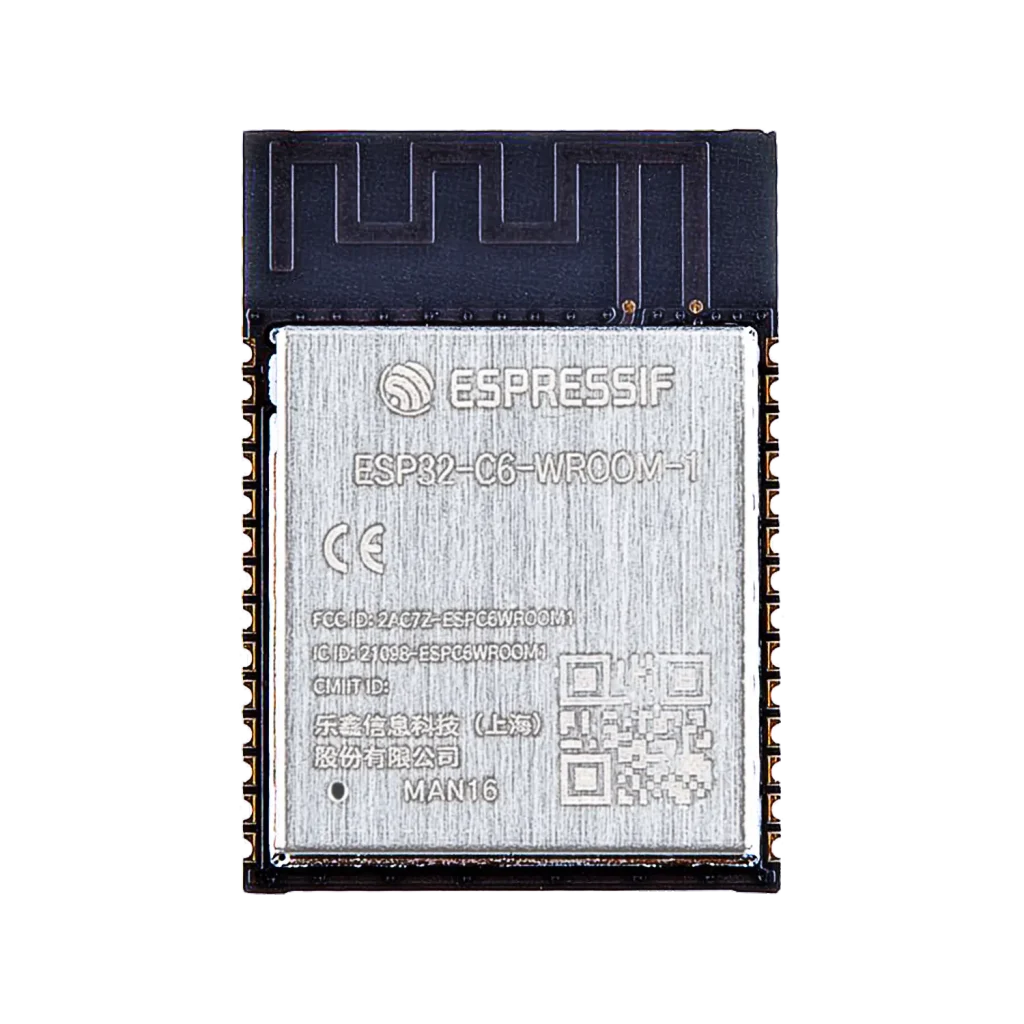
Module
The ESP32-C6 Super Mini is built around an integrated module that combines:
- The ESP32-C6 chip
- Flash memory (typically 4 MB)
- Crystal oscillator
- Passive components
Important nuance:
The external flash memory is connected via SPI and uses specific GPIOs internally. These pins may not be available as general-purpose I/O, depending on the module variant.
Development Board
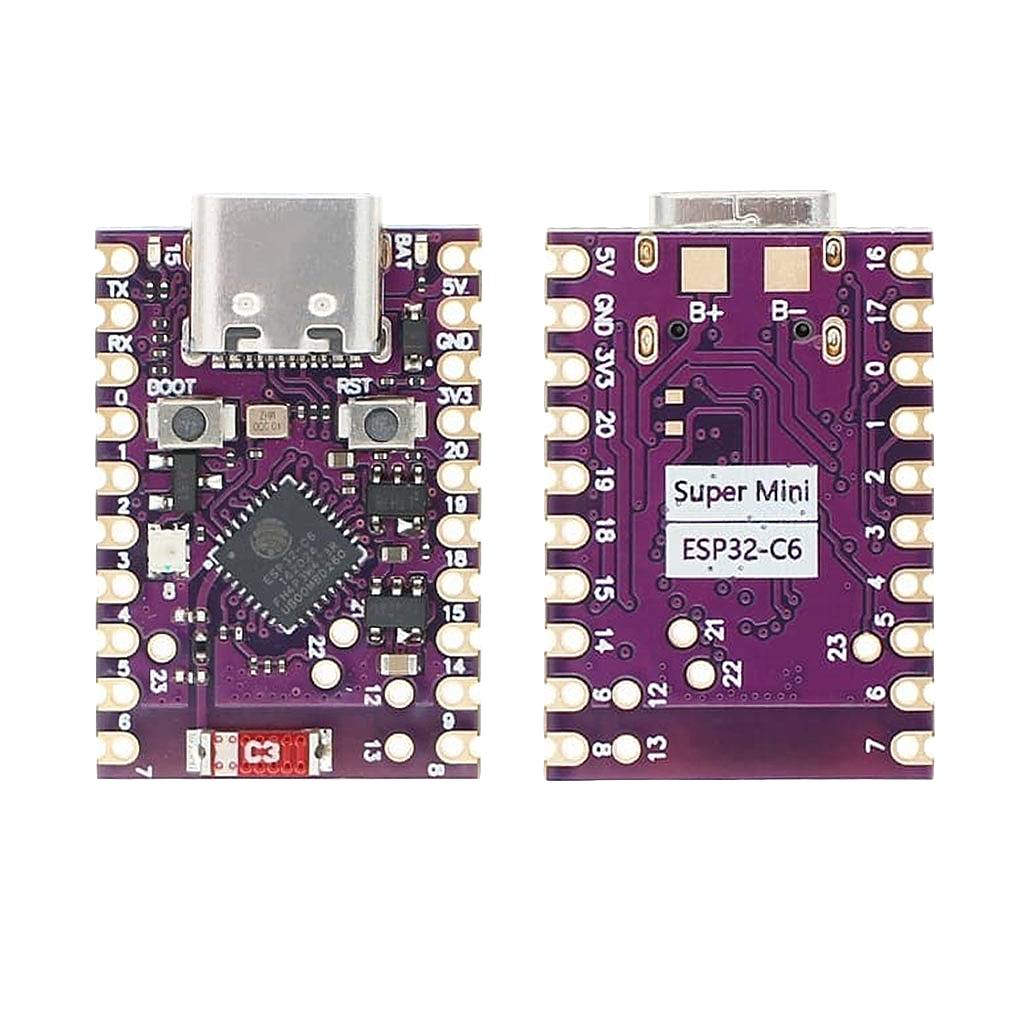
The Super Mini board exposes the module in a compact and practical form factor, featuring:
- USB Type-C for programming and power
- Accessible GPIO pins
- Onboard LEDs
- Stamp-hole design for direct PCB mounting
Important detail often overlooked:
- USB is implemented using native USB (CDC/JTAG)
- GPIO12 → USB D-
- GPIO13 → USB D+
- Most boards do NOT include a USB-UART bridge (e.g. CP2102)
This means:
- Flashing is done via USB CDC
- Debugging uses USB JTAG
This differs from older ESP32 boards.
Power & Battery Considerations (Often Overlooked)
Important Reality Check
ESP32-C6 Super Mini boards vary significantly in power design. Many boards (including common variants) include:
- Battery pads (B+ and B-) for LiPo / Li-ion connection
- Onboard charging circuit (USB → battery)
- No standard JST connector (soldering required)
Other variants may only include a 3.3V regulator without charging support.
Always verify your specific board using the schematic.
Power Pins (Essential for Safe Use)
Typical pins include:
- 5V / VBUS (from USB)
- 3V3 (regulated output)
- GND
- EN (enable/reset)
Battery Usage (Best Practice)
If your board includes B+ / B- pads:
- You can connect a LiPo battery directly
- Charging may be handled via USB (if a charging IC is present)
If not:
Use an external charger (e.g. TP4056)
Battery Monitoring via ADC
The ESP32-C6 ADC can be used for battery measurement.
⚠️ Important:
- Never connect a battery directly to ADC
- Use a voltage divider (e.g. 100k / 100k)
Low Power Modes
The ESP32-C6 includes:
- Light sleep
- Deep sleep
⚠️ Reality check:
Actual power consumption depends heavily on:
- Onboard LEDs (often always on)
- Voltage regulator efficiency
- Charging circuitry
For true low-power designs:
- Disable or remove LEDs
- Measure real current consumption
Power Pitfalls
- WS2812 RGB LED → high current draw (~50mA)
- Status LEDs → constant drain
- WiFi → current spikes up to ~300mA
⚠️ WiFi 6 power spikes can cause instability on weak regulators or batteries.
Always ensure:
- Battery capable of peak current
- Stable 3.3V supply
- Adequate decoupling
Designed for Connectivity and Control
The ESP32-C6 offers:
- Low-power modes
- WiFi 6 (802.11ax, 2.4 GHz)
- Bluetooth 5 LE + Mesh
- RISC-V CPU @ 160 MHz
- Flexible GPIO
- ADC
- PWM
- UART, I2C, SPI
- Native USB
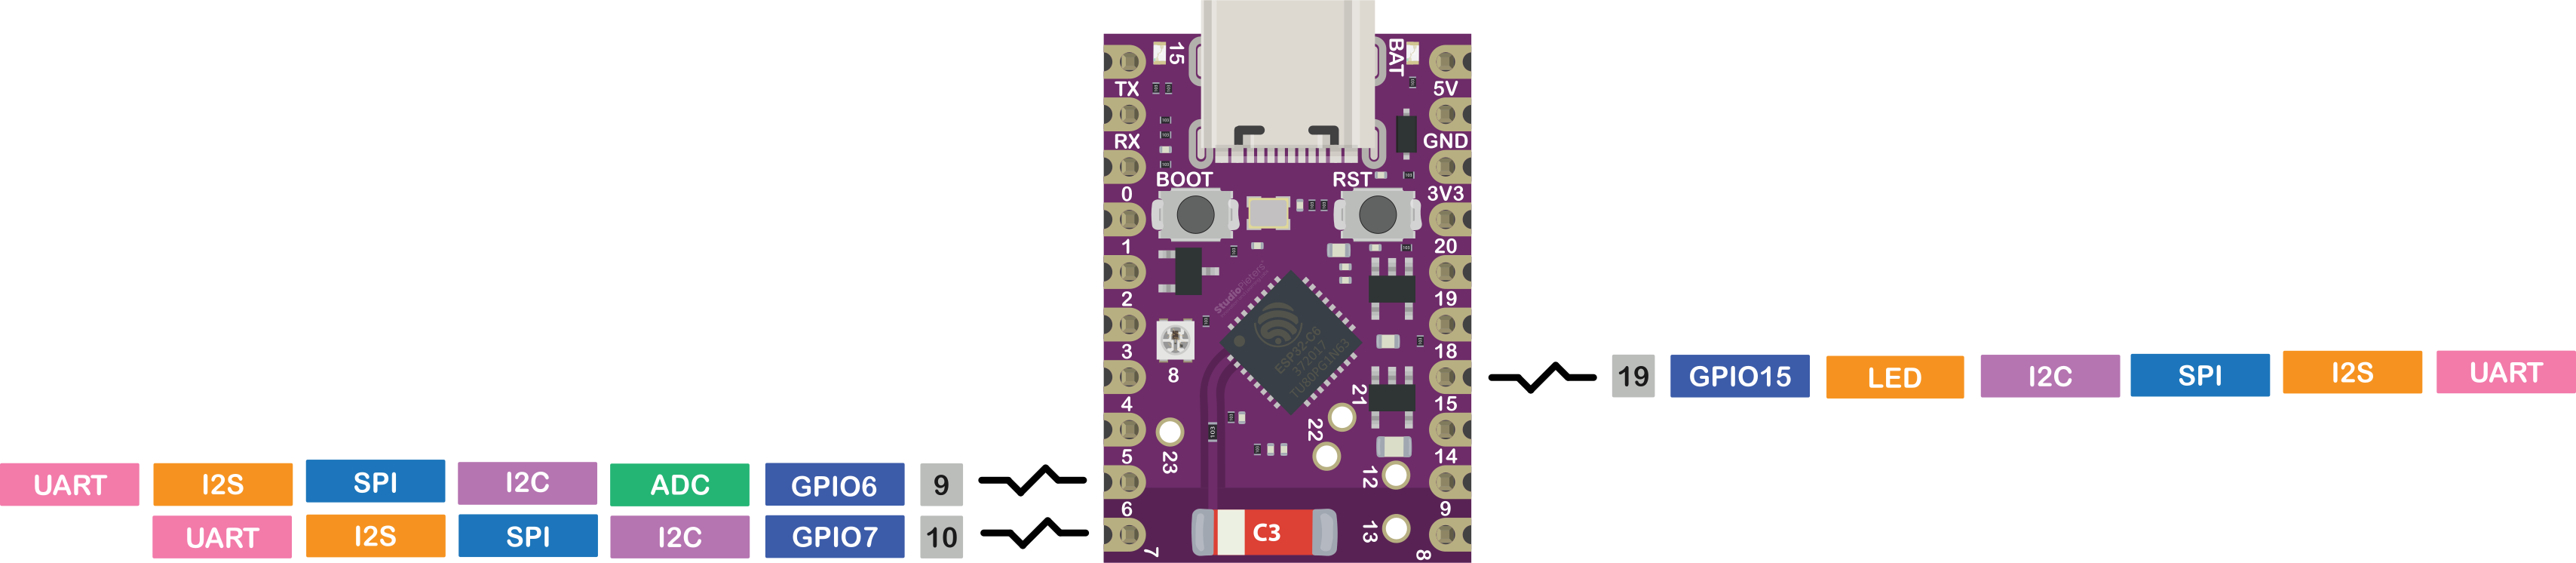
ESP32-C6 Pinout – GPIO Fundamentals
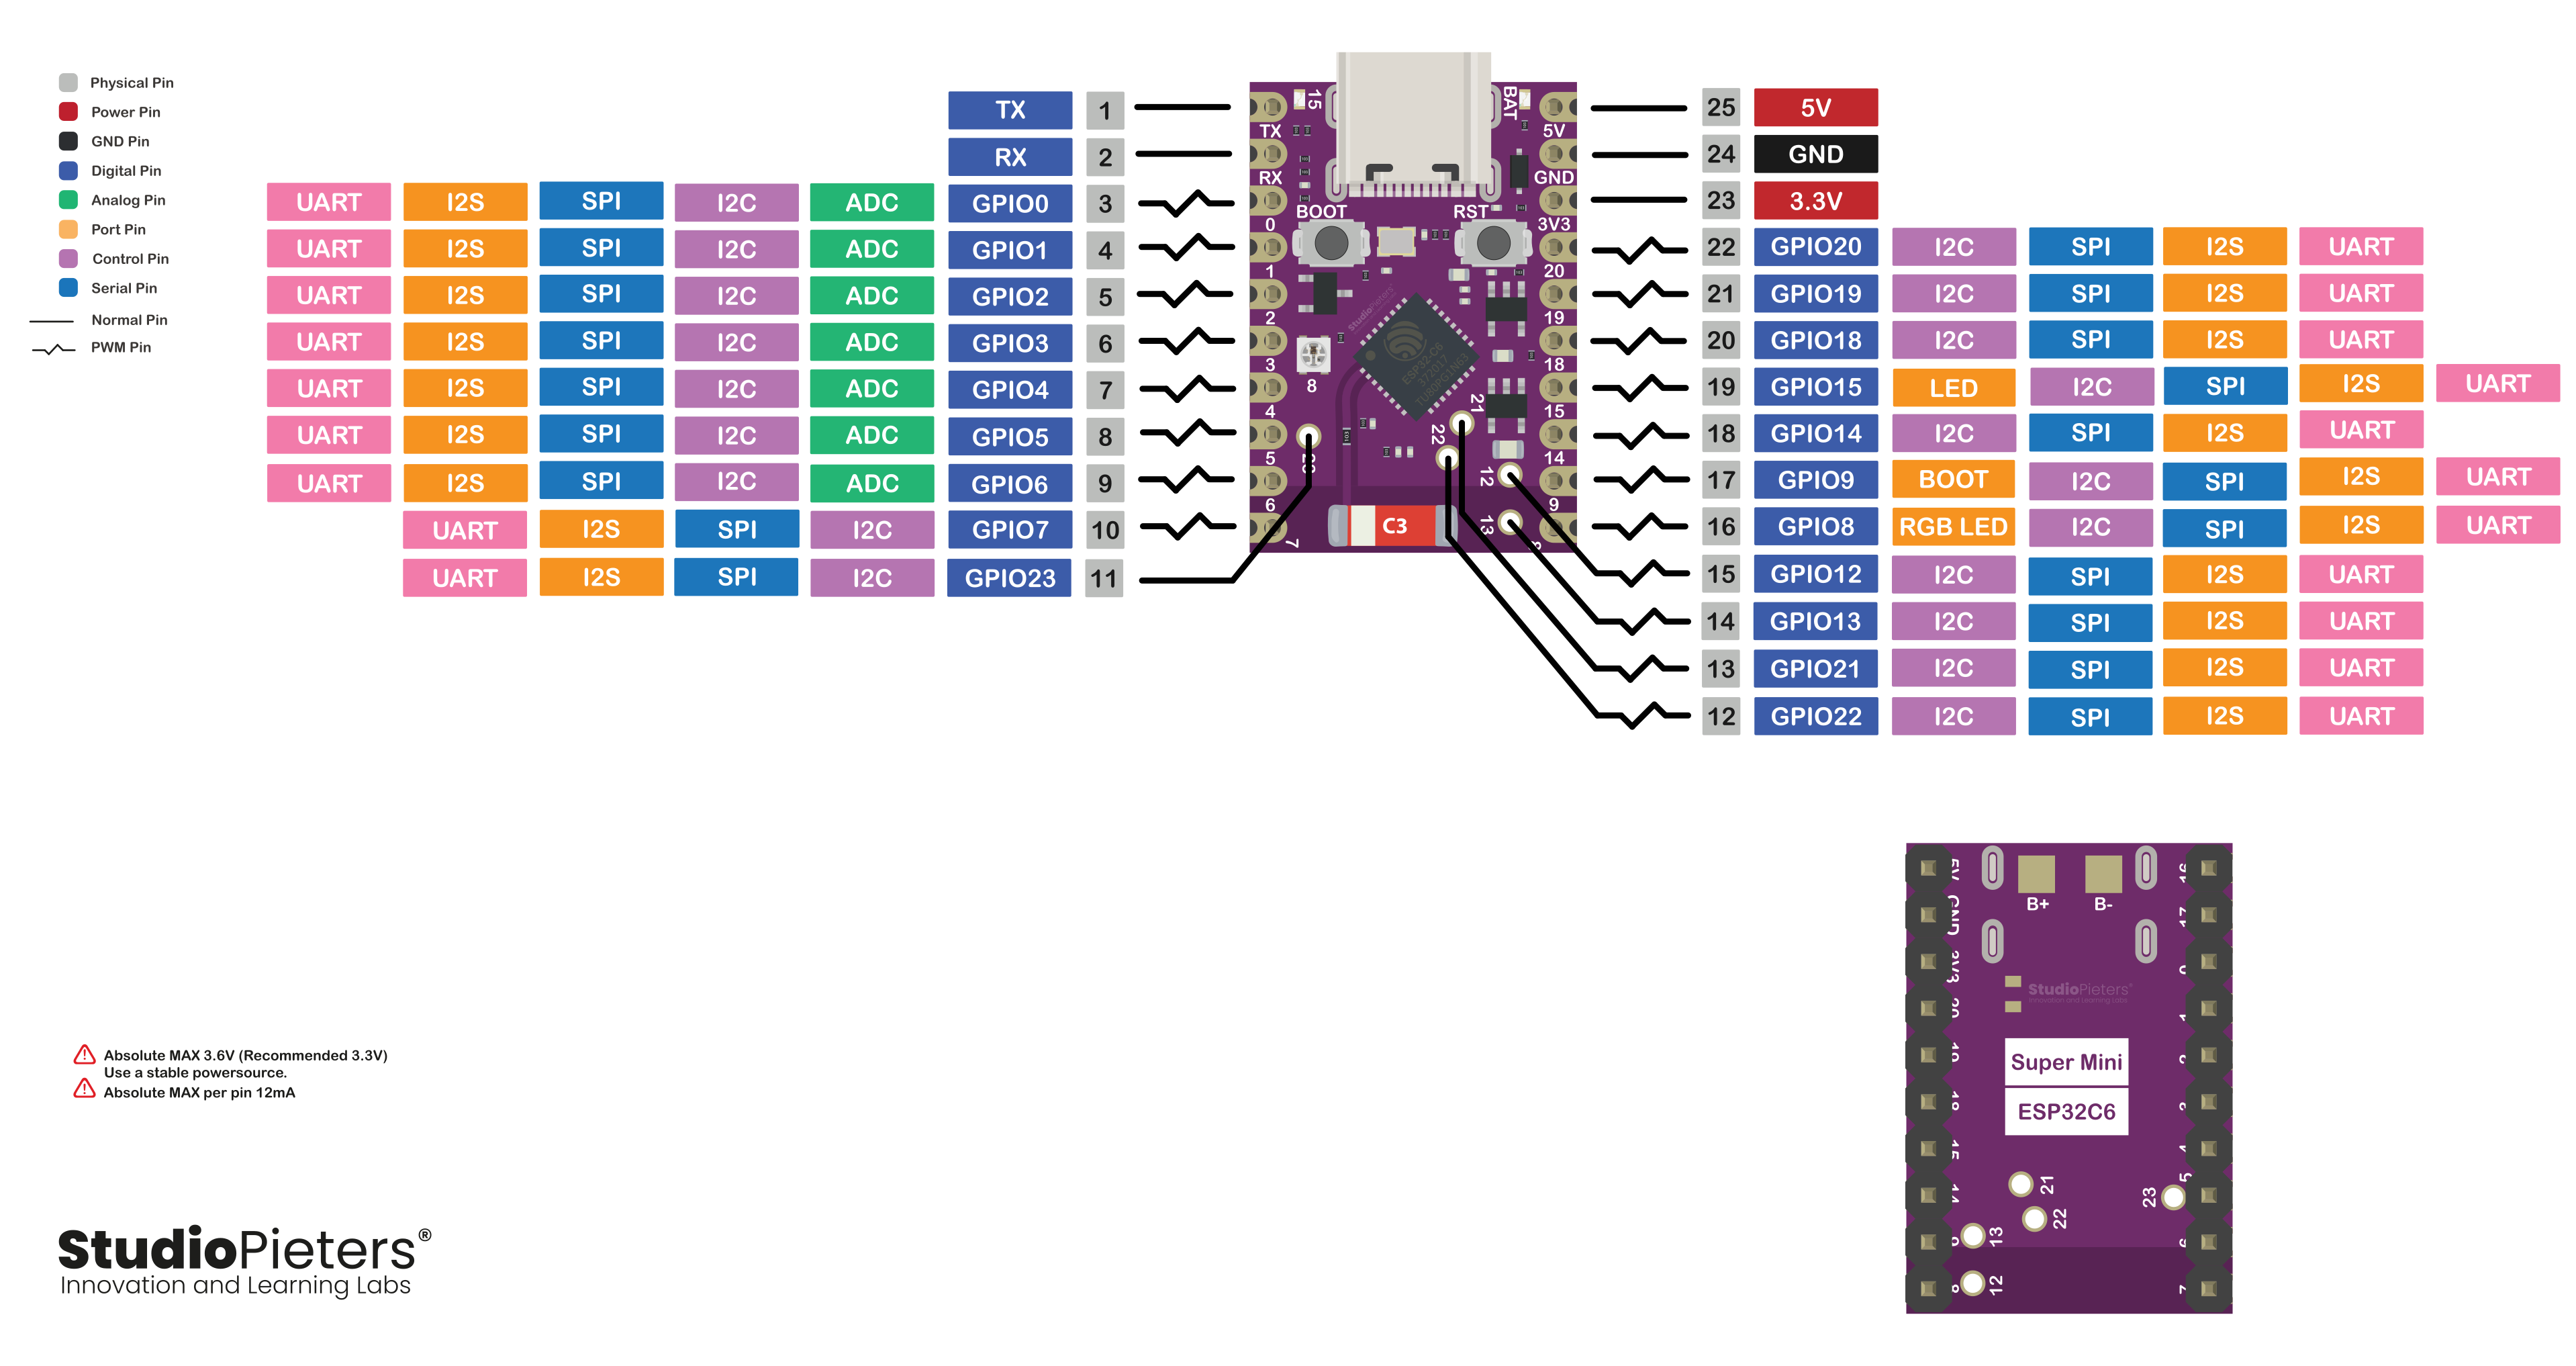
The ESP32-C6 Super Mini provides a flexible set of GPIO pins. However, not all pins are equal.
Some are:
- Used for boot configuration
- Fully general-purpose
- Shared with internal hardware
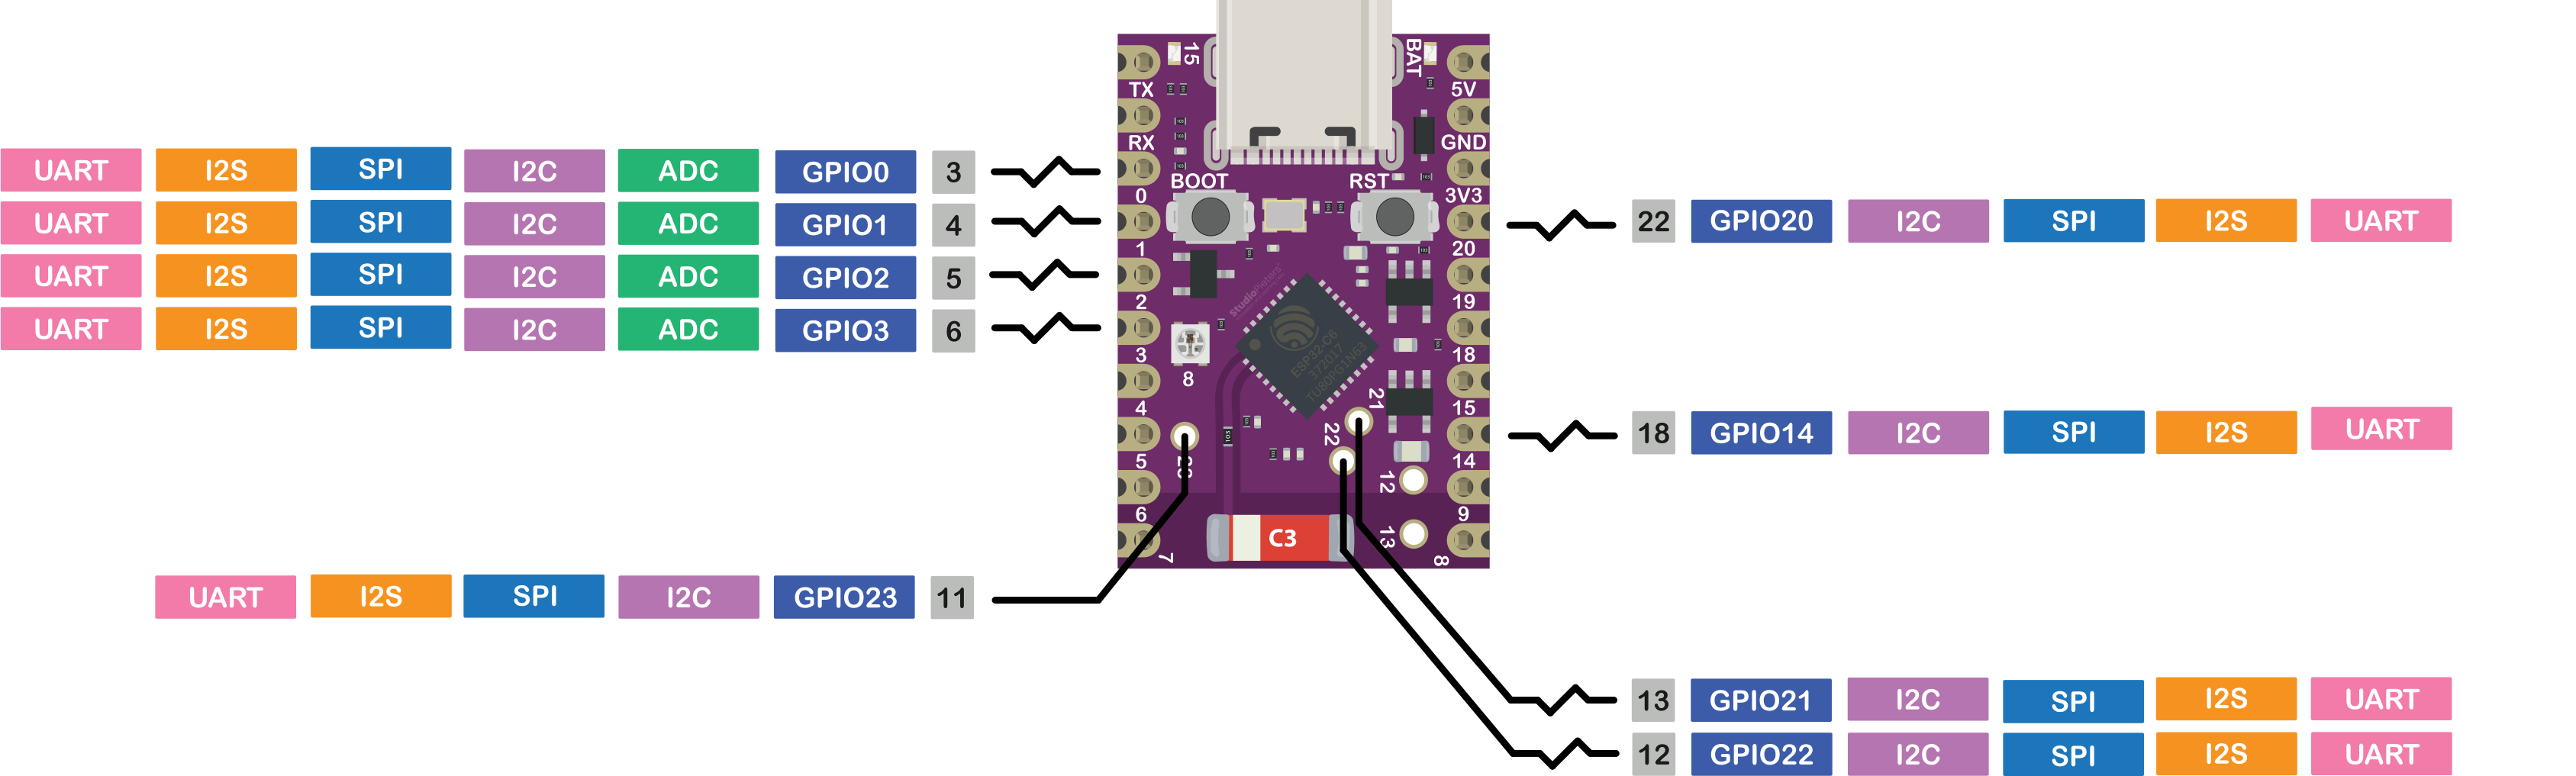
Safe GPIO Pins
Commonly usable pins include:
- IO0, IO1, IO2, IO3
- IO14
- IO20, IO21, IO22, IO23
⚠️ Important correction:
These pins are not always fully free, depending on the board:
- GPIO8 → often connected to RGB LED
- GPIO12/13 → used for USB
- GPIO18/19 → may be used for flash
Always verify with the schematic.
Pins to Avoid or Use with Caution
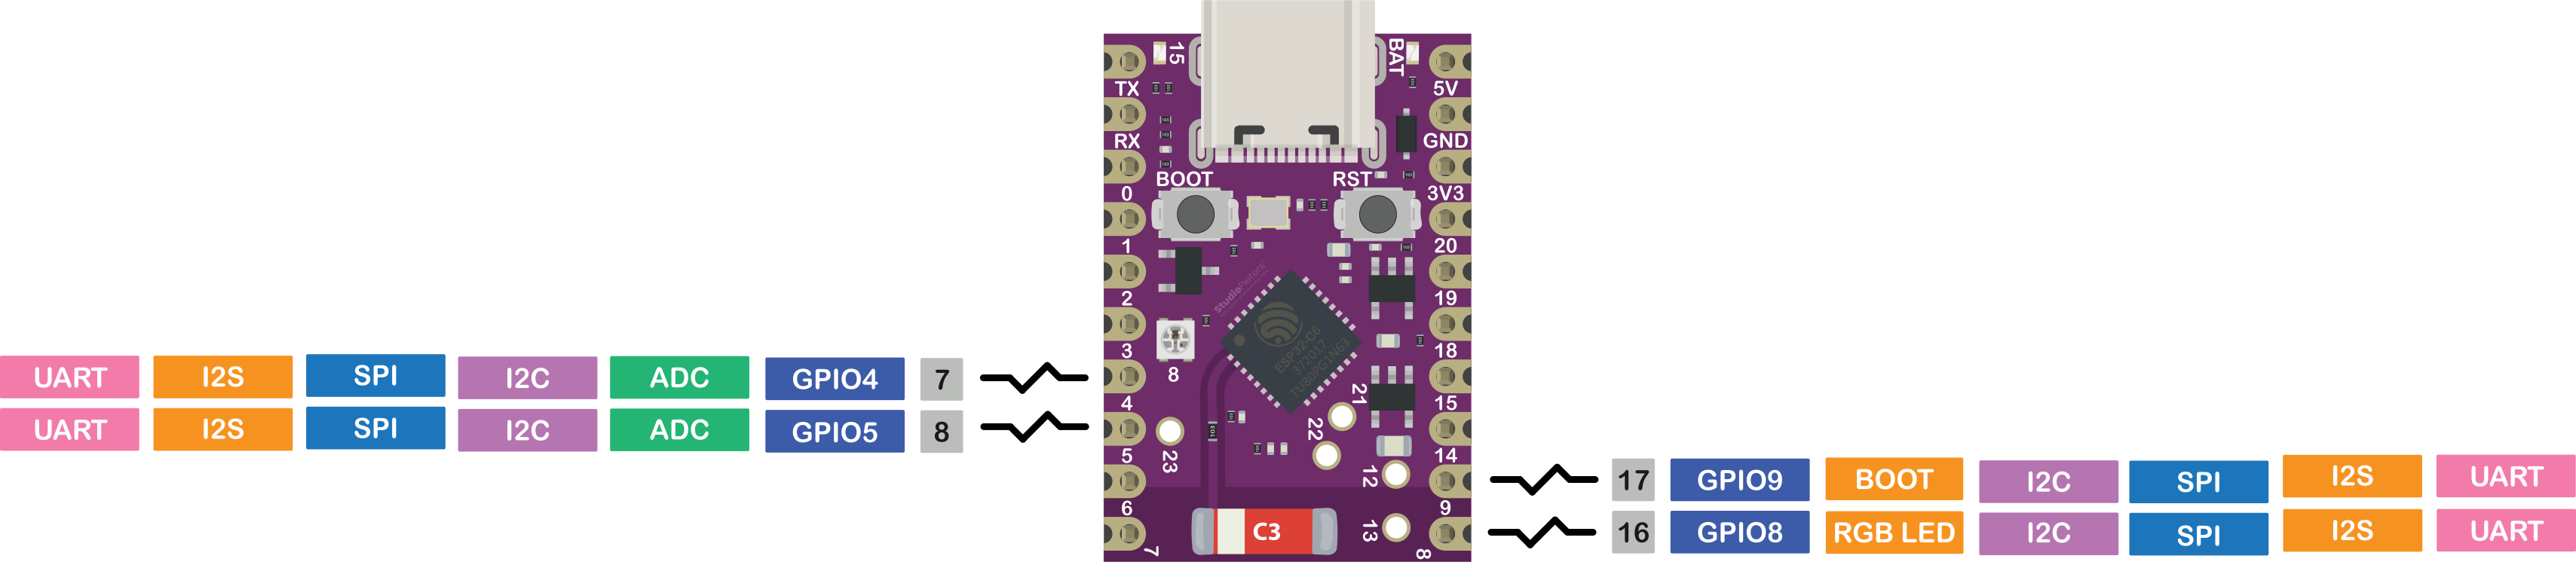
Strapping Pins (Boot Configuration)
- IO4, IO5, IO8, IO9, IO15
⚠️ These pins influence boot mode.
Hardware pull-up/down resistors on the board determine their behavior.
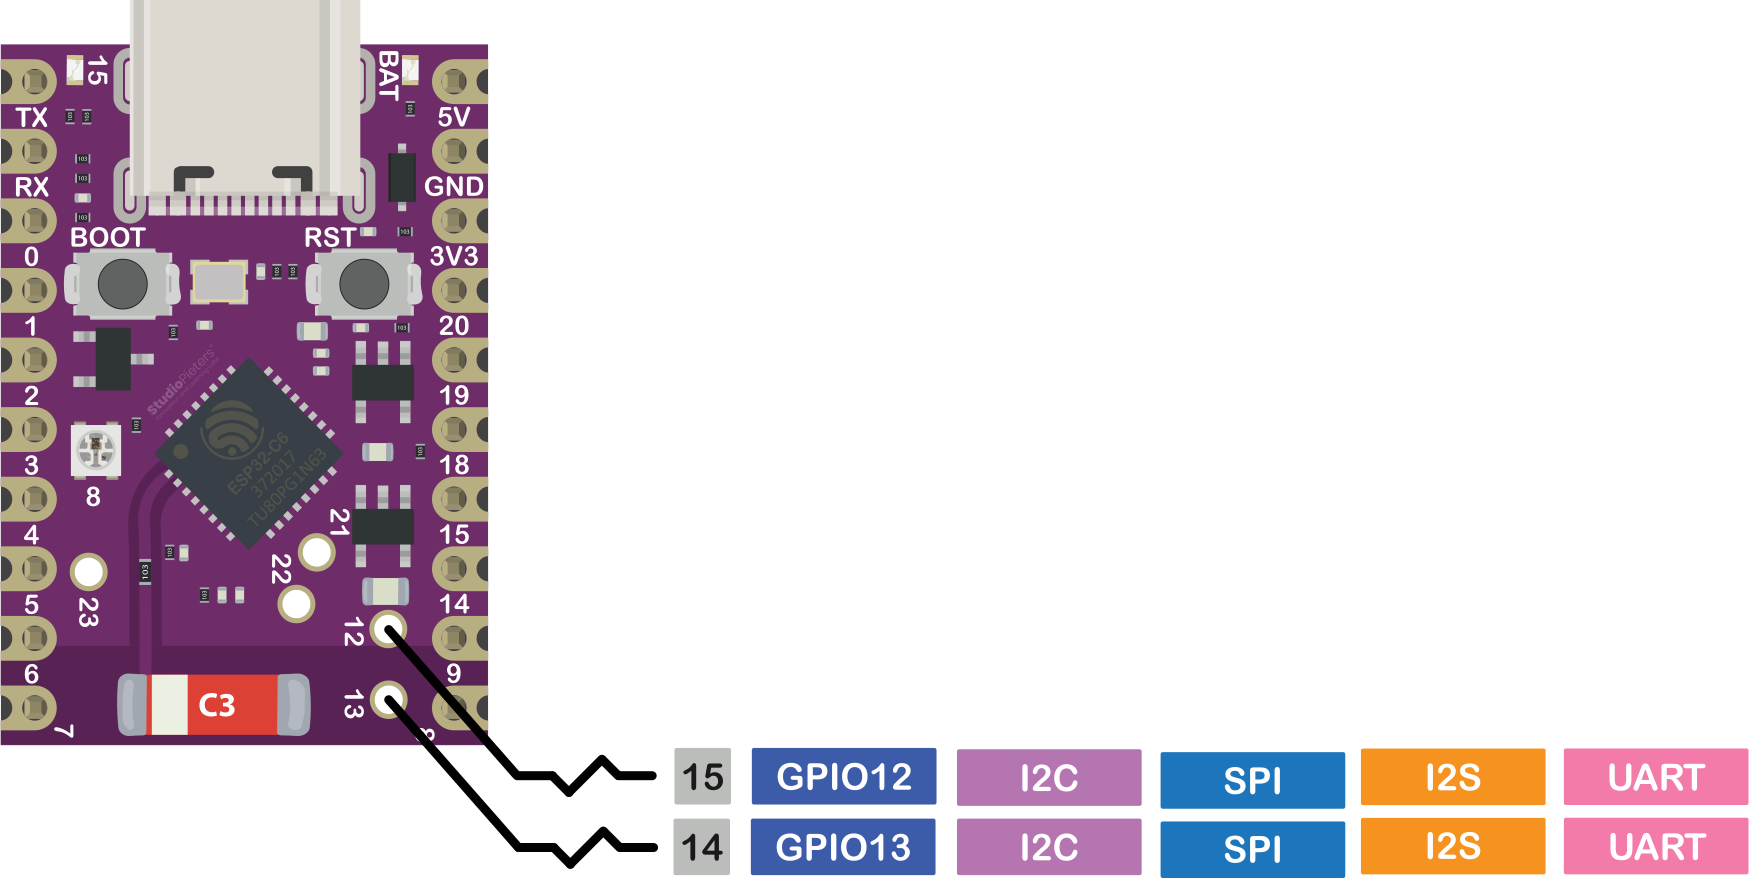
USB Pins
- IO12 (USB D-)
- IO13 (USB D+)
Do not use if USB functionality is required.
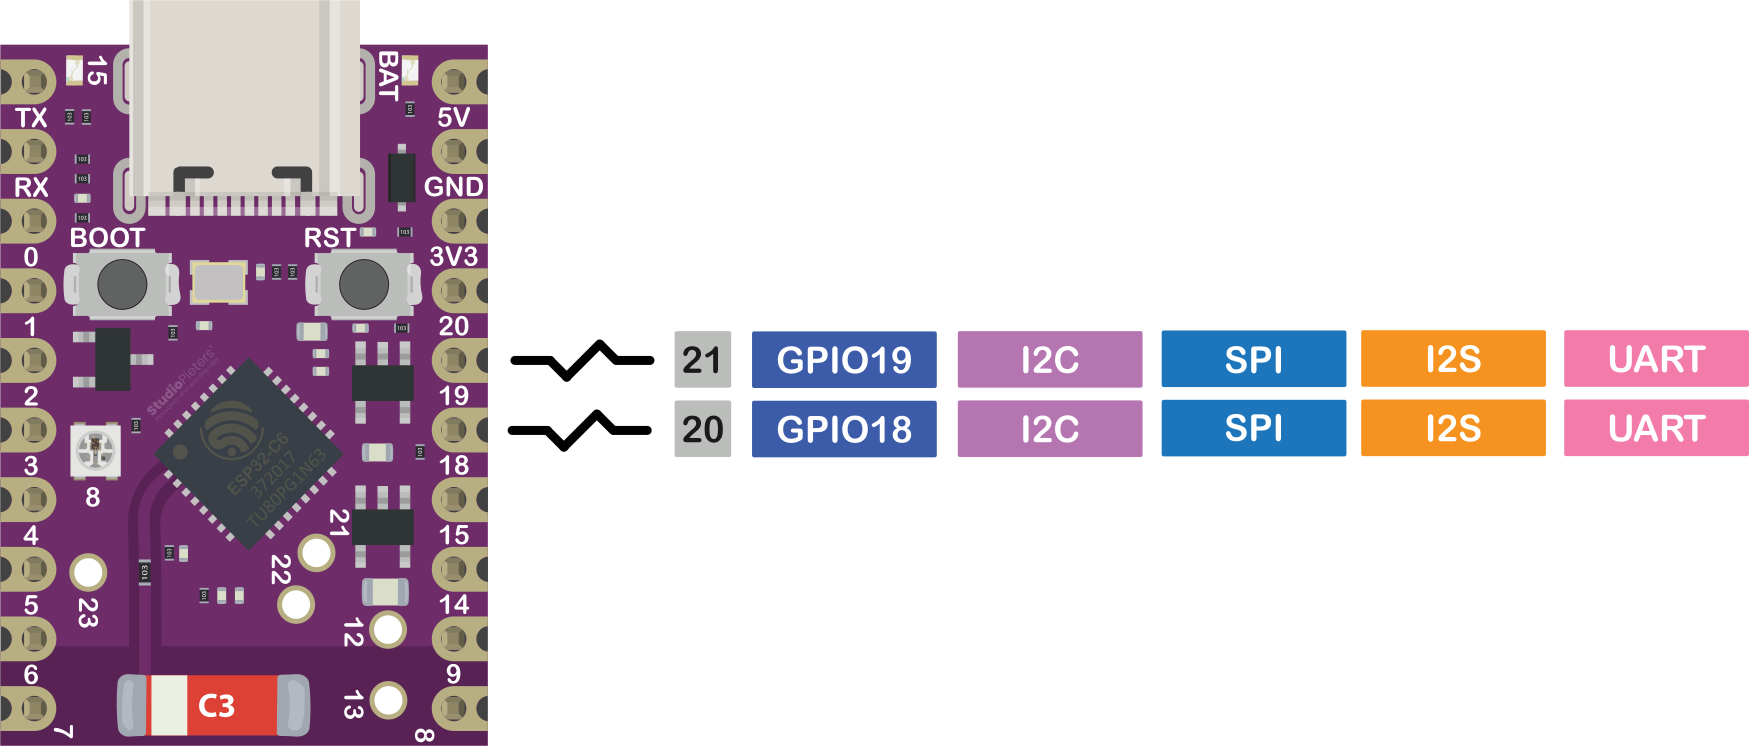
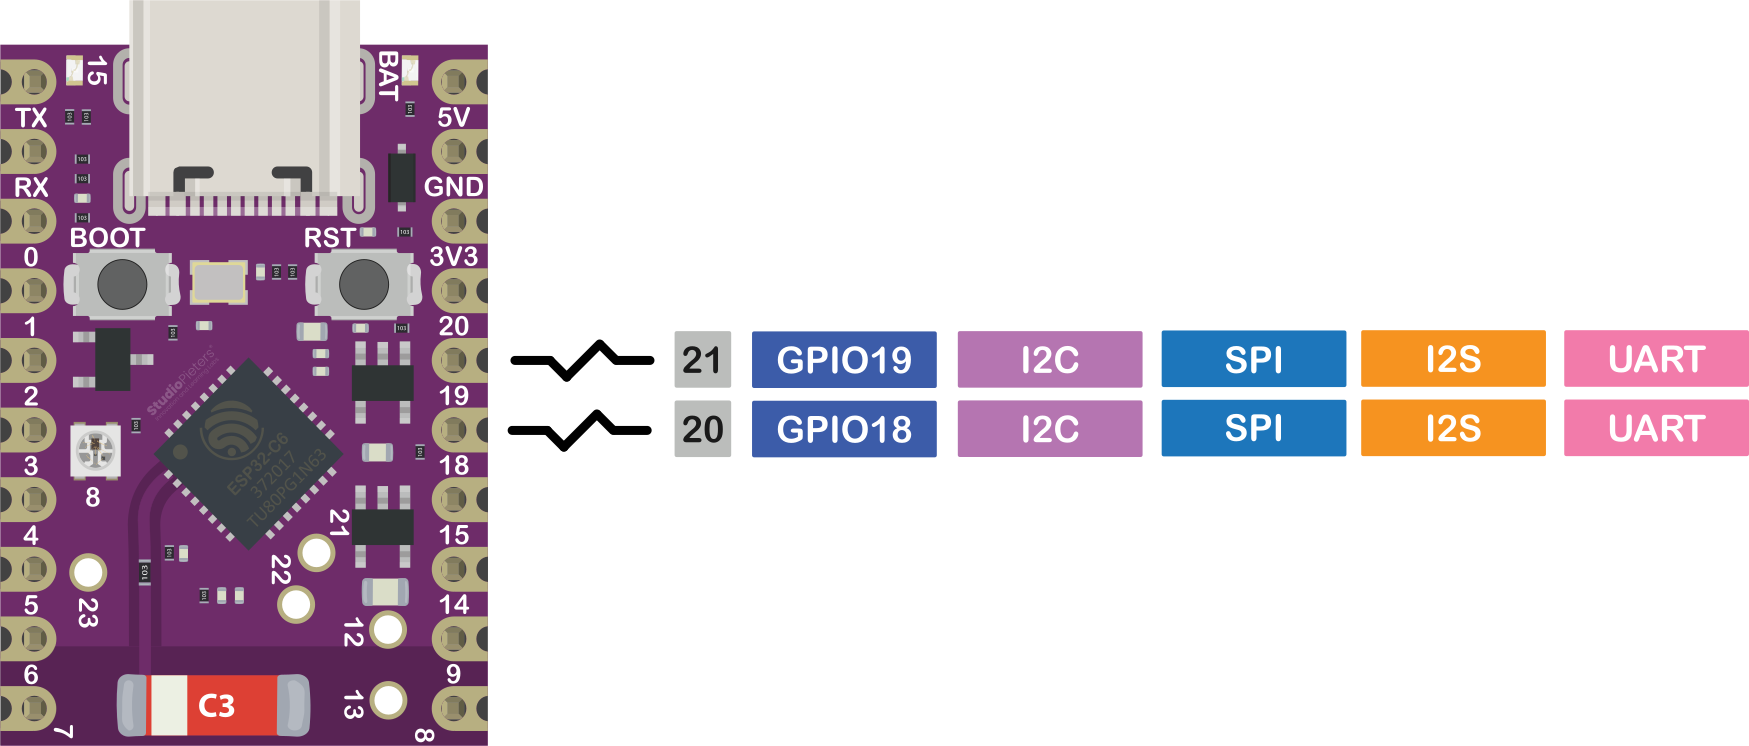
Flash / SPI Pins
- IO18, IO19
⚠️ Often internally connected to flash → not usable as GPIO.
JTAG / Debug Pins
- IO6, IO7, IO15
Used for debugging — best left unused unless required.
Advanced GPIO Features
ADC
Available on GPIO0–GPIO6.
Used for:
- Sensors
- Battery monitoring
- Analog inputs
⚠️ ADC accuracy may be affected by WiFi activity.
PWM
Available on most GPIOs.
Used for:
- LED dimming
- Motor control
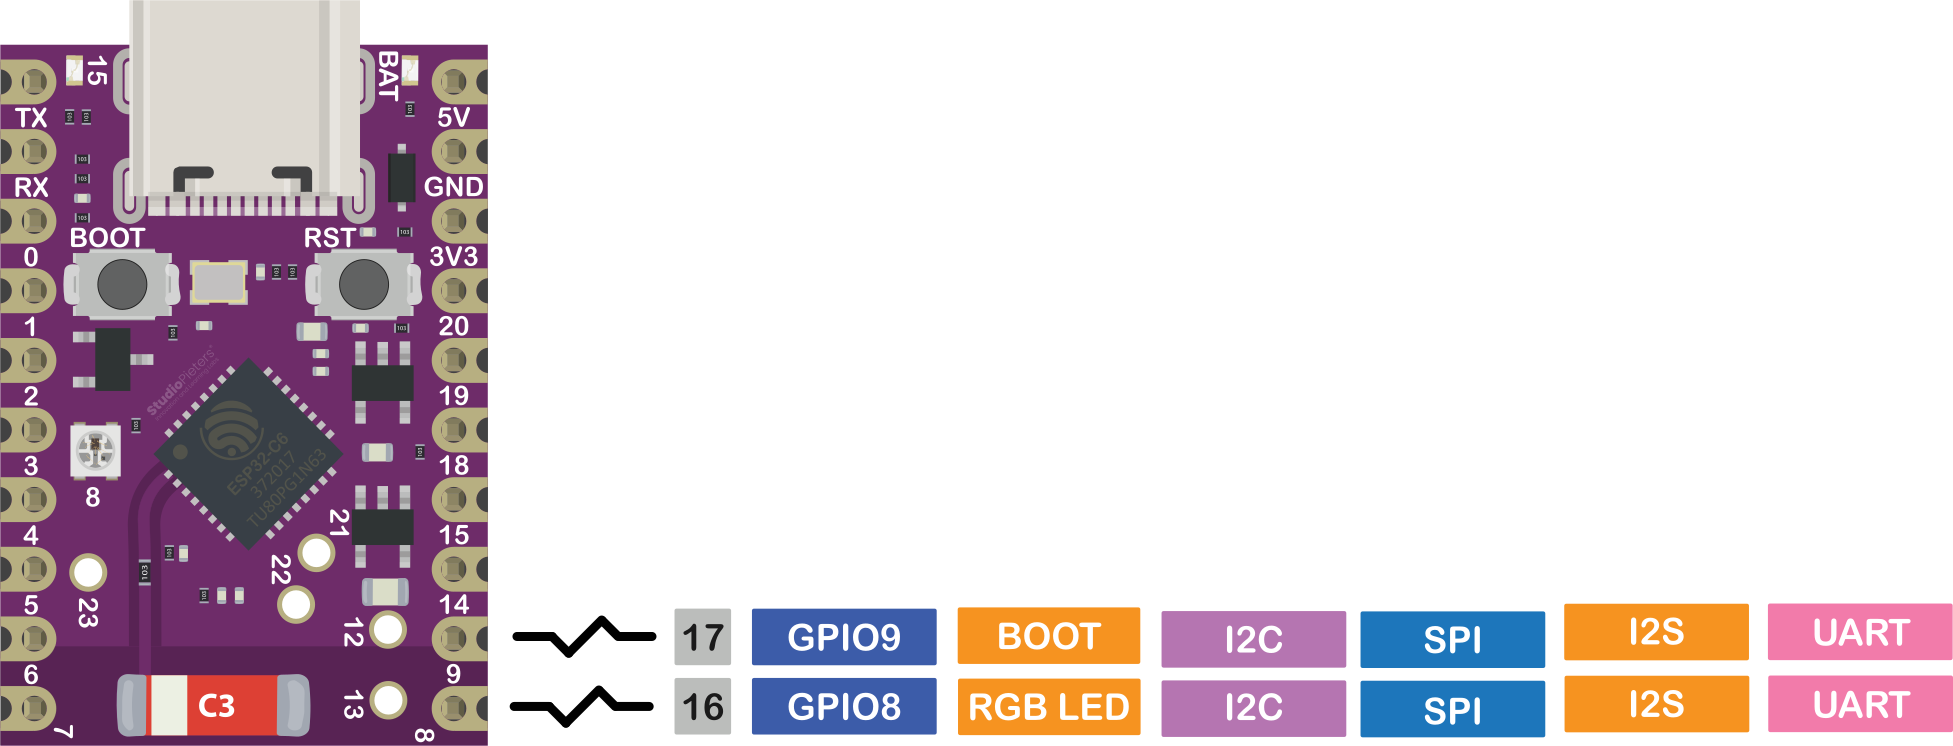
I2C
Software configurable.
Example:
- SCL → GPIO2
- SDA → GPIO1
SPI
Fully configurable, but:
⚠️ Avoid strapping and flash pins when possible.
UART & USB
- UART → debugging / serial
- Native USB → direct communication
ESP32-C6 uses USB CDC and USB JTAG by default.
Onboard Features
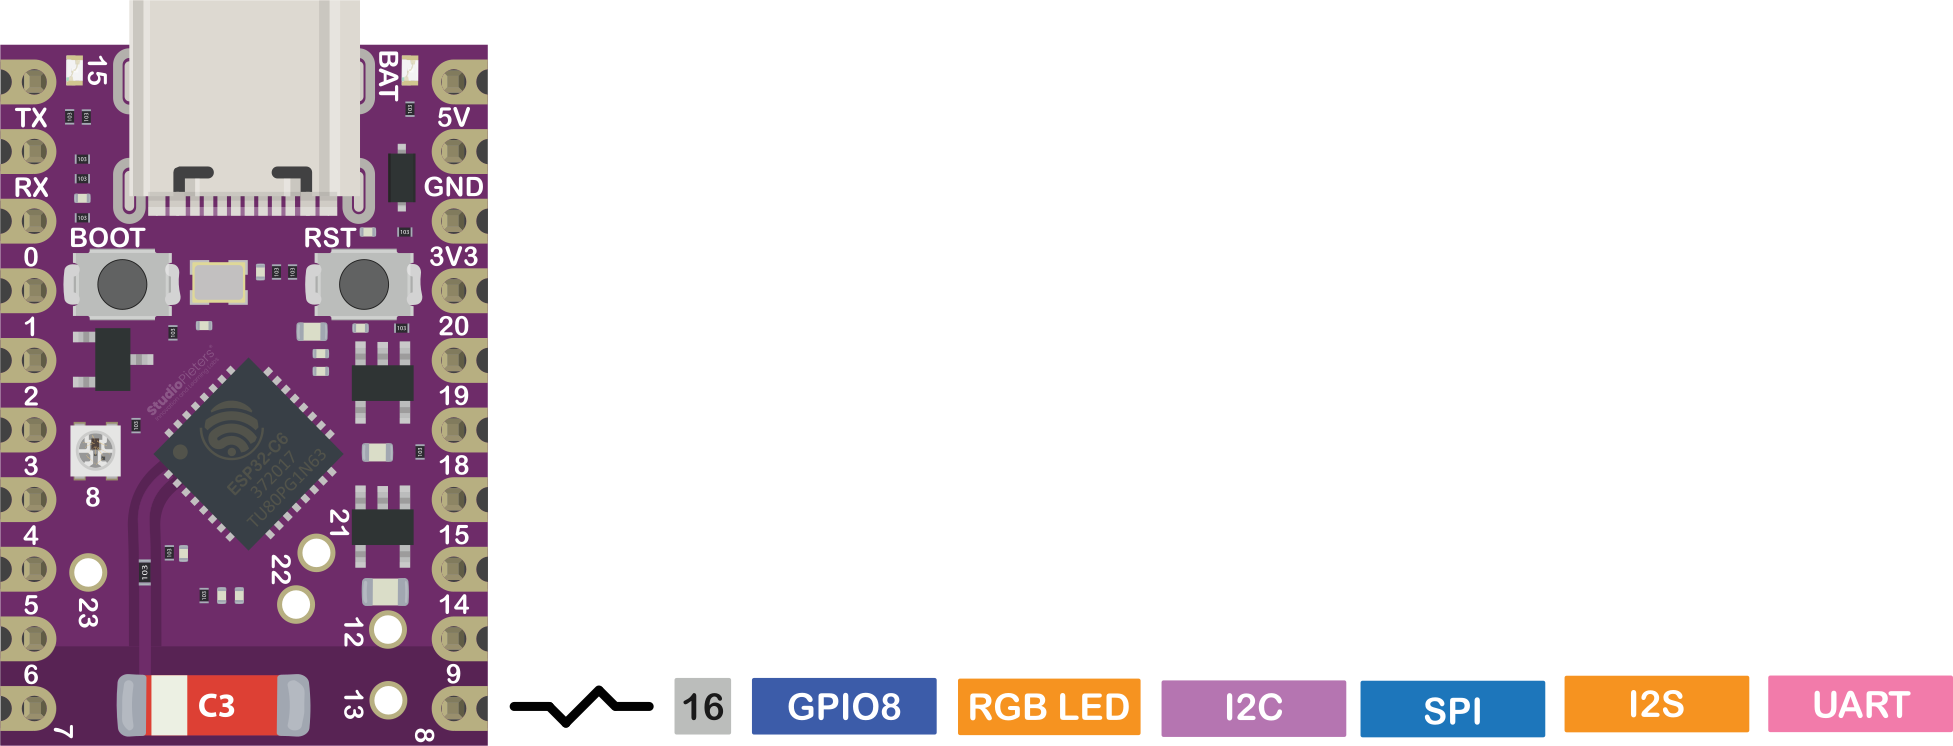
RGB LED (WS2812)
- Connected to GPIO8
- Fully programmable
⚠️ GPIO8 is a strapping pin — use with care.
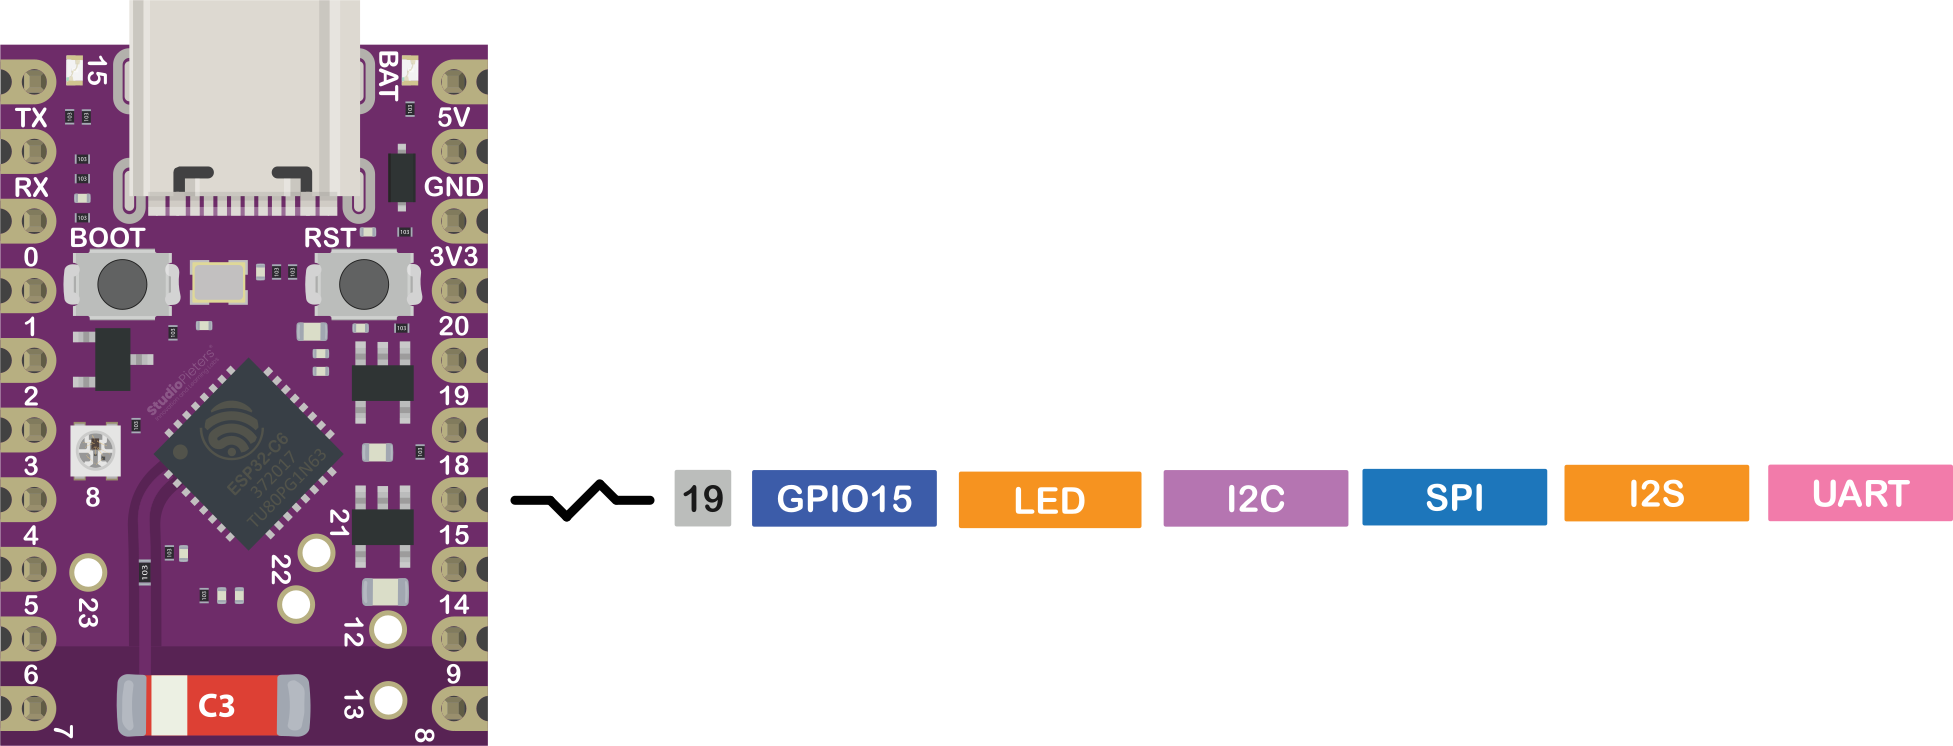
Status LED
- Connected to GPIO15
Power LED
- Indicates power/charging
- Not GPIO controlled
Security Features
Security Features
The ESP32-C6 includes:
- Secure Boot
- Flash Encryption
- Hardware cryptography (AES, SHA, RSA, ECC)
Required for modern standards like Matter.
Best Practices and Common Mistakes
- Avoid strapping pins during boot
- Verify flash-connected pins
- Avoid USB pins when in use
- Use pull-up/down resistors where needed
- Stay within current limits
Real-World Considerations
Compared to earlier ESP chips:
- Ecosystem is still evolving
- Matter / Thread support is improving
- Some libraries may not yet be fully compatible
Conclusion: Designed for What’s Next
The ESP32-C6 Super Mini represents the next step in embedded development.
With:
- WiFi 6
- Bluetooth LE
- Matter / Thread / Zigbee
- RISC-V architecture
…it delivers the performance and efficiency required for modern IoT applications.
Mastering the ESP32-C6 pinout — and verifying it against your specific board schematic — is essential to unlocking its full potential.
Happy Building! 🚀