Now that I’ve made at MQTT LED setup in my previous blog, It’s time to make a MQTT Sensor that Sends information rather then only receiving the information. Let’s keep it simple for now and add a Temperature-Humidity Sensor. For this Sensor I use a cheap DHT11 Sensor as it’s only to test if it will work. later on we can use a more accurate sensor.

Homebridge
You need to setup your Apple Homebridge based on MQTT first to connect this setup with Apple HomeKit / Siri. For whom did not read my previous blog about setting up your Apple Homebridge based on MQTT you can find it here.
The hardware
ESP8266-01 ( you can buy one here)
FT232 FTDI USB Adaptor Module ( you can buy one here)
Tactile button ( you can buy one here)
0.1 uF Capacitor ( you can buy one here)
DHT11 ( you can buy one here)
Breadboard and Wires ( you can buy one here)
When I have collected al the necessary parts, I can setup the test environment like show in the image below.
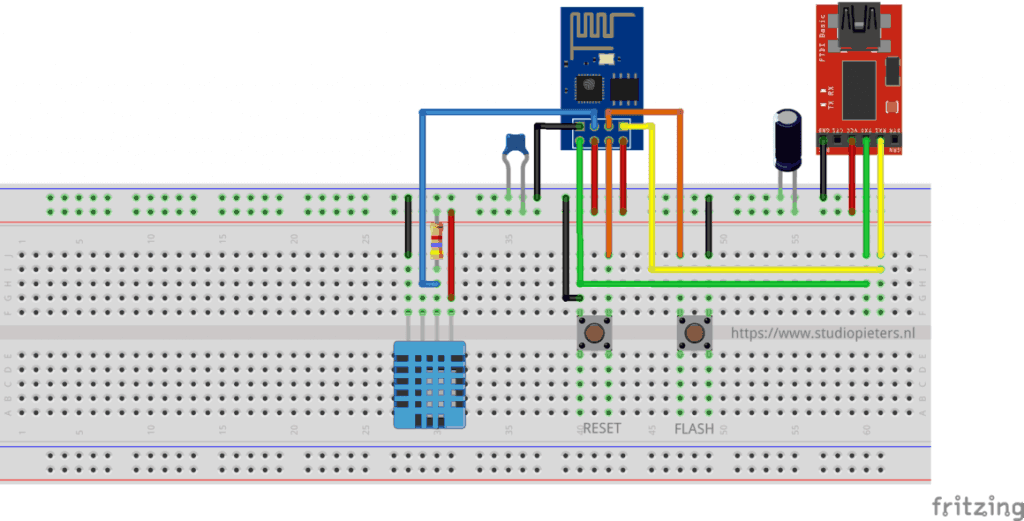
As you can see There are two button’s on toe reset the ESP8266-01 module and one to flash the ESP8266-01 module. If you have worked with the ESP8266 for any length of time, you have undoubtedly experienced the endless resets on power-up. From what I have experienced and read from other users, there are two likely hardware causes that makes logical sense:
- Inadequate power supply interface.
- A flash chip failure.
In order to prevent resets, you must include the following three features in the power source to the ESP8266.
Sufficient current. A regulated 3.3V source of at least 500ma is essential. Aside from the 300ma peak current needs of the ESP8266, it is essential to also consider the current requirements for other components you have – like the sensors and controls in your circuit.
A large capacitor (suggest using 470 uF) across the Vcc to Gnd rails on your breadboard or PCB is a vital ingredient that will minimize reset inducing voltage fluctuations.
A 0.1 uF decoupling capacitor across the ESP8266 Vcc to Gnd inputs very close to the pins (within 1/2 inch). DO NOT SKIP THIS COMPONENT! This cheap yet often overlooked component, when missing, is the root cause of ESP8266 resets.
Software
To connect this hardware with our Apple Homebridge based on MQTT, we need a MQTT client. There are many open source libraries available allowing you to connect your ESP8266 to a MQTT server. The one I found most stable and complete, is the pubsubclient by Imroy. Note that there are multiple pubsubclient libraries available, so make sure you download the one by Imroy. After installing this library to your Arduino IDE, It’s time to start coding.
The Code
/*
      Project name: Apple Homebridge – MQTT Temperature-Humidity Sensor
      Project URI: https://www.studiopieters.nl/apple-homebridge-mqtt-temperature-humidity-sensor
      Description: Apple Homebridge read DHT11 Over MQTT
      Version: 0.1.6   License: MIT
*/

#include <ESP8266WiFi.h>
#include <PubSubClient.h>
#include "DHT.h"
#define DHTPIN 2     // what digital pin we're connected to
#define DHTTYPE DHT11   // DHT 11
DHT dht(DHTPIN, DHTTYPE);


const char *ssid =  "xxxxxxxx";   // cannot be longer than 32 characters!
const char *pass =  "yyyyyyyy";   //

// Update these with values suitable for your network.
IPAddress server(172, 16, 0, 2);

void callback(const MQTT::Publish& pub) {
  // handle message arrived
}

WiFiClient wclient;
PubSubClient client(wclient, server);

void setup() {
  // Setup console
  Serial.begin(115200);
  delay(10);
  Serial.println();
  Serial.println();
  dht.begin();
  client.set_callback(callback);
}

void loop() {
  if (WiFi.status() != WL_CONNECTED) {
    Serial.print("Connecting to ");
    Serial.print(ssid);
    Serial.println("...");
    WiFi.begin(ssid, pass);

    if (WiFi.waitForConnectResult() != WL_CONNECTED)
      return;
    Serial.println("WiFi connected");
  }

  if (WiFi.status() == WL_CONNECTED) {
    if (!client.connected()) {
      if (client.connect("arduinoClient")) {

      }
    }

    if (client.connected())
      client.loop();
    delay(2000);
    float h = dht.readHumidity();
    // Read temperature as Celsius (the default)
    float t = dht.readTemperature();

    if (isnan(h) || isnan(t)) {
      Serial.println("Failed to read from DHT sensor!");
      return;
    }

    Serial.print("Humidity: ");
    Serial.print(h);
    Serial.print(" %\t");
    Serial.print("Temperature: ");
    Serial.print(t);
    Serial.print(" *C ");

    client.publish("/sensors/Temperaturesensor", String (t));
    client.publish("/sensors/Humiditysensor", String (h));
    client.subscribe(MQTT::Subscribe()
                     .add_topic("/sensors/Temperaturesensor")
                     .add_topic("/sensors/Humiditysensor")
                    );
  }
}
First off, lets start by adding your Network Credentials:
const char *ssid = "Your_SSID"; // cannot be longer than 32 characters!
const char *pass = "Your_PASS"; //
Now you have to add the IP address of your Apple Homebridge based on MQTT:
IPAddress server(192, 168, 1, 10);
The you only need to add the outtopic to your code:
client.publish("Outtopic", String (t)); //Outtopic Temperature
client.publish("Outtopic", String (h)); //Outtopic Humidity
You can find the Outtopic when you have your Apple Homebridge based on MQTT up and running by going to your web browser and opening the Homekit2mqtt web server. You can find more information here in my previous blog Apple Homebridge – MQTT LED
Yes it Works!

So Now we made the second step to make accessories for the Apple Homebridge based on MQTT. From here on we can make more accessories and expand our accessories, so more to come…
![]()
Download all Files for this project on github.

Do you have any questions? Leave a comment down here.
Reference
Sebastian Raff (APR 25 2018), Homekit2MQTT, Use to control a MQTT-connected “Thing” in your home automation through Siri and with HomeKit apps., https://github.com/hobbyquaker/homekit2mqtt