My ESP32 HomeKit Development with ESP-IDF is unlocking new frontiers in smart home development — and nothing illustrates that better than seamless Apple HomeKit integration. But setting up HomeKit accessories can be tedious, especially when provisioning devices with the correct pairing credentials. That’s where the ESP32 HomeKit QR Code Generator steps in — an elegant solution to streamline HomeKit setup with professional, printable labels. In this guide, you’ll learn everything about generating HomeKit QR codes, creating product labels, and using your ESP32 like a true Apple-certified accessory.
What Is the ESP32 HomeKit QR Code Generator?
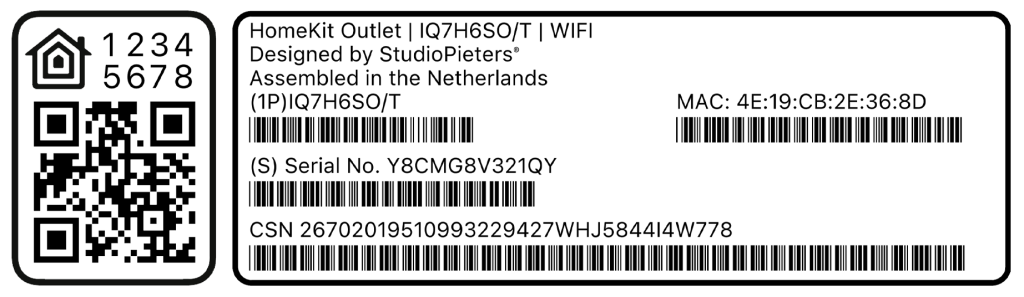
This project, available on GitHub, automates the process of generating a full HomeKit pairing label — complete with:
- A valid HomeKit setup QR code
- Setup code (XXX-XX-XXX) in large text
- Device code
- MAC address
- Serial number (with barcode)
- CSN code (with barcode)
- Aesthetic label layout for print or product packaging
Whether you’re building a one-off prototype or producing a batch of HomeKit accessories, this tool simplifies the provisioning experience with Apple-like polish.
Free to use under the MIT license — attribution is required.
Designed for Developers and Makers
The tool is written in Python and uses libraries such as:
qrcode– to generate the HomeKit QRPillow– for image manipulationreportlab– to build and print the final label layoutrandomanduuid– to auto-generate unique device codes and identifiers
Simply clone the repository, run the script, and receive a high-resolution printable label that adheres to Apple’s HomeKit onboarding standards.
Label Design Breakdown
Each generated label contains carefully arranged information. Here’s what you get, line by line:
- HomeKit Setup Code – prominently displayed in a bold font
- Your Brand or Project Name – customizable line (e.g. StudioPieters®)
- Device Info – Assembly line info or version string
- Device Code – A unique identifier (e.g. STP-XXXX)
- MAC Address – Sourced directly from the ESP32 or auto-generated
- Serial Number – 13-character alphanumeric, shown with a barcode
- CSN Code – Long-form code (e.g. for manufacturing), also barcoded
- QR Code – The HomeKit pairing QR in the center of the label
The QR code is optionally detachable and can be used separately for easy pairing during installation or as a sticker on a user manual.
Example Output
A label layout perfectly suited for:
- Sticker printing
- PCB box inserts
- User manuals
All fields are vertically aligned for visual consistency, and the QR code meets Apple’s recommended scan size and contrast.
HomeKit QR Code Format (Explained)
The QR code content follows the Apple HomeKit Accessory Protocol (HAP) structure:
X-HM://<payload>The payload includes:
- Setup ID (e.g.
1QJ8) - Setup Code (e.g.
111-22-333) - Accessory category
- Flags
This information is encoded in a base36 string, which your iPhone reads to pair the device. The script handles this encoding automatically — no need to calculate it manually.
How It Works
Step 1: Clone the Repository*
git clone https://github.com/AchimPieters/esp32-homekit-qrcode.git*Free to use under the MIT license — attribution is required.
cd esp32-homekit-qrcodeStep 2: Install Required Libraries
pip install -r requirements.txtStep 3: Generate a Label
./gen_qrcode 7 123-45-678 1QJ8 4E19CB2E368D new/qrcode.pngA label will be generated using the latest template image (qrcode_ext.png). The output is saved as a high resolution PNG.

Want a different QR template? Replace the qrcode_ext.png image with your own — just make sure to preserve resolution and layout zones.
Customizing the Output
Want to brand the label with your own company name? Change this line in gen_qrcode.py:
BRAND_NAME = "StudioPieters®"Features at a Glance
| Feature | Supported |
|---|---|
| HomeKit-compliant QR code | ✅ |
| Setup code in text | ✅ |
| MAC address display | ✅ |
| Serial + CSN barcodes | ✅ |
| Customizable layout | ✅ |
| Output formats (PNG, PDF) | ✅ |
Generating a QR Code for ESP32 HomeKit Demo
If you’re working with the esp32-homekit-demo repository, here’s how to generate a compatible QR code for pairing:
Cloning the Demo Repository
git clone --recursive https://github.com/AchimPieters/esp32-homekit-demo.gitThis will download the project along with all submodules.
Accessory Setup
HomeKit requires two identifiers:
- Setup Code: Must be formatted as
XXX-XX-XXX. Example:10148005becomes101-48-005. - Setup ID: A 4-character unique alphanumeric string (e.g.
1QJ8).
Example configuration in your code:
homekit_server_config_t config = {
    .accessories = accessories,
    .password = "123-45-678",
    .setupId = "1QJ8",
};
QR Code Prerequisites on macOS
Install Homebrew (if you haven’t already):
/bin/bash -c "$(curl -fsSL https://raw.githubusercontent.com/Homebrew/install/master/install.sh)"Add Homebrew to your PATH:
export PATH="/usr/local/opt/python/libexec/bin:$PATH"Install Python 3 and required libraries:
brew install python
python3 -m pip install --upgrade pip
python3 -m pip install --upgrade Pillow
python3 -m pip install qrcode
Generate the QR Code (Demo Project)
Run this command from the demo’s tools/ folder:
tools/gen_qrcode 5 123-45-678 1QJ8 qrcode.png5is the HomeKit category for Lighting.123-45-678is the setup code.1QJ8is the setup ID.qrcode.pngis the output file.
HomeKit Accessory Categories
| Category | Number |
|---|---|
| Other | 1 |
| Bridges | 2 |
| Fans | 3 |
| Garage door openers | 4 |
| Lighting | 5 |
| Locks | 6 |
| Outlets | 7 |
| Switches | 8 |
| Thermostats | 9 |
| Sensors | 10 |
| Security systems | 11 |
| Doors | 12 |
| Windows | 13 |
| Window coverings | 14 |
| Programmable switches | 15 |
| Range extenders | 16 |
| IP cameras | 17 |
| Video doorbells | 18 |
| Air purifiers | 19 |
| Heaters | 20 |
| Air conditioners | 21 |
| Humidifiers | 22 |
| Dehumidifiers | 23 |
| Apple TV | 24 |
| Speakers | 26 |
| Airport | 27 |
| Sprinklers | 28 |
| Faucets | 29 |
| Shower heads | 30 |
| Televisions | 31 |
| Target remotes | 32 |
Common Use Cases
- Provisioning ESP32 HomeKit devices in bulk
- Creating labels for testers or beta users
- Simplifying HomeKit setup at trade shows or demos
- Generating one-off pairing sheets for DIY projects
Pro Tips & Best Practices
- Use unique serials – Especially if you’re flashing multiple devices
- Print in high contrast – Apple’s QR scanner is picky
- Test on different printers – Label printers may handle dimensions differently
- Always verify with an iPhone – Scan the QR before shipping devices
- The QR code is optionally detachable and can be used separately for easy pairing during installation or as a sticker on a user manual.
Conclusion: Professional HomeKit Setup in Seconds
Apple’s HomeKit standard demands precision — and this script delivers it. With the ESP32 HomeKit QR Code Generator, you get streamlined onboarding, factory-ready labels, and an experience that rivals commercial-grade accessories. Whether you’re shipping products or just impressing yourself, this tool is your new best friend in the HomeKit workflow.
Free to use under the MIT license — attribution is required.