Introduction
After the success of my previous project – the Halloween – Jack O’ Lantern – many of you asked for something even more dynamic, with smoother flame transitions and more LED action. So here it is: Ultimate Fire Effect, a fully reworked version with improved hardware and software, driven by the tiny but mighty ATtiny85.
This project expands on the original flickering candle by adding six independently controlled LEDs, more realistic flickering, and even an optional magical blue flame effect inspired by Harry Potter. It’s perfect for pumpkins, lanterns, fantasy props, or spooky Halloween scenes.

Hardware Overview
I stuck with the ATtiny85 for this version—it’s compact, affordable, power-efficient, and powerful enough for individual PWM control.
New in this version:
- 6* individually controlled LEDs (3 red, 3 yellow)
- PWM flickering on all pins (PB0–PB5)
- More lifelike flame simulation
- Optional: blue flame effect
- Custom PCB for easy and compact assembly
*Optional: default 5 LED’s, Pin PB5 (pin 1) is the default RESET pin. → If you want to use it as a regular output, you must set the “RSTDISBL” fuse using avrdude.
Be aware that this makes reprogramming via ISP more difficult — you will need High Voltage programmer.
Bill of Materials
| Quantity | Component | |
|---|---|---|
| 1 | Microchip ATtiny85 |  |
| 6 | 200Ω Resistors | |
| 3 | Red 5mm LEDs | |
| 3 | Yellow 5mm LEDs | |
| 1 | 3×AA Battery Holder with switch |  |
| 3 | AA Batteries | |
| 1 | Custom PCB (see below) |
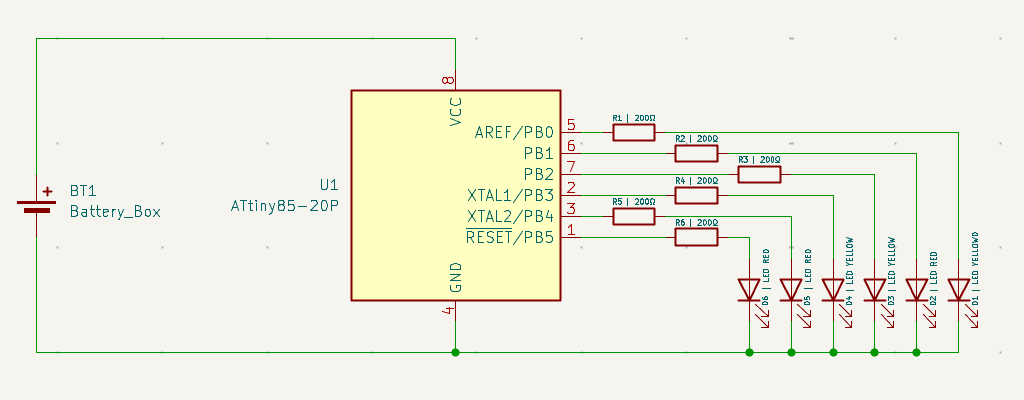
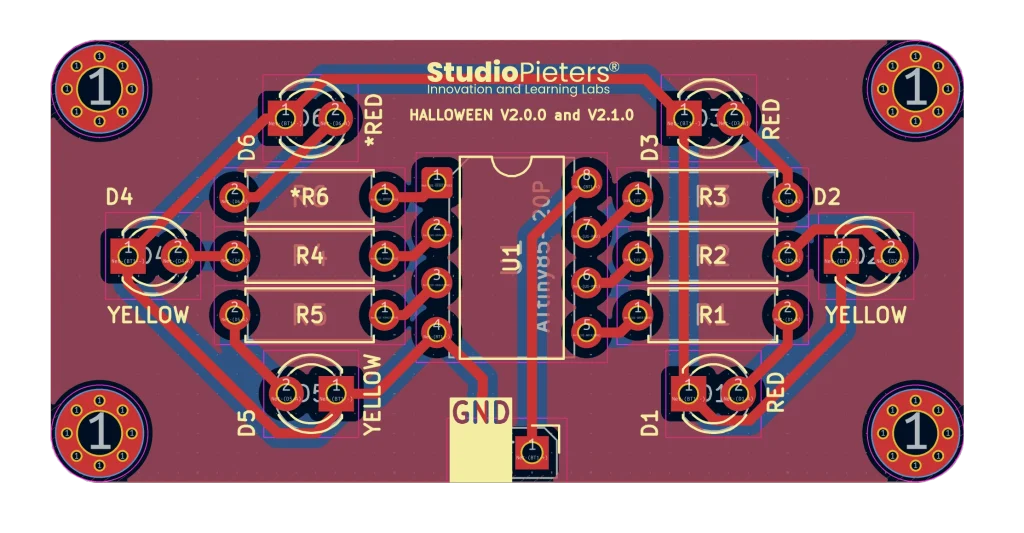
Circuit Diagram
All six LED’s are connected to individual PWM pins on the ATtiny85. The schematic shows the basic wiring, and the matching PCB layout keeps everything neat.
See the images below:
Schematic:
PCB Layout:

Code – Halloween V2.0.0
This version uses per-LED fading with randomness and occasional spark bursts for realism. Smooth transitions are achieved with logarithmic fading.
Optional – Halloween V2.1.0
Blue Flame – Harry Potter Style
Want a mysterious blue flame effect instead? Try this cool-burning version for a more magical, fantasy-style look.
Build the same harde ware but replace the Red and Yellow LED’s for All Neon blue LED’s.

Programming & Assembly
Program the ATtiny85 using a USBasp, TinyUSB programmer, or even an Arduino-as-ISP. Then insert it into the PCB, connect the LED’s as shown, and power it with three AA batteries.
Once powered on:
- V2.0.0 delivers warm red-yellow flickering with glowing bursts.
- V2.1.0 provides cool, subtle pulses with rare magical flashes.
Note: Pin PB5 (pin 1) is the default RESET pin. → If you want to use it as a regular output, you must set the “RSTDISBL” fuse using avrdude.
Be aware that this makes reprogramming via ISP more difficult — you will need High Voltage programming.
FREE PCB Download
Want to build it yourself? You can download the full KiCad files, Gerbers, and HEX code from my GitHub:
Or orde your PCB’s fast and easy at PCBway here.
Final Thoughts
With just a handful of components and some code magic, you can create an enchanting fire effect that’s both safe and reusable. Whether you choose the fiery red or the magical blue version, this is a perfect Halloween or cosplay prop for any DIY enthusiast.
Happy Halloween – and stay spooky!